Texture Points

I got up Sunday morning and decided to play around with skin smoothing some more – of course – but was once again disappointment with my first attempt.

portraitzoomcollage1

The “after” shot there is OK, but still too mushy for my liking, with too much detail lost. And as much as I appreciate comments saying I don’t need retouching (and I really do appreciate them), it’s not something I do to improve my personal appearance; I do it to create the look I want for that particular photo – I really don’t even look at the person in the photo as me, I just happen to be the subject I’m working with.  It would probably be better to show edits on portraits that are not my own, so people wouldn’t get distracted by the fact that the person in the shot is the person who writes this blog, but I’m not sure my friends would be happy with me sharing all the steps I take to the edit their portraits here. Not to mention that most of the other people I’ve photographed up to this point are much younger than I am and as such, don’t create very dramatic “after” effects. Most tutorials on YouTube also use young models as their editing subjects, and I like being able to show how to work on a middle-aged face. But my point is, whether or not I need edits to my original photos, I definitely want them, from a purely artistic standpoint. Moving on.

After working on that first shot and feeling dissatisfied with it, i decided to go dig up more skin softening tutorials on YouTube to follow. I then spent two hours following a fairly advanced tutorial that, eventually, lost me entirely, which was really frustrating. Determined to figure something out, though, I located yet another video that focused on softening the skin without losing texture:

This is a more detailed tutorial than the one I followed the day before, but I was pleased with the results as they left a lot of texture to the skin while still smoothing out some of the wrinkles and imperfections. Here’s a bigger version of my before shot:

portraitzoom6

This actually isn’t a pure before shot, by the way, as I’d already edited out my larger undereye wrinkles and a bunch of stray wig hairs that were straggling in my face, as well as removed a blemish I had on the side of my nose. But other than those edits, it’s “before” enough. The tutorial uses several steps to eventually brush over a lot of the little lines and discolorations here, but again, it managed to retain some texture at the same time – so the end result of the process was this:

portraitzoom6retry1

The color is smoother, for sure, and the skin is definitely softer, but notice that you can still see the skin’s texture and pores. More realistic, and definitely more blended. We’ll overlook the fact that my lipstick was terribly uneven, since this is just a sample photograph anyway, but in the future I need to be more careful when applying the longwearing stuff – I suck at lipstick application as it is, but with a semi-permanent lipstick like this I really need precise application for photos, something I didn’t bother with here as I shot the photos in a hurry. Speaking of lipstick, the one I’m wearing here is from Lime Crime – one of my favorite makeup resources for photography makeup – and it is a semi-permanent one from their Velvetines line; the color I wore here is called Salem.

I liked the first go using the new technique, but I thought perhaps I could make it a little better by applying the technique I used yesterday after going through this process, just to make it look a touch smoother. I also ran it through Snapseed to brighten and lighten the skin a bit and whiten my teeth and eyes (I also tried to even out my lipstick lines a little, but was not too successful):

portraitzoom6retry1a_final

If I compare the first softened portrait to this one, I think the second one actually gives a smoother look overall by evening out the skin tones nicely, and while at first glance the level of detail appears to be about the same, there are subtle differences if you look closely. The pores in particular have not completely disappeared, just reduced and smoothed. And the color distribution is more even, while the first process came out splotchy. I think using both techniques blended details together better for a more natural appearance – but again, I get that no one else may be able to see a difference:

portraitzoomcollage2

A few other things I considered as I spent WAY too much time working on all this today: I wasn’t using the greatest lens for portraits (my telephoto), my makeup was pretty slopped on, my lighting was thrown together quickly, and these photos are MUCH more zoomed in than most portraits I do, not to mention most portraits in general, which will usually show the head and shoulders. So, I felt those things were probably part of what led me to be less than completely thrilled with my results. Since apparently I hadn’t spent enough of my Sunday at the computer editing photos, I decided to go back into the archives a bit and find a portrait to work my new magic on where I had a good, full face of photography makeup on and decent lighting, and that was taken at a better distance with a better lens, but I think I’ll save those edits for another post. This one’s gone on long enough already!


Advertisement

Smoothsayer

That’s a terrible title, but I’m sticking with it.

I got home from work Friday after a particularly frustrating week and realized one of the errands I had on my plate for the weekend had already been taken care of by my husband, so that was nice. He went out for the evening to jam with some friends and I decided at the last minute to throw on some stage makeup and a wig and take a few photos, since I haven’t done that in quite a while – well over a month, I think. I didn’t get too fancy as it was already five o’clock in the evening when I got started, and I mainly wanted to see what results I could get taking portraits using my new telephoto lens in my tiny little office/studio. None of the photos were anything groundbreaking, but it was interesting to see how close up I could get with the 70-200. I planned to process some of the closer-up close-ups (if you think about it, that does make sense), but when I started working on the first photo I got distracted by attempting some new Photoshop skin smoothing techniques I found on YouTube.

It’s not often that I feel inclined to try out new editing processes, although I try out new lighting and shooting techniques all the time – once I get down to editing I want to go with what I already know and get to the end result quickly. But Friday night, for whatever reason, I felt ready to tackle skin smoothing on a new level. Perhaps it was because these photos on their own were nothing I hadn’t done before, except for use a new lens, so I felt open to trying new things out on them to see a different result when I was done. Whatever. If anyone’s interested, I followed this eight-minute YouTube tutorial as I worked:


I don’t want to get too into the steps involved here, because as usual I cannot speak about it in a technical manner, but suffice it to say this process involves creating a mask layer consisting of a serious amount of blur (on my 45-year-old face, anyway) then using a brush to essentially ‘paint’ the blurred effect onto the skin wherever it is needed, while avoiding edges and lines like eyelashes, lips, eyebrows, etc. In this manner, the end result is skin that looks soft, while everything else remains sharp and detailed. That is one seriously crappy explanation, but it’s all I’ve got, so if you want a better explanation watch the video above. However, I can still show you a few examples, because you all know how into before-and-after photos I am, so let’s start with this original. I’m warning you, keep in mind that I was using a telephoto lens and therefore am REALLY CLOSE in this shot. I must be crazy sharing such close-up images of myself without any editing at all on the internet, but whatever. I don’t think my source material is all that bad to start with, so if the internet sees my wrinkles so be it. It’s still fun to compare. And yes, I was being silly in this photo, but I liked it anyway:

portraitzoom2a

Now, for anyone who’s tried to use simple skin smoothing software when editing a photo, you know it makes the entire photo, not just the skin, way too soft and unrealistic; I always think, when I see such edits, that the person looks like they’re carved out of butter, with all their lines and angles mushy and melted. As an example of this, below is the same photo, run through a pretty basic skin smoothing filter from Paint Shop Pro:

portraitzoom2ab
Kinda mushy, and not very smooth to boot. 

I’ve come up with a few solutions to skin imperfections in portraits over the years that have served me well, but I always knew there were even better ways to pull it off – as I said, I’d just not been willing to take the time to learn them. I think I did OK with the two shots I’ve processed so far, but in the future I probably need to zoom WAAAY in when editing to target problem areas more closely and get the edges precise (of course, the fact that the model in the tutorial is about 17 years old while my “model” is 45 probably had something to do with the amount of editing/smoothing my shots took versus the video version). But anyway, here’s my end result using the layering/masking/painting technique:

portraitzoom2_Snapseed
I also added some extra lighting on the face as well as reducing contrast on the skin when I pulled the photo over into Snapseed, by the way. And if you really want your mind blown, scroll back up to the original. Yep. 

This process takes a long time to execute, so as I mentioned previously, I’ve only edited two shots so far. Without any more gabbing, here’s the original of the second one:

portraitzoom1a

And here’s the final version:

portraitzoom1_Snapseed
Another bonus is how much better my hands look – I’ve always had wrinkly hands and fingers

I also used a pretty cool lighting technique on this shot, but I’ve got more to process  and share, so I’ll talk about that later. I’m excited to see how much better I can get at this with some other photos, but I start to get sloppy with this sort of detailed work if I do too much at once, so I stopped with these two for now. And I can also talk about that lipstick later, which is another of my fab-for-photos-but-awful-on-me-in-real-life purchases. I’ll save those discussions, and more photos, for later. Happy weekend everyone!

Sofa Float

Continuing with yesterday’s post about my levitation experiments, here’s the second set I worked with to practice floating composite shots.

As I mentioned previously, taking the first set of photos took almost no time compared to how long I usually shoot. I got the shots in about 15 minutes, then spent a few hours noodling around with the results, and was done on the computer at a decent hour. Just as I began to put my room back together I was thinking to myself, okay, I still have some daylight here I can use to do laundry, steam the wrinkles out of some new clothes I’ve yet to wear, and exercise – and then I moved the small love seat I keep in my office up against the wall (part of my office reconstruction process when the room transitions back to that from a studio). In one quick second the thought flashed into my head that some shots levitating above that love seat would probably be pretty cool, and the wicker ottoman I used in the previous shots would just about fit on the sofa cushion for me to pose on it. Sure enough, I got the wig and the dress back on, set up the camera and lighting again, annnnnnd the rest of the day was effectively blown. Almost got out without a marathon editing session, but didn’t quite make it.

backdrop couch
The couch in question

I tossed the ottoman up there and popped off a few quick shots, then got to work with Levitation Editing Round Two:

couch float 3

As you can see, I remembered to use a fan this time to fling the hair around and create some movement. I kept having to remind myself that I didn’t have to worry about the fan showing in these shots, as I’d be layering my body over the background shot of the sofa. Trying to hide the fan in shots where I want to use it to create movement is a pain, and it was nice to be able to get it so close this time.

sofa float 1

So here’s the composite shot – not too bad, but of course there’s those shadows to worry about again. This took me awhile to get anywhere close to right, but in the end I used the darken tool in Paint Shop Pro to trace an outline around my lower body at a fairly low opacity. My first attempt at doing this wasn’t my best, but I think this worked better than yesterday’s method (which wasn’t much of a method at all). I also think having something to work against other than a white backdrop made shadowing easier, at least for me. I used the darken tool also around my body’s edges overall, as it seemed to make them less stark and more realistic.

sofa float 1 final

The end result here is okay, but the edges aren’t great, and I think it looks a little obvious. There’s also a shadow in the upper-right corner from my umbrella stand that I forgot to edit out, but I remembered to do so in the shots below.

My second attempt came out better, and started with a background shot including my dog Penny, who kept insisting on sitting on the sofa while I was trying to take my picture of it. In her defense, this love seat is more hers than mine anyway; between she and Sprocket, I never get any sitting time on this thing. I managed to get Penny off the sofa, but then she slunk down to the floor and refused to move for awhile. As soon as I thought, fine, I’ll put you in the shot too then, she of course got up and moved. By that time I’d decided it was a fine idea to keep her around, and I had to coax her back into position. She never really settled down (Penny isn’t a cooperative model, like Sprocket is) but I managed to get one taken before she split again:

backdrop couch dog
You can tell she’s not into it, though

I didn’t do any piecing together of different body parts for these shots; as I said in the previous post, I don’t at this point feel much need to do that. I just used a second shot taken when I was on the ottoman and worked with it in its entirety:

couch float 2

I tried for poses here that had cleaner lines, and that didn’t have too much going on around the sofa or the wicker, as I knew those two areas would be a bitch for me to edit away from the edges of the dress. It still provided complications, but I think I did an OK job getting this into the composite shot:

sofa float dog

Overall this was the easiest pose to work with, and Penny’s apprehension works well with the appearance my body gives of being slightly out of control. I also love it that she’s the one looking at the camera, while I am looking away.  I added shadows using the technique mentioned above, and I actually think they worked out nicely this time:

sofa float dog final

For whatever reason, the shadows really work to add the right dimension to my body floating over the sofa. Of all the levitation shots I tried Saturday, I’d have to say this one is my favorite.

I do have one more though – I had some fun poses I took while on top of the ottoman, and I wanted to get one where the hair was really blowing as we all know what a fan I am of that. So I went with this final one to edit:

couch float 1

I left the dog out of this one, as I didn’t think I could top the first one I created using her background photo. The one foot that was at rest on the sofa in this original turned out to be a bit of a bitch for me to get placed right on the background shot, and I actually had to also include a bit of the indentation from it when layering; without that it just looked like my toes were cut off. It was hard to do, and I don’t think I pulled it off in an entirely successful manner, but I worked with it as best I could:

toe couch

You can see a dark line where the layered indentation of the sofa is, at least I can, but I worked to darken the fabric around it so it didn’t stand out so much. I don’t think the shadows were quite as successful in this shot as they were in the previous one, but overall they weren’t bad. I like showing the editing steps here, as it really reveals how important those shadows are; I look awfully flat and pasted-on in the photo above in spite of my attempts to get all the edges smooth and sharp.

toe couch_final
I’ll take it though

Discovering the use of the darken tool to trace some decent shadows into the shot was a big help here, but having something aside from a white wall to put those shadows against may have also contributed to their improvement in the editing of this set. I do think that foot ended up getting darkened too much in all of this, but aside from that I think this one works. At the least, this is further than I’ve ever been able to take a process like this, and the end results make me happy. I feel like I’ve discovered some techniques I can build on in the future, and I can begin to realize some new visions I’ve had in mind for some time. I’m excited to see where I can go next.

For that last shot, I did add a filter to it after all the processing was done, just to see if it added a little punch to the photo. Still not sure if I like the one above or the filtered one below better; let me know which you like better in the comments, if you don’t mind!

toe couch_final2

Skills test

A friend of mine on Facebook sent me this link and said it made her think of me; I’ve been sent links to photos like this before and they always make me jealous. I don’t have the photoshop skills to pull something like this off yet – it is tricky to seamlessly edit a subject into another photo like that without it looking sloppy. For me the issue is the edges of the subject (in this case, a person) – I haven’t yet figured out how to soften the outlines of the body and hair so that they aren’t too harsh. I’ve done a little research on it but haven’t got a clear answer yet to the problem, because as usual the tutorials all talk over my head – I have more skills than I have knowledge, so when trying to learn something new, it’s not that I can’t do what they are telling me do, I just don’t know enough terminology to pinpoint what it is that’s going on, if that makes sense. So as usual, I end up gleaning what little I can from the tutorials I read and then screwing around with the software until I figure it out on my own. This works very slow and piecemeal for me – I figure out one little step of a process at a time, rather than be able to follow a full tutorial on the entire process at once.

But after looking at the photos on that page, I decided today was the day to start figuring this shit out. I’d already taken a ton of photos the day before of me playing around in the new clothes I bought over the holidays, just putting outfits together and learning how to integrate everything into my wardrobe, so I had tons of shots of me against a white background I could use. I do have some straight-up outfit shots I’d like to share later, by the way, but I thought for this post I’d share the Photoshop experiment – which actually isn’t using Photoshop at all, of course, but Paint Shop Pro, which is what I know how to use. I just call it Photoshop because everyone knows that name and I’m too lazy to call it anything else that might involve more explanation.

So – here’s the original shot. The skirt,by the way, is from ModCloth and is just lovely. Only forty-something bucks and it photographs like a dream, as well as being a great addition to the clothes closet. Shorter in the front than in the back, and in a very light material, it is incredibly flowy and comfortable, although to wear it out of the house I’ll most likely put a slip under it. But I’ll talk more about the clothes in another post – back to the original:

skirt2_Snapseed

To play around with editing my body completely into another photograph I needed a background photograph to use; I first looked up backgrounds on Google, as my idea was to have me floating above a bed in a room or something. But I couldn’t figure out quickly how to get my hands on a decent-quality free photo like that without flat-out stealing one, which I wasn’t going to do, so I went for this picture I took with my iPhone when I was at a work retreat back in August:

trees

I had to get myself “cut” out of the first photo and “pasted” into this one, and through some tutorial deciphering and screwing around I managed to get a pretty good copy of my body to layer into this shot. The issue is in how I have to “highlight” (sorry for all the quotes but I know I’m not using the right words here) just my body, and absolutely nothing else, out of shot #1 (a lot of white can slip into the shot around the body’s outline, especially the hair, and that may not seem like a big deal until you paste that subject onto a new photo, where the background is not white). As far as that goes I think I did OK, but I still think I look rather pasted into the shot (click on it to see a better quality copy):

treesandme

So, I did what I always do when I’m not completely satisfied with an edit: I Pixlr-ed it, of course. I added a little more light flare to hit right on my body and maybe soften my edge a little, made a slight change in tint to the overall shot, and added some faint, glittery bokeh:

treesandme_pxr

As I said when I shared this over on Facebook, I think it looks like a 70’s prog-rock album cover, but aside from the cheese factor it isn’t bad. It’s actually leaps and bounds (pun intended) above any previous attempt I’ve ever made to do this sort of this thing. I’ll be flying around empty bedrooms before you know it.

One thing I’m thinking now in looking at this is that my obsession with clarity might be working against me here. I used an already-processed original of my body to layer over the trees, and that layer of me is decidedly more crisp than the image of the trees; that may be what makes me stick out a bit. Perhaps in the future I need both the background and the subject to be unedited when I merge them together, then add the sharpening and detail clarification after it’s a merged photo. Or maybe I should just have less clarity in these shots overall, as that’s probably part of what makes the hard edges of the body difficult to seamlessly blend into the shot. I noticed the girl who took those photos in the link used a lot of blurring and textures in the shots too, so maybe those things help conceal edits also. And I’m sure I can work with light and shadows to add to the realism…see what I mean? So much to learn.

Sunday Photoshoot

I ended up with a full day Sunday to take photos, so I went all out with the drag makeup, which took an hour to apply (here’s a link to the tutorial I attempted to copy; obviously I failed at replicating her look but it at least got me somewhere interesting).

December2
Using the softbox for this shot; lots of light on the face and sharp shadows. Also, I wore some different foundation for this shoot, and the results were a little splotchy, IMHO. I can tell on the neck more than anywhere. 

I’ve ordered a new backdrop but didn’t have it in time for this session, so I was using the same brown background I’ve used for over a month. Quite honestly, I’m completely bored with it, so I wanted to be able to at least change its color while processing – something that isn’t as easy to do as you might think. The mottled background means it blends too easily with my skin and other clothing tones, so I knew I’d need to wear something that would completely contrast with it or editing would get too messy. I also needed to cover as much of my skin as possible to avoid it blending into the background, too (I wasn’t able to change the background color of the photo above, by the way – too much of my skin matching up with the backdrop).

December4
No softbox here, using a Speedlite mounted on the camera and bounced off the ceiling. Much softer light, but more shadows. I aimed a ring light at my face to help eliminate some of the peskier shadows this lighting tends to create. 

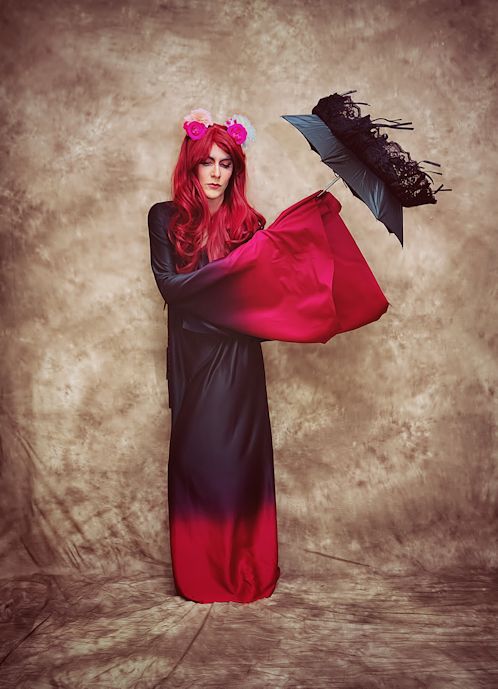
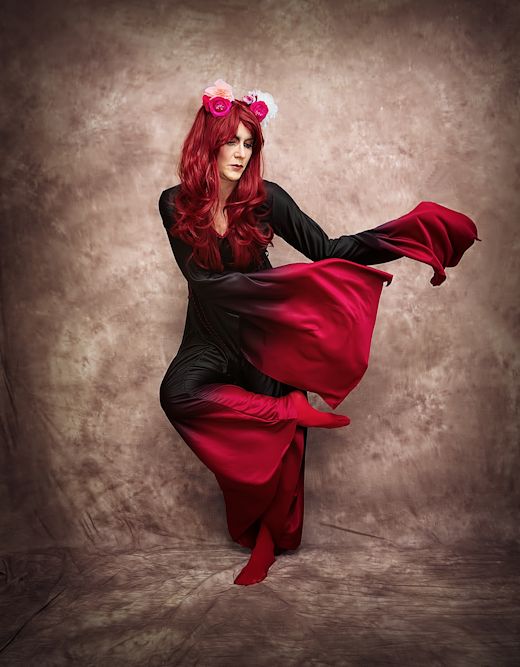
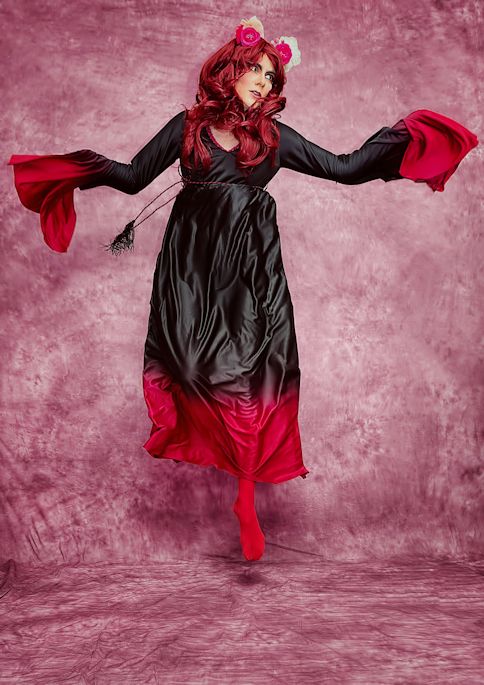
I decided on a costume gown I got for 75% off at the grocery store right after Halloween – it isn’t exactly season-appropriate, but it was a good contrast for my backdrop, and it was surprisingly appealing when moving to boot. An interesting ombre effect on the skirt and sleeves, and an awesome overlong bell-shape to the sleeve all created interesting images when flinging the cloth around. I was very pleased with both the color and movement of this thing when I saw the photos (you can tell I was able to change the backdrop color on these easier, too):

December1
By the way, I never use a softbox on full-length shots. Only portraits. Just the Speedlite camera-mounted and bounced off the ceiling, and two umbrella lights at 45-degree angles to the subject. 

December8
Not happy with that one foot, but whatever.

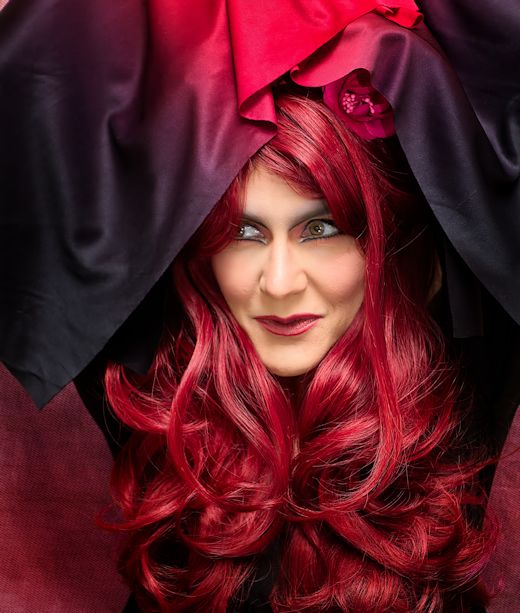
As you can tell in the shots above, I got bored with the short red wig (since it doesn’t incorporate any movement into the shot), so I switched to one called “Cool Kitten” from Gothic Lolita Wigs (it’s now discontinued). As a kitty wig, this thing sucked; the little cat ears were just some wig hair wound around two little styrofoam triangles, and didn’t stay put at all. But when thinking about what hair to wear with the dress I remembered this wig, and thought it might work to use the styrofoam ears as a base for some flowers and give the whole outfit something a little more Renaissance-faire and less Gothic-bride. Worked out great.

December6
My skin tone is really all over the place in these photos.

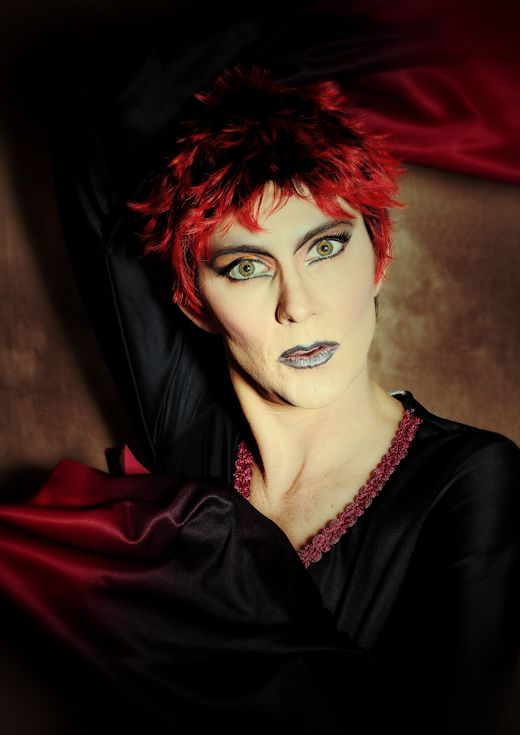
I also played around with my two Speedlites a bit to create some cool shadows. White balance on these shots was a bitch though, and I came out a little green, so I just decided to go with it and added a vintage filter to exaggerate the effect. Not as pleased with these as the others, but it’s something different.

December3

December5
It’s not easy being…well, you know.

And of course, there was jumping:

December7

December9
I may have oversharpened this one.

In looking over all these photos, I fear they may have suffered from the I-must-edit-every-shot-I-like-now syndrome that takes me over at times. I edited pics from 4 PM to midnight, and at some point in all that work I got sloppy, as I always do. When will I ever learn? Oh well. There are loads more from this shoot I can process more slowly and meticulously throughout the week.

Including photos with props, like this one!

December10

I May Have Gone Overboard…

…with Pixlr the past few days.

As you may have noticed, I changed my header recently; that image was a happy accident inspired by a very simple shot I took one weekend when I was taking some photos of a hairpiece I got in the mail, to show some friends who might be interested in seeing what it looked like in person.

in the stars3

I used my good camera and set up decent lighting so I could take accurate photos of the color and hair texture, and although the shots were just me in a sweater with some fake hair on my head staring basically right at the camera, I thought I’d at least try to get a few photos out of them that I could share over on Flickr. I pulled this one into good old Pixlr, and since it really had nothing much going on to make it interesting on its own, I decided to go for broke. My new header was the result.

in the stars10

I decided I liked it so much I used it here as well as on my cover page on both Flickr and Facebook. Then I decided I still liked it so much I’d take some other simple photos from this shoot and give them a go, as well. Here’s another original I chose to process:

in the stars8
And yes, it’s a very nice hairpiece; I wrote a review of it that I’ll upload later.

in the stars7
Sort of Mary Tyler Moore on acid.

That one went well, so I kept going. Here are the rest, along with the originals:

in the stars9
Another nice hairpiece, but not a thrilling photo.

in the stars6
Thrilling! That may be an exaggeration, but still.

Towards the end of my little hairpiece shoot, I got a wee bit fancy and started flinging the long one around a bit. Hey, I always have to do that a few times, especially when I’m sporting long hair. I had the lights and the camera set up, so you never know if you’re going to snap something you can really use. A girl’s gotta try, at least.

in the stars5

in the stars4

in the stars2
I actually like this one as is too.

in the stars1

I have a few more I may play around with, but towards the end of all this editing I started to feel like I was running out of steam. We’ll see if I do any more like this in the future. There’s really no end to what you can do with a photo, though. It’s a lifetime of fun for me. Even something as simple as a basic headshot can turn into a creative exercise. God bless photography; it really feeds my soul.