
Before I talk about my latest portrait sessions, enjoy a random shot of Simon:

Simon likes to sit on this teeny little cat tower we bought for Violet when she was a kitty. It only has one little ‘bridge’ at the bottom but I Photoshopped in a second one for symmetry.
I hadn’t been much in the mood for portraits the past few months, but two weeks ago I woke with the urge to put on a full face and play around. Ever since discovering the Portrait Pro plug-in about a year ago, I’ve gotten a bit lazy with my makeup application before a shoot, just because I can add so much of it when processing that it at least feels like it saves me a lot of time (applying a full face of photography makeup can take up to two hours). But in going over many of these shoots, I found myself getting frustrated with the limitations of the software, and how my end results just weren’t as good as I wanted them to be. More specifically, I was feeling like my recent portraits were not as good as they used to be, and I looked everywhere to find the culprit, thinking it was primarily some issue with my lighting that was off.

The primary problem I was having with these portraits was skin tone; even with the editing software I kept ending up looking kind of ruddy and ‘off’ or over-processed when trying to correct it, and the tones just weren’t very rich in the end, and it was throwing off the whole photo (in my picky opinion). But I would go back to previous shoots and clearly see how much more vivid and rich the shots looked in the end, and how much more natural the shots ended up even with a ton of processing. I didn’t really know the makeup short cuts I was taking were the culprit when I set out to do apply a full face a few weeks ago, but once those shots were done the results were obvious.

All these shots were so much easier to edit, and I had way more flexibility in how much manipulation I could do with the tones and lighting. And a lot of that came down to not needing to edit the makeup as much as I’ve been forcing myself to do lately. A “full face” for me is no joke – I start with an orange color corrector to cut the darker blue tones I have due to sun damage on my face (drag queens use orange to help conceal their five o’clock shadows) then apply a heavy Derma-blend foundation, and three different highlighters over the forehead, nose, and cheekbones (Derma-blend, NARS Illuminator, and a MAC cream highlighter). After blending all of that out with a sponge, I contour with a powder from MAC under my cheekbones, along the sides of my nose, and heavy on my chin to try to make it look a little shorter since I have a long face. I also apply a lot of highlighter under my cheekbones just to make them look more pronounced – I think you can see the effect of that in this shot:

This was inspired by a photo the drag queen Trinity Taylor posted on Twitter; she had on a brightly printed top, cinnamon-colored hair, and orange lipstick, and I wanted to give it a go myself.
Because my makeup takes so long to do if I’m really going to do it properly, I’ve started applying it in shifts when prepping for a photoshoot. If I do it all at once, by the time I’m done I am already so bored that I have to re-energize myself to take the pictures, and I also start getting really sloppy by the end of the application process. So, what I now do is get all the foundation and highlight/contour applied, then take a break. I may do a few things to set up the office/studio, like set up my lights or get the backdrops unfolded and propped against the wall, or take the dogs out for a bathroom break – just something to break up the monotony of staring into a mirror and applying makeup.

The eyes take the most work for me; I’ve always known to apply a lot of black eyeliner and shadow, and to darken my eyebrows as much as I dare (even when being lazy and not applying a full face), but one thing I hit on last month was that applying a brightly colored liquid liner to my entire eyelid makes my lids pop in a way they don’t do otherwise; since I’m approaching 50, my lids are starting to droop, and they were never very big anyway, so they tend to disappear in photos. In my first of the two shoots, I’d applied a lime green liquid liner made by Lime Crime, and you can see how it really made my eyelids stand out in a way that, in the photos, actually looks pretty natural (in reality it looked very heavy-handed and costume-y, but who cares).

The trick is to apply it to the entire lid, and then extend it a bit higher than that, so that if your eyelids get concealed a little bit by less-than-taut skin, they will still pop on camera (obviously the Trinity Taylor-inspired pic is from a different session, where I went with a different eye makeup look and didn’t use this technique). It’s amazing how much difference such a little detail makes in a photo, but it really does help quite a bit. In fact, my Lime Crime neon liquid liners are really old, and I need to dash over to their website and pick up some more since the ones I have (a neon green, a bright eggshell blue, and two shimmer liners in gold and silver) are almost done.

For this shoot, I also used some more of my face stickers I bought around Christmas last year; the nice thing is that you can wear them in the shoots and Photoshop them out quite easily if you decide you don’t want them in the shot later.
Other than that, I sometimes use the tape technique of placing a piece of Scotch tape on the outside of each eye, from the outside corner of the eye up to the edge of the eyebrow, to get a nice sweep of eyeshadow that is even on each side; this works well when creating a cat-eye shape with dark liners and shadows, which I usually do. And false eyelashes are really amazing eye enhancers, but I just cannot apply them properly or tolerate the lash glue, so I do add all my lashes using Portrait Pro (I apply mascara as usual, but in photos it just doesn’t show up at all). I tried blocking my brows to create a more exaggerated eye one time, but ended up losing a lot of eyebrow hairs in the process (and I already have thin brows) so I don’t do that anymore – if I want a higher brow line, I move my natural brows up in Photoshop instead, as in this picture:

Sweaters are tricky for photos; they’re hot, which is a challenge under studio lighting, and the fabrics can look dull and heavy. But this one had sparkle and those two great zippers that I thought would add interest.
After applying my eyes, I’m usually ready for another break, so I eat some lunch or maybe start some laundry and finish setting up my camera and props for the shoot. For some reason, working in shifts like this keeps me from getting impatient and frustrated, and it sets a more relaxed mood for the whole shoot (I can start to feel rushed if I don’t pace myself, and I’ve learned the hard way that bad things happen when the photographer AND the model get rushed. At the best, you just end up with bad pictures, but at the worst you end up getting sloppy when moving about or handling equipment, and something expensive gets broken).

This top was a fun discovery; in Goodwill I just liked the look of the polka dotted top peeking out from under the black sweater, but when I got home and put it on I was pleasantly surprised by the sleeves! They’re actually quite puffy and it creates an interesting shape; I had to get really creative with my posing to show them off, which happens sometimes when interesting sleeves are involved. Honestly, if this top wasn’t already worn out I’d add to my wardrobe – the sweater is dingy and pilled, though.
For final makeup touches, I apply one of Laura Mercier’s sparkly powders in all the highlighted areas (you really can’t get enough highlighter, it’s true), apply some blush in both cream and powder form, do my best to contour my nose and jaw line, and apply my lips as best as possible – I’m not good with drawing on bigger lips, and I usually use a liquid long-wearing lipstick for photo sessions, so I just use the wand to apply a line right outside my lip line, then fill that in. Sometimes it works, sometimes not, but even when it works I usually end up having to fix some sloppy lipstick work later. Fortunately, it’s not too hard to fix. Then – and this is really important – I apply Derma-blend to my neck, chest, and arms; I have a lot of sun damage that, if it shows up in photos, is very hard to work with. There’s a million different tones to it, and dark spots, and all that skin ends up not matching my face or even some other part of the neck or chest. The Derma-blend is so high coverage, though, that it evens things out nicely, and makes those sun damaged areas much easier to work with later.

The wig is actually a magenta color; had to use Photoshop to turn it red. I did a better job with that in the second shot; it’s actually tricky to do without also turning the background a different color around all the little flyaway hairs.
The second shoot – the one these two photos right above came from – was a bit tricky because I got half of my makeup on, then remembered I needed to pick up some medications from the vet before they closed (it was a Saturday, so the vet’s office closed at noon). I only had my foundation on at that point, so even though it irritated me to do it, I put everything on pause to zoom up there and get Penny’s meds. Then, since I was out already, I figured I’d stop by our local Goodwill to see if they had any tops I could snag; I woke up inspired to play in makeup and take pictures, but I was running a little low on new things to wear in them, which is another thing that always ends up frustrating. Sometimes I’ll think, oh I can just throw on any old thing for these photos, since it’s only my head and shoulders showing anyway, but that rarely works out.
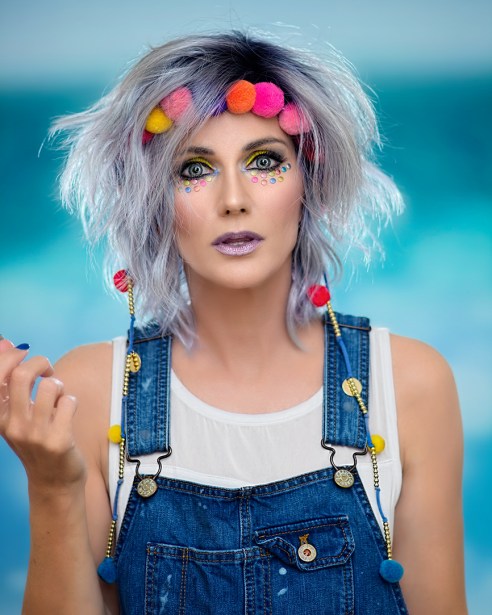
Overalls are great, though. As are pom-pom headbands.
The truth is, interesting tops are super-helpful for portrait shots, and way more important than you might think. A t-shirt doesn’t have a nice drape to it, and that material isn’t particularly attractive in a photo, so a sloppy top really can bring down an otherwise nice shot. When I hit up Goodwill, I’m always looking for tops with interest – high necks, textured materials, interesting details, flowy fabrics, vibrant prints, anything I know will add pizzazz – and on this trip I scored some real winners. The Hotrod Angel photo has to be the best acquisition, though; if you notice in those two shots above, one side is the front of the top, and the other one I have on backwards where there was another awesome logo (wearing tops backwards is a trick I employ often, if the back has more interest than the front). I didn’t even realize the back of that top had anything on it until I got home; as soon as I saw the front of it I knew I had to have it. It was a junior’s size small, though, and I barely got it on, and I even thought I might have to cut myself out of it, but it stretched just enough for me to save it.
So much more to process from these two shoots, but that’s all I have for now. So what have I learned? Patience, and planning, and proper preparation make for better photos. Seems I should have known that already, but shortcuts are always so tempting…more to come!

These are great! What is the name of the magenta wig you turned red? I love magenta wigs. 🙂
It’s called Helen, by Janet Collection. It’s a great little bob, I also have a purple/grey one I use in photos often. Super-cheap – I scored mine for $9.99.
Thank you so much!
I love how you are such a perfectionist with your photos.
Thanks 🙂
Your photos are visually arresting – you hVe such an eye for detail! Also, now I’m lusting for Lime Crime eyeliner. Thanks, Cynthia! 😜
Thank you!
Your photos are visually arresting – you have such an eye for detail! Also, now I’m lusting for Lime Crime eyeliner. Thanks, Cynthia! 😜
Those wigs tho lol. My eye makeup alone took me an hour when I did my show last. I did my lashes first took a small break. Then did my eye makeup that took an hour, then did the rest after.
My newest burlesque act that I’m doing next week I’m using make that glows under uv black light. And they are quite bright. But I don’t think I’ll leave the house wearing it lol
yeah probably a good idea LOL
I’m hopeless attaching false eyelashes, but I watched a you tube video last week and got some useful tips, so they looked better as the week went on. I think you’ve done an amazing job, getting the eyes symmetrical is really hard.