Groceries! Part whatever.

I’ve captured a few interesting shots here and there lately, so it’s time to share. I’m gonna save my fave for last, but let’s start with this one, found in the cheap wine section:

single
That pretty much sums up the attitude of people who buy box wine. YEP.

I’ve been wanting to capture this little mixed message for several trips now, but located as it is at the front doors to the store, and given the fact that I never remember about it until I’m on my way out and my phone is already stored away, it’s been a hard one to catch. But on a recent quick trip where I was just picking up a few things I remembered to leave my phone out, and although the shot’s a little blurred I think you can still make out the quandary this might put a shopper in if she or he is too literal-minded:

comeheregoaway
I’m not sure what to do here.

I passed by these pastel-colored booze bottles on the way to the checkout line one day (didn’t pay attention to what sort of booze they contain) and couldn’t resist a quick snap. On its own the picture wasn’t worth much so I gave it the Pixlr treatment:

bottles
What happens to your vision if you drink too many of these.

This is one of my favorite iPhone captures of recent memory. This little heart post-it was stuck to the parking lot concrete right behind some dude who was getting out of his car when I stopped to take the photo; he looked at me like I was bonkers, but he did keep his feet out of the shot.

heartlot
When searching for art in the everyday, be sure to look down on occasion.

Aftermath

So for my final shots from Saturday’s session, I decided to get some shots of me taking all that makeup off. I don’t really know why. The camera was set up so I figured, why not?

237_Snapseed_sm

One thing about all that stage makeup is it does a real number on my rather sensitive eyes. The only eyeliner I can comfortably wear is MAC Powerpoint eye pencils; the liquid liners and glitter shadows I use for photoshoots stings when I apply it, and if I leave it on too long will cause my eyes to swell and itch a bit for a day or two after. And the glue from false eyelashes is bothersome too, so my eyes were itching during the entire shoot.

241_Snapseed_sm

At the same time, when I spend an hour and a half putting on makeup I hate to wash it all off right away, so I tend to keep it on longer than I should. As a result, my eyes were a red, itchy mess the day after this photosession.

245_Snapseed_sm
This one needed to be black and white for some reason. I think it was the shadow created by my hand that convinced me.

At first I had the idea of wearing a different wig while taking the makeup off, because I rarely take photos of me with my real hair. There’s nothing wrong with my real hair, in fact it’s longer right now than it’s been since I was 30 years old (although it’s still short). It’s just that my wigs have become such a part of my photography-persona that I never care much for shots where I’m not wearing one. But it was too much hair covering my face and I couldn’t get the shots I was after, so I took it off and left the wigcap on. And for some reason I don’t quite understand I chose to put this chambray/ruffle top on; I actually bought it thinking I would wear it for real, but on me it looks pretty ridiculous IRL. However, I am always on the lookout for tops with interesting detail that would look good in portraits, so I kept it. Honestly, it still doesn’t look all that great, but I thought I’d try it out.

252_Snapseed_sm
It kind of pains me to post a photo of myself without makeup, but I’m willing to suffer for my art.

And, a few photos of the mess I make on picture day:

256_Snapseed_sm
Neither of those clocks are accurate.

254_Snapseed_sm
Torture tools for sensitive eyes.

The flip

I got a lot of enthusiastic responses when I showed people the flipped photo that I shared in Saturday’s post; many comments indicated that people didn’t realize I flipped an image but actually thought I somehow pulled off a backflip in the shot. This kinda cracked me up – but that was the effect I was going for, so it’s nice to know I pulled it off better than I thought I did.

It inspired me to share as much of the editing process as I could here, so people could see how it was done. To me it seemed really obvious, but that’s because I know what I did, so when I look at the photo I still see it. Unfortunately, I  don’t save every step of a photo as I edit it (if I knew Photoshop I wouldn’t be saving any alternate files at all) but I can at least show some of the progress, so here goes:
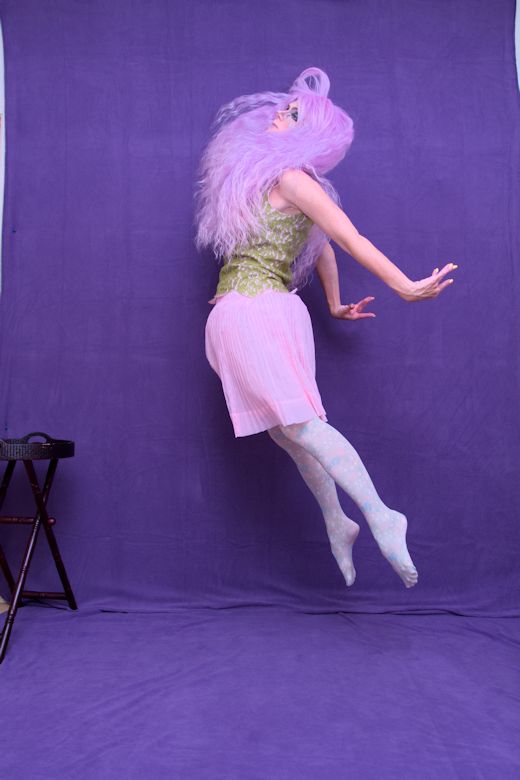
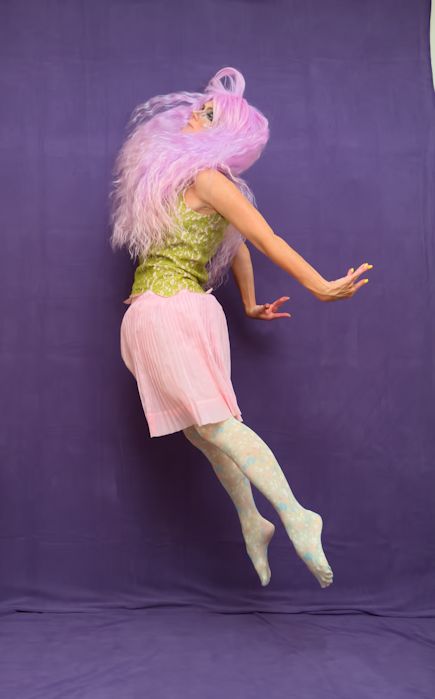
Step 1:

125orig

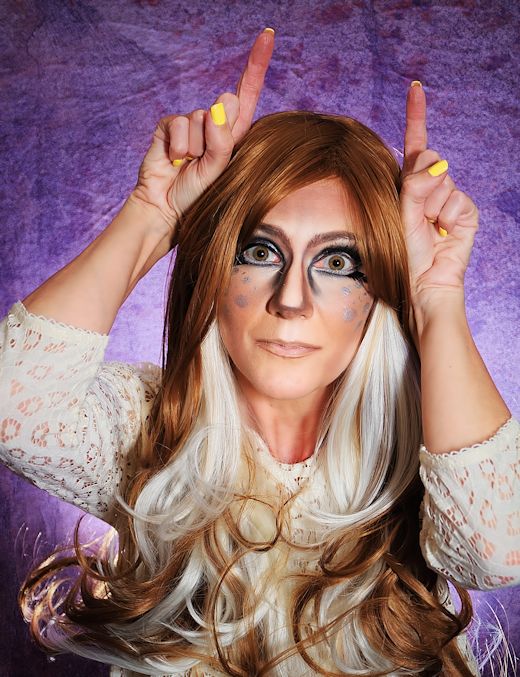
Welp, there it is y’all – the original, unretouched photo. This is probably the only time you will see one of these on this blog. Normally, before a photo is converted from RAW to a .TIFF file, I run it through Photo Ninja, where I color correct/enhance, crop, correct chromatic aberration, demosaic, etc. (I can’t recommend Photo Ninja enough for those last two – I get an amazing level of detail out of those two processes on this program). With this one, I did nothing but convert it, and I admit it made my fingers itch a bit not to correct anything. Also, there’s a surprisingly small amount of crap in this photo to edit out compared to my usual: the remote is usually thrown on the floor somewhere (I think in this shot I’d managed to put it on that little table that is always sitting to the side of my setup to hold random things – my glasses, sometimes the remote, a wig brush) and there is usually more white space showing where the backdrop doesn’t cover the wall. Sometimes there’s also a dog tail or the edge of a fan showing up somewhere in the foreground, but not here – so not a bad original actually. But, my hands went all wonky and the skirt didn’t have an interesting flow, so it was still a reject shot, which is why I eventually decided to mess with it and see what happened.

Step 2-ish:

original

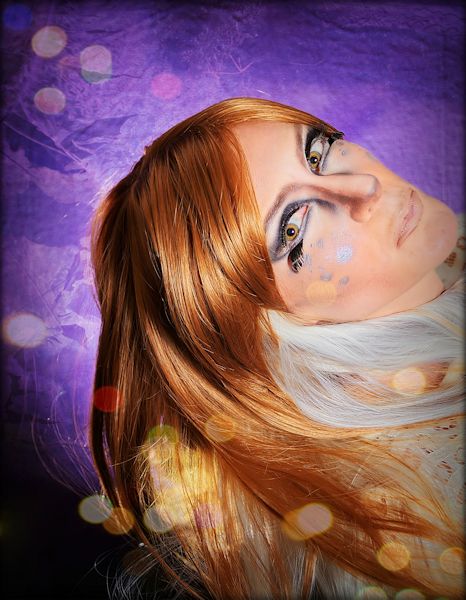
This is the original after I’ve run it through the Photo Ninja process, so you can see the effect of the enhanced color and the added detail and clarity. You can also see how color correction got rid of the pinkish tint the original had – most noticeable in my skin tone. After giving it the Photo Ninja treatment and converting it to a .TIFF file so as not to reduce quality while editing, I used Paint Shop Pro to edit out the table using the clone brush; I also use PSP to enhance color and contrast further, as well as use a skin softener filter the program has that I particularly like. You can still see a bit of the white wall in the upper corner there, but I edited that out later.
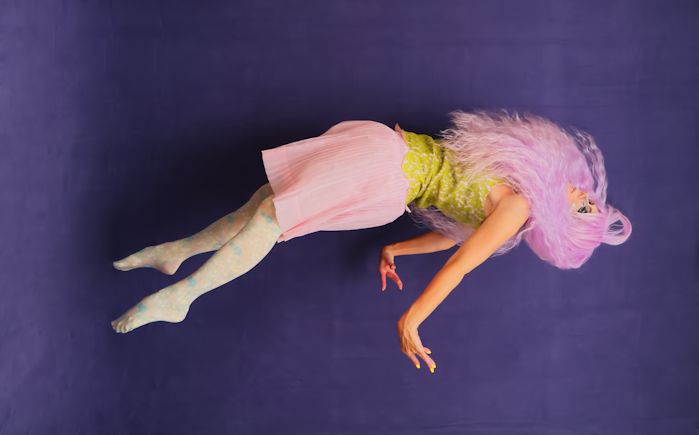
Step 3:

flipped

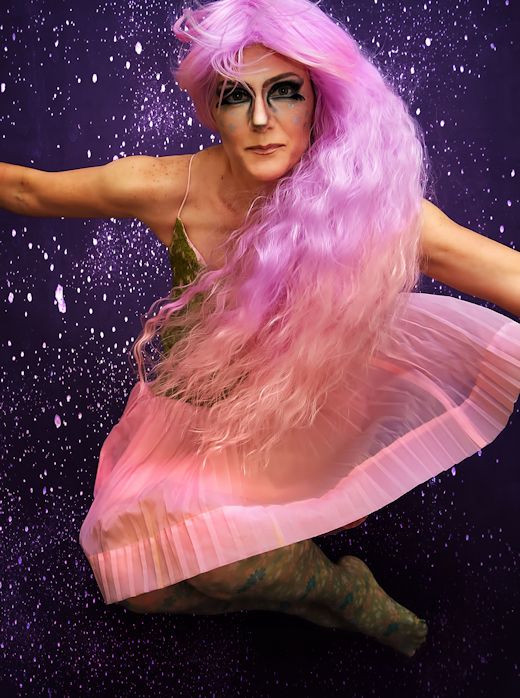
Here it is flipped. I cropped it a bit tighter, which reduced clarity a bit but I felt it had to be done to give the right effect, and I removed the horizon line using Photoshop’s Patch tool. And yes, this is where things start to get weird, if they weren’t already, because all of these processes I use through different cheap and/or free programs could all be done in Photoshop, but I never learned how to do them and instead have cobbled together my own system that works for me. I realize that’s probably ridiculous, but they’re my photos so shut up already. Moving on.

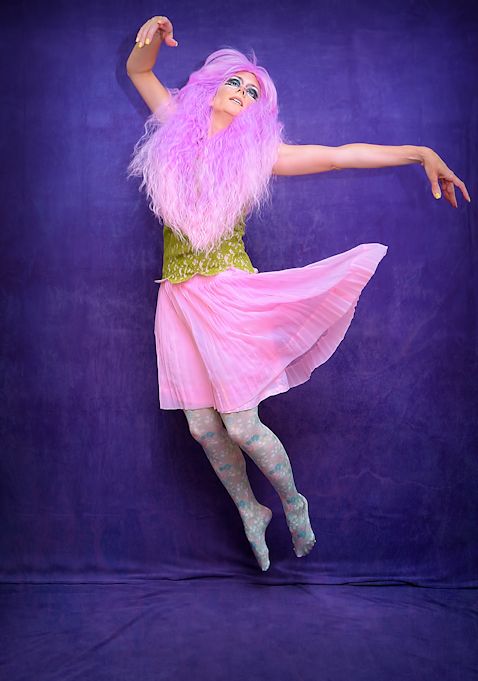
I still felt there was a dark shadow at the horizon line that indicated where it was, so I used yet another program I love, Snapseed, to lighten that area. I told you I had a weird system. Anyway, I adore a few of Snapseed’s photo editing processes, and it sucks that the company is no longer offering the PC software I managed to snag a few years ago; sadly, it is now available only as a mobile app. This program has a sharpening/structure tool that I think is awesome;, it has a preset that always gets it right without overdoing anything, and adds a fantastic level of clarity to my photos at the touch of a button (I have a thing about clarity). If you scroll back up and compare the photo above to the one below – just looking at the subject and ignoring the background (which has also been heavily edited in this next shot) – I think you can see the difference in detail, and at this size, the photo isn’t nearly as detailed as the full quality version. I think sharpening is my favorite editing step, because when I hit that button the image really comes to life for me:

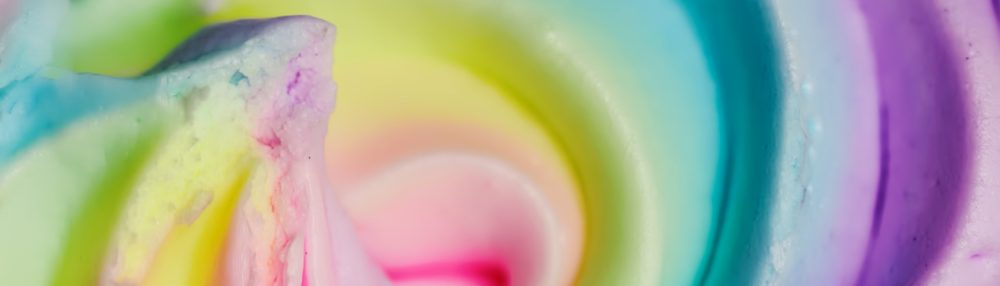
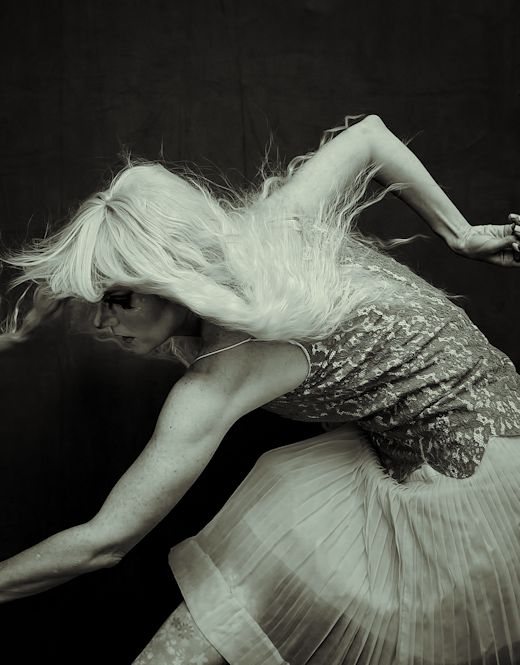
Step whatever (many steps combined here):

125_Snapseed_sm

I’ve already raved about the added clarity and sharpness, so the other thing I’ll mention is how I moved the file back into Paint Shop Pro to add a few layers of texture to the background. I wanted to further conceal the horizon line (which, as I mentioned previously, I’d used Snapseed to lighten, but I could still see it) and get rid of some of the creases you can see in the backdrop. I also wanted to use the textures to enhance the feeling of someone floating, and I think these worked out nicely. I get most of my textures from this website – I started out with the freebies but have since purchased several of their packaged sets to add depth to my backgrounds as well as conceal flaws in them like the creases and lines I wanted to cover here.

So, there you go. There’s how I managed to do a backflip in my very own studio, without killing myself in the process.

Photoshoot Round 2

After working on deer portraits, I decided to change costumes and do some jumping. Unfortunately, my office/studio gets really hot during the day when it’s hot outside, so I couldn’t leap for long as I timed things badly and was jumping about at the hottest part of the day. I still got some good shots, just didn’t get as many as I usually do. I’m learning to take less anyway, since I can only process so many photos from the same shoot before I get bored. There’s no need for me to take 300 shots each time, it’s just I have so much more to work with when I do; but when it’s 100 degrees outside, and about 80 degrees in my studio, well, I just can’t handle too much bandying about in a hot wig and layers of costumery. So I made this part quick and kept the fan on high to try and reduce the heat.

135_Snapseed_sm
Is this a fab dress or what? It’s like a cross-dressing costume for Peter Pan.

I wanted to play around with different movement and camera focus some, since I tend to rely a lot on fully zoomed-out full-body jump shots. I thought it might be interesting to bring the focus in and just capture parts of me in motion; it irritated me a little as I feel I probably missed cool movement this way and am still more interested in the shapes the entire body makes, but still. Gotta change things up a bit when I can.

199_Snapseed
I felt this one needed to be B&W for some reason. And that little shot of the floral tights bugs a bit; it takes away from the seriousness of the shot, but cropping out the leg entirely ruined the movement of it so I had to keep it.

2077_Snapseed
I love this one – I look like some freaky combination of a My Little Pony and a day-glo extra from Cats. The wig is another Gothic Lolita one; not sure you can tell but it transitions from purple to pink on the ends. 

I also wanted to play around with leaping in such a manner that I might flip the photo on its side and look like I was falling, or flying, or something. This hasn’t gone so well for me in the past but I thought I’d give it another shot by trying some jumps with a falling motion to my body. Interestingly, in the leaps where I tried this, I kept visualizing me flipping the photos over to the left, so when playing around with editing I kept flipping everything that way and it wasn’t working. Then I got the idea (duh) to flip to the right and it looked a little better. Still not sure this works but maybe that’s because I know I was leaping straight up and can’t stop “seeing” it when I look at it. Who knows. Also, it’s a bitch to edit the floor out of the shot but that has to be done or the effect is ruined, so I probably won’t try this with too many photos just yet. Or maybe I will, who knows. I just know it took twice as long to edit this one, and I had to use several extra layers of texture to conceal lines that would indicate what was really going on.

125_Snapseed_sm
Click on this one to see a better shot with more clarity. For some reason it looks crappy when inserted into the post.

Tomorrow I’ll share the last “look” from this shoot, although I’ve got lots more of both these and yesterday’s costumes to edit. I’ve also kept my studio set up in case I want to shoot anything else on the holiday. I do have lots of grocery store pics to share at some point since that’s what I did Sunday.

183_Snapseed_sm
Kinda cheesy background but I thought the movement of the stars worked well with the shape my body made. 

9/1/2013: Finally some new photos

Finally got to gussy up and take photos Saturday. I’ve kept the studio set up so I can hopefully get more done today or tomorrow as well, but they won’t require elaborate makeup next time as this took forever to create:

19_Snapseed
I’m supposed to look like a deer, but after I got the makeup on I realized I did not own a deer costume, so I had to improvise with finger-antlers.

The brown and white wig is new; it’s from Gothic Lolita Wigs, which is my favorite costume wig store. The hair fiber on this one easily tangled and was hard to comb out though, so it was a pain to use. As much hair-flinging as I like to do, I have to brush out my wigs every two or three shots to avoid having a massive rat’s nest by the end of the shoot, and this one was difficult to comb through every time. Bummer because it otherwise is easy to wear and I love the color combo.

060_Snapseed_sm

I used a Speedlite behind me for most of the portraits; it’s become my favorite way to light tighter shots. I love the way it frames the subject and adds some depth to the background.  I added a softbox to the Speedlite on my camera to help erase shadows on my face as well.

069_Snapseed_pxr
I decided to Pixlr this one up a bit.

I had a few costume changes in this set so this was just my first “look.” I’ll share round two tomorrow.