Fab Pants

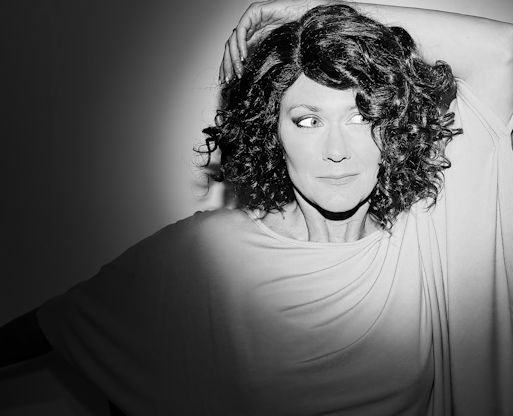
Because I take and process so many photos, I am often pressed for what to title them so that I can keep track of them on my hard drive. I have to do something with them other than just use the numbered data they are given when uploaded to my computer, so I tend to give them whatever title pops into my head first when it’s time to save an edited file. The title that popped into my head when working with the shots I took Saturday was “Fab Pants.”

FabPants2_Snapseed_pxr

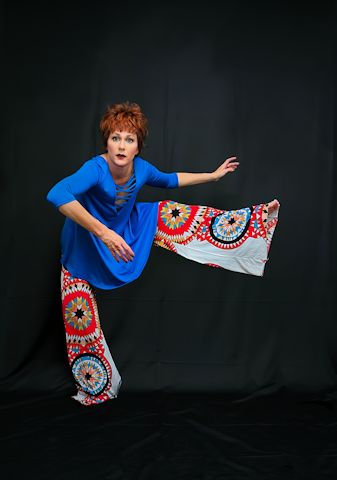
Then every shot from that set that I process I just number; so far I’ve got a “Fab Pants 1” and a “Fab Pants 2.” This is all I’ve had time to edit since I last updated, but I wanted to share it so I had to reach a bit to come up with a blog post, hence the rather lame rambling I’m doing right now. By the way, for anyone who’s curious – I actually had my leg up on a chair when taking this shot. Then I used the composite technique to remove the chair when processing. I’m getting better at this whole thing, I think. Even added some decent shadows this time using the burn tool in Photoshop CS5.

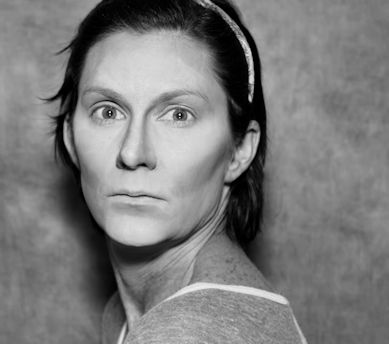
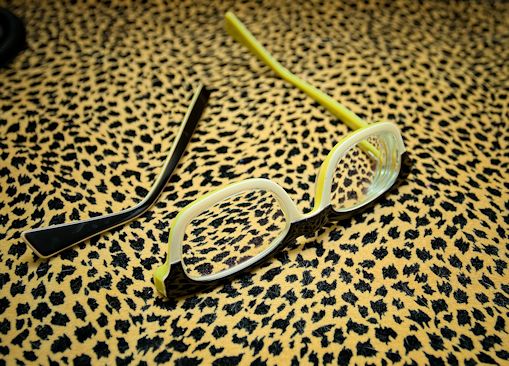
I also thought I’d share that I suffered my first optical tragedy during Saturday’s shoot: I always wear a spare pair of glasses when I’m shooting self-portraits because there’s so much putting on and whipping off of the spectacles that I worry about stretching out my real pair. I have several spares to choose from but I use the weirdest ones since I care about them the least. I will usually keep the glasses on until right before I hit the remote, then I toss them onto the floor somewhere for the photo, and sadly, on Saturday after posing for the shot above my left foot came down right smack on top of them and broke them. I knew it would happen someday, and as I said it’s fortunate that they were a pair I didn’t like very much – although they looked great in photos, they were too harsh on my face to wear them out of the house, and my husband always said they made me look angry. I don’t think he’ll be sorry to hear they had to go.

brokeglass_Snapseed

By the way, it appears that Fly Fest 2014 has finally wound down, a torturous six days from when it started, with just a few stragglers hanging about that have yet to leave the party. Here’s hoping that’s the last aspect of the cycle of life currently breaking down inside our bedroom wall that we have to deal with.


More Christmas Pics

Some more shots from Christmas Eve – I’m finally getting back to them.

Eve7
My dad

Eve4
My niece Chana and nephew Ben

Eve6
My brother Scott and my sister Kim

duckfacecollage
The Christmas Ducklips Contest – not sure who won

In many of my shots, the color was rather washed out and boring, so that’s why some of them are black and white. If the color wasn’t vibrant I found the shot looked better that way.

I have a few more to share, but I want to show their editing process, so I’ll save those for later.

Spot Blogging

Today I stumbled across a little Rogue spotlight I bought about a year ago to attach to my Speedlite; I’d only tried it out once before forgetting about it. At the time I wasn’t very interested in what it could do as I’d also bought a small softbox and got way more into using that than this little thing. So after coming across it again, I decided it was time to play around with it and commit more to learning how to use it.

spot 1a_Snapseed
Spotted!

The detachable spotlight also came with a sample gel filter to put over the spot for color effects; it was an orange one, but I’d definitely like to get more colors at some point. I stuck the gel on the spot and ended up doing the bulk of the shots with it in. The results were interesting – I actually used the orange gel on the shot above, but edited a black and white version also to show the spot effect without any color distractions. Here’s the actual shot using the orange filter:

spot 1_Snapseed
Pretty damn warm – believe it or not, I actually REDUCED the color in this shot when editing. That’s some serious orange.

Apparently this came with three different grids to create tighter or wider spotlighting, but I could only find two. Figures. Of the two, I much prefer the wider spot to the tighter one, so it’s the main one I used.

spot 2_Snapseed
The spot/gel combo didn’t do much to wash out the wrinkles in the backdrop, so I added a texture to the photo in an attempt to camouflage them

I thought that shot might be lacking a little, so I added some more filters to it in Snapseed, just for the hell of it:

spot 2a_Snapseed
Totally cancels the effect of the orange filter, but I thought it gave the shot a spooky vibe

But I still felt the shot was missing something, so of course I ventured over to Pixlr to play with it further. I discovered recently that if you access the “adjustment” tool in their Express editor, there’s an “upload image” option which allows you to superimpose another picture over the one you’re editing (more hours of fun on the way, as is the norm any time I discover something new) so I gave that a go by uploading the same image over it, enlarging it a bit and reducing its opacity, then throwing in some light leak, smoke, border and texture filters to finish it up:

spot 2a_Snapseed_pxr
Even spookier!

I really like the movement in this last one, and in spite of my itchy photoediting fingers I forced myself to keep the adjustments to a minimum (so hard for me to do):

spotshot_Snapseed

I’m sure you could get this entire effect using software after the fact, but it’s great fun to experiment with vignetting effects and filters right in the shot. Taking thousands of photos a month using one’s self as the subject does get boring (believe it or not, yep) so any time I run across something new that makes the actual taking of the photos more interesting (taking the photos is never my favorite part) I’m all for it. Plus, I do believe the more you ‘get right’ in the actual shot, the better – it just feels better in the final result.

Seriously considering zipping right over to Amazon and buying those other filters. Loads of colors for $30 and totally worth it. But it’s way past my bedtime and I have a busy day ahead, so the sooner I get off this computer and force myself to get sleepy the better. And I know I still need to share pics from as far back as a week ago (Christmas Eve) but I get so excited about my newest shots that ones I took previously and failed to upload right away sometimes get lost. I’ll get them all shared soon though; once work starts up again I won’t have so much time to take photos and get backlogged.

Evolution of a photograph – makeup test shot

I’ve mentioned this here before, but I always take test shots as I am applying my makeup to be sure it’s going to appear as I want it once I start shooting. Sometimes I luck out and get an interesting photo out of those shots; in fact, I often discover that some of my expressions in those one-off shots are more interesting than my posed ones, and I regret that the makeup and outfit wasn’t complete when I took it. Sometimes I can still get a decent shot out them though, like this one:

0060_Snapseed
Edited, of course

Anyway, I discovered one such shot Wednesday evening and played around with it a bit, so I thought I’d share its evolution. This is as close to an original as I have, but it was not shot in black and white originally:

test shot1
Same headband as in the first photo – it’s the one always I use when applying makeup for shoots

Obviously my makeup was not complete here, nor was it well-blended, as I discovered after taking the photo. But the extreme highlighting and contouring did make for an interesting look in its own right. However, one of my regretful side-effects of getting older is the sun damage that is starting to show itself on my skin, my neck in particular. I admit it is getting more and more difficult to disguise it in shots without it being obvious, and at some point I’m just going to have to embrace it or quit taking photos of myself (which isn’t likely). I doubt anyone notices, but it does bother me (more in photos than in day to day life, when it isn’t as noticeable but is slowly getting more so). The sides of my neck as well as my decollete are both getting red and splotchy; I used to try to cover it with makeup but just ended up with a red, splotchy neck AND a foundation-stained shirt, so I don’t bother anymore. But in this photo, the hyperpigmentation showing on my neck, as well as the crappy pajama t-shirt, were really bugging me, so I decided to try something new instead of just my usual softening and lightening:

test shot2
Problem solved

With my nominal Photoshop skills, I used the patch tool to blend the background into my skin and hair; I also blended out some of the harsher contouring around my hairline and softened the skin to conceal the fairly sloppy powder-blending job I’d done right before taking the shot (I also got rid of the headband I was wearing).Then I pulled the photo into Snapseed to sharpen and define it:

test shot3

To blend in some of the rougher edges where I’d blended the background in, I also added a texture to the background, keeping it very faint so as not to overwhelm the nice clean lines of the face (I did this in Paint Shop Pro, since I don’t yet know how to do it Photoshop). This was nice enough as is, but it was tempting me to give it a little Pixlr treatment to make it extra-special, so off we went:

test shot4
I also liked how my cheekbones started to look like mutton-chop sideburns somewhere during all of this

I added a vintage effect to add contrast, a space overlay for a ghostly feel, a tie-dye overlay for a little color, and an ink border for depth and visual interest. I still like the plain old black and white version too – but this one is probably going to get my top vote, ultimately.

I may look through my test shots and find a few more to work over this way. Blending the background into the subject in a portrait is something new for me, and I had fun giving it a go. As always, problem-solving when editing leads to new and creative processes and solutions. At least, that’s how it works for me.

Here’s a collage of the work in progess:

collage_testshots

9/1/2013: Finally some new photos

Finally got to gussy up and take photos Saturday. I’ve kept the studio set up so I can hopefully get more done today or tomorrow as well, but they won’t require elaborate makeup next time as this took forever to create:

19_Snapseed
I’m supposed to look like a deer, but after I got the makeup on I realized I did not own a deer costume, so I had to improvise with finger-antlers.

The brown and white wig is new; it’s from Gothic Lolita Wigs, which is my favorite costume wig store. The hair fiber on this one easily tangled and was hard to comb out though, so it was a pain to use. As much hair-flinging as I like to do, I have to brush out my wigs every two or three shots to avoid having a massive rat’s nest by the end of the shoot, and this one was difficult to comb through every time. Bummer because it otherwise is easy to wear and I love the color combo.

060_Snapseed_sm

I used a Speedlite behind me for most of the portraits; it’s become my favorite way to light tighter shots. I love the way it frames the subject and adds some depth to the background.  I added a softbox to the Speedlite on my camera to help erase shadows on my face as well.

069_Snapseed_pxr
I decided to Pixlr this one up a bit.

I had a few costume changes in this set so this was just my first “look.” I’ll share round two tomorrow.