Knitography!

Well hello everyone! How the hell are ya?

Coloring!

So I haven’t updated since April, and since then I’ve been able to meet up with friends, hang out with my sister, and eat in a few restaurants with Doug. Hallelujah! Except oh wait – this is Texas, after all, and our super-low vaccination rate means the Delta variant of COVID-19 is on the rise in a major way, and Doug and I are back into quarantine mode. I’ll be damned if after committing to avoiding this stupid virus for a year I’m going to turn around and get COVID, even if it most likely wouldn’t be in some serious form since I’m vaccinated, because a bunch of people refuse to do their part and just take the damn shot already. And yes, I have family members and friends who refuse to get vaccinated, and they are all absolutely on my shit list. There’s no way in hell our governor is going to mandate masks, social distancing, or vaccines at this point, so if we’re going to stay healthy AND do our part not to spread the virus (since vaccinated people can carry it asymptomatically) we’re going to stay home. Again. Sigh.

Knitting!

But hey, I did this whole stay-at-home thing for like 14 months already, so I’m good to go. I’m still knitting a LOT, and although I still have much to learn I’ve managed to knit a few decent scarves so far. My plan was to keep knitting scarves until I had several more advanced stitch patterns down – my first full scarf was a basic garter stitch (and that one was a bitch because I bought a light weight yarn that was hard for a newbie like me to work with), then a seed stitch, and then a rib stitch. I tried stockinette with a border but the damn thing still curled up, so I don’t know what I did wrong there.

Check out my fancy multi-colored knitting needle!

I was going to move on to a basket stitch when I got the idea to learn how to knit roses – and now I am obsessed. My goal is to knit a shit-ton of roses together to make a blanket, but that’s going to take a while, so in the meantime I thought I could at least get enough made to use in photos. Even that was going to take awhile, so I got the bright idea to just use photoshop to pretend like I’d made a shit-ton of roses. Problem solved!

This was done with only three different roses

I just snapped a photo of myself, then stood in the same exact spot and stuck a knitted rose on a knitting needle and held the thing up in all the different positions I wanted it to be, and then layered them all on to the original photo.

Yep-more roses

These little roses I turned into tea light holders, and they sit in a little silver platter on my office table. I’m pretty pleased with them! I’m currently learning to knit leaves I can add to my roses, but that involves both increasing and decreasing stitches, which is a new skill for me, so I have so far successfully knitted — one. I have a long way to go folks. But thanks to the Delta variant and a plethora of stubborn Southerners who won’t get vaccinated, I have plenty of time now!

*And yes, I realize many, many people cannot get vaccinated for various reasons. I do not fault those people one bit. In fact, the high risk of COVID to people who cannot get vaccinated make me fault the ones who could get it but won’t EVEN MORE.

This was done with one rose

Anyway, I’m enjoying both the knitting AND how I am finding ways to incorporate it into my photography – or knitography, as I have taken to calling it. I feel like there is loads of potential here to take both activities in some fun new directions.

This is one scarf I made that is half white and half yellow – I just layered several different shots of me throwing it around into one photo.

Aside from this, my summer has been light. I have put on some weight again, and tried to taper off my Lexapro since I dropped 20 pounds the last time I stopped taking it, but emotionally I couldn’t handle it. I finally realized it was ridiculous to put myself through the wringer mentally to lose a few pounds, so I went back on it and am trying to get the weight down without having to lose my peace of mind in the process. It ain’t easy, but at this point I have at least stopped the weight gain, which was really starting to climb. Haven’t lost any yet, but am no longer putting it on, so that’s a start.

Penny!

Our old girl Penny had a rough June. She has vestibular disease, which is common in old dogs. It’s essentially when small blood vessels burst in the inner ear, and the symptoms can be scary because they mimic a stroke, but vestibular is much less serious in the long run as dogs generally recover from them 100%. Penny has had three vestibular “events’ as we call them, where she gets major vertigo and struggles to walk and stand. Initially she also gets so nauseous that she throws up, but now that we’ve dealt with this before we have medication on hand that helps her with both the dizziness and the nausea. Mid-June, she had another bout of this; she was lying down on a beanbag chair when all of a sudden she rolled off it and started shaking her head around. We knew right away what it was, and tried to get medicine in her before she threw it up. It was unpleasant night as she couldn’t walk well enough to go outside, so she peed and pooped in her dog bed for about 24 hours before things kicked in enough for her to be able to walk with our assistance.

Dog harness

We bought a harness like the one pictured above, and it was a real lifesaver once Penny regained enough balance to be able to walk outside. She was still terribly dizzy, but she COULD walk, and with this harness we were able to help her keep her balance. Her recovery took a while this time – it’s been a little over a month now and it’s just been in the past few days that she’s been completely back to normal. We still keep the back harness on her all day and use it when she goes out, as her back leg strength still isn’t as good as it used to be and it allows us to help her stay upright when she goes to the bathroom. But she’s finally back to walking around the house on her own, and even being able to sleep on the bed with us again – although she still needs help with the stairs that get her up there. For the first three weeks, when she couldn’t get up on the bed, I actually slept on the floor in my office right next to her, which was not good for my back let me tell you, but it was good for my heart. After losing Sprocket in December, we are both even more sensitive towards any pet that gets sick right now. Even after so much time has passed, we still miss that old boy something terrible.

RIP Sprocket. We miss you!

That’s all for now, although I do have a bit more Knitography to process. So maybe we’ll be speaking again soon!

Summer Stuff

I’ve had a light summer of tutoring, with the past two weeks having no students whatsoever, so you’d think I would be busy taking advantage of all the free time to do things I don’t have time to do during the school year. But, you would be wrong.

JasmineFloral1

For the most part, I’ve been incredibly lazy, napping every day and sleeping late, while occasionally hopping into the pool. But I’ve had a few moments of activity here and there, just enough to keep me away from the blog, I suppose.

braids1

For starters, my older sister and I have taken a few little day trips over the past several weeks. It started when I was staying in a hotel during the last few weeks of our mold remediation; I figured since I was in a nice hotel and she and I both love hotel rooms, she should come on over and hang out with me for a while. She spent one night with me and we spent the day shopping at the nearby mall and eating in the restaurants surrounding the area.

Hallettsville1

I thought this was the town hall in Hallettsville, TX, but my sister thinks it’s a church. I still have no idea. 

That led to us getting another hotel room in Clear Lake City so we could visit my brother, who lives in Dickinson, when he threw a graduation party for his two kids. It’s a long drive out to Dickinson from where we live, even though technically it’s all still “Houston” – especially since Dickinson is off the main freeway to Galveston Island and the party was thrown over a holiday weekend. Traffic is always horrible on I-45 in the summer, so my sis and I figured we’d get another hotel room, check in at the graduation party, and then spend another nice night hanging out in a hotel on the water instead of making two traffic trips in one day. I forgot my camera, though, so no pictures of that little jaunt.

Hallettsville2

Another Hallettsville shot

Most hotels were booked in Clear Lake for the weekend, though, and we ended up staying in an older Hyatt hotel that had a lovely view overlooking the bay, but had horribly thin walls and those old, adjoining rooms that I don’t think newer hotels even do anymore – and the first floor we stayed on was so poorly insulated and populated with small children that I swear my sis and I kept opening the door to the hallway to try to find out where the large gaggle of children was playing in the halls, only to realize that they were the kids in various other rooms that we were hearing as if they were right outside our door. We ended up moving to a higher floor, where they apparently don’t let kids stay, and that reduced the noise level quite a bit. But lesson learned, no more stays at the Clear Lake City Hyatt. It also must have been moldy, because after having no breathing issues for several weeks, I woke up coughing like a maniac the night of our stay, and it took me another week or so to recover. Moving on.

Hallettsville4

Then my sister wanted to go spend a few days in an incredibly tiny little Texas town called Hallettsville, which is where all these pictures are from. It’s a bit convoluted, but my aunt and uncle bought a tiny little country house there, on about 4 acres of land, where they plan to retire someday, and my sister, who is close to my aunt, has a key to go stay out there whenever she wants (I’m not as close to this aunt so I had never even been to this house before). Sounded like a nice free vacation to me, so we loaded up her car and headed out there for a few days in June.

Hallettsville3

When I say Hallettsville is small, I do mean small: Wikipedia lists its population as just over 2,000. Even though we were wandering around their little town square on a Saturday afternoon, there was still almost NO foot traffic, and I have no idea how anything aside from the factory supply store manages to stay in business there. The house my aunt and uncle bought is small, also – almost claustrophobic – but it’s actually a nice enough place to retire if you want some land and a Dairy Queen to visit on occasion. I was a bit fascinated by this little walkway leading up to their front porch though, and fortunately I’d remembered to take my camera so I could do some quick levitation using it as a background:

sidewalk2

That’s the walkway leading up to their house, and as you can see, it just sort of stops for no reason in the middle of the grass. I’m assuming someone at some point had intended to put in a driveway or something and then never did…? I dunno. But anyway, it inspired me as some sort of launching pad to a magical dimension, so there you go. The house is right behind me here, and you can see their little stretch of land with some decent trees and a pleasant view to look out over from the front porch. Not bad, if you’re into that sort of thing. Not sure I could do it long-term though.

Fun little detail: my aunt and uncle keep a golf cart on the property so they can tool around a little, and my sister loves to just hop on it and drive around on the grass, so we did that a few times. I am not as big of a fan of this, because I HAAAAATE flying bugs, and as soon as you start cruising around on the grass all of these CREATURES leap out of the grass and into the cart. So, my sis was really enjoying driving around and listening to me scream. Then, she accidentally ran over a cow pie (that’s cow shit, for those of you not familiar with the term) and it splattered all over my leg. Two more reasons I probably should not retire in the country: cow pies and flying bugs. Moving on.

nails

In other news, I have new little beauty obsession – fake nails, the kind you glue on and can buy at the CVS.I wore acrylics for years, but really got tired of all the filling and drilling involved, so about a year ago I had those soaked off and just got shellac manicures for about another year. But, since my husband and I are both wanting to work less now, I am trying to cut back where I can, and shellac manicures are rather expensive where I live ($50!). So, the last time I went to the salon I just got a plain old manicure and left it at that. But, not being one to just leave well enough alone, I decided to try out these Lime Crime “Pop On Nails” I saw on their site a while back. I’d never been able to try them before, because of the aforementioned acrylics, so I figured while I had naked nails would be the best time to try.

popon

I’ve never tried press-on or glue-on nails before, and I was actually nervous about how these would turn out. I held onto them for several weeks, but then my sister and I decided to make one more hotel trip out to the Woodlands to see Chicago and REO Speedwagon (shut up, I’m old) so I figured that was as good a time as any to give these a go. I was really surprised by how nice they looked. I had to shorten and file them a little because they were pretty long, though:

wine

I don’t drink; that was actually my sister’s glass of wine

I loved them so much I ended up buying all the other available colors of them I could find online (they were limited edition at Lime Crime) but before I got them all in, I discovered some nails I like even better – the ImPress brand you can get at any drugstore or even (in my case at least) the grocery store.

impress


I actually prefer these ImPress nails because they are much easier to apply, and they hold up better. The Lime Crime ones look amazing at first, but they have to be applied with nail glue and the first time I applied them I used WAY too much and spent about an hour melting them off my fingers with acetone. The ImPress nails actually have adhesive already applied to the nail, so you just peel the backing off and stick them to your nails.

Photo Jul 09, 7 42 03 PM

I have always had seriously wrinkly fingers! When I was a kid classmates would call me “granny hands.” Kids are assholes, BTW. 

Both brands stayed on for a week (the ImPress ones are still on as I type this) but I must say that after a few days the color was starting to flake and peel off the Lime Crime nails, and every little scratch or scuff showed on the surface so that by the end of that week, they looked a lot worse for the wear. So far, the black Impress nails aren’t showing any wear and still look like new. I haven’t tried to take these off yet, so I can’t speak to how hard they will be to remove, but all the reviews say they are easy enough to do and I know I didn’t overdo it with adhesive this time. I’m so pleased with these nails, especially since the ImPress ones are easy to find, are inexpensive (around $7 for 30 nails) and are quick to put on. I never liked getting my nails done, although I do still get pedicures (ImPress actually makes press on toenails, too, but I just can’t go there), but I always loved the look of the acrylic nails, and these are a really practical and nice alternative.

newroomjump1

Another thing I’ve done recently is volunteer to be a Democratic precinct chair for my precinct. I do not yet know what this means, but there is a meeting for all of the Democratic chairs for Precinct 3 this Wednesday, so I’ll find out my duties then. With the mid-term elections coming up, I am sure it will entail a lot of phone calls and block-walking, which I do not look forward to, but the opportunity was there for me to fill an empty chair and even though I didn’t really want to do it, with everything going on right now I felt it was important to do it anyway. Especially being here in Texas, where so many of these immigrant families are being torn apart. By the way – our city’s mayor, Sylvester Turner, is awesome, and in no way supports these policies the Trump Administration has tried to implement and bungled so stupendously. He and our city’s police chief Art Acevedo are both very strong, progressive voices for reasonable immigration policy and gun control; Acevedo in particular has gotten a lot of attention lately for his outspokenness on both issues. Houston, even though it’s deep in heart of red, red Texas, tends to have Democratic mayors, and Fort Bend County – which is the county where I live – is statistically the most diverse county in the country. A lot of Fort Bend is more purple than red, except for – you guessed it – precinct 3, where I live, which is the reddest area out here. So block walking for the Dems should be an adventure. If I get shot, well, I can’t complain. I’ve had a better life than most…only partly kidding about this!

bossy1

I also discovered Venessa Arizaga’s jewelry lately, which, if you haven’t checked her out, you really should. I know a lot of her stuff looks insane, and her prices aren’t cheap, BUT the pieces look much better on that they do just sitting there against a white background, and if you get on her mailing list she has major sales ALL the time. I got a TON of her stuff during a recent 50% off all sale event, and things like that bracelet above I got for a steal. It was already reduced to  $27 and I got it for 50% off that, when it was originally fifty bucks! I now have a ton of her necklaces and bracelets and they are just what I like. I actually don’t care for metal jewelry, and much prefer necklaces and bracelets made of leather or cloth material, which is pretty much her thing. And everything is made to be worn with other items and really layered together, like so:

floorseat1

It all is very light and works well together – although I will say, I bought one of her shell chokers and it was literally choking me; I had to buy a necklace extender just to fit it around my neck. That one also isn’t very comfortable; the shells are heavy and the material is itchy. But other than that, everything I have bought from her I’ve loved.

coldshoulder1

Oh, and I have a few other things I’m keeping busy with right now – for starters, I am really trying to learn Spanish, and so far am having little luck. I’m using Babel, and there a few damn verbs I just can’t get a grasp on (those damn ‘to be’ verbs are killing me) and trust me, if I were taking this as a class I’d be failing right now. But using the app is actually helping me understand what it’s like to struggle with English grammar and spelling, which helps me with my tutoring, so it’s all good, even if my Spanish never gets up to snuff.

charlotte1

The thing I am more excited about than that, though, is that I am learning how to sew. I haven’t officially started yet, because my sewing machine doesn’t arrive until tomorrow (I tried to borrow one from my mom but hers was broken), but I’ve got a good book to work with that jumps right in to working with simple patterns like making headscarves and simple skirts. I’ve been wanting to learn how to sew forever (I was forced to take sewing in high school, and in a fit of misplaced feminist rage I refused to learn anything. This worked against me because not only did I not learn how to sew but I failed the class, which was less than impressive on my transcript. I failed cooking too, for the same stupid reason). I figure that most of the clothes I love to wear are loose, light, and pretty damn simple; I dislike zippers and buttons and fancy details, I tend to wear things I can easily pull on and off, and I don’t even like to wear prints, so how hard can it be to sew this stuff? Plus, I have so many things I don’t wear but would if I could just alter them a little, and let’s not even talk about the COSTUMES I could create for my photos! I really think I am going to love this new hobby, and hopefully, I will be better at it than I am at speaking Spanish.

doubleme1

As you can tell, I’ve also managed to take some photos too – so this all sounds like I’ve been way busier than I feel like I’ve been. Especially when I mention that I am taking one more trip with my sister at the end of the month to Galveston, but honestly, most of these trips I’ve taken have been her idea, and she’s done the planning while I’ve just tagged along. I promise there has also been a LOT of nap-taking, TV binging, and Candy Crush playing going on this summer, too. In truth, I’ve actually started to get bored and look forward to getting back to tutoring my students again in August.

Oh, and one more thing – in trying to spend less, I recently opted to not renew a LOT of the features I’ve paid for in the past for this blog. I am honestly not sure what some of the stuff was I was paying for, so things might randomly go wonky here if I actually canceled something I should have kept. If that happens, I’ll figure it out eventually and get things back to normal. 🙂 It just seemed like I was spending lots of money every year for a blog I only post on about once a month now, so in a fit of frugality I canceled all the extra features. We’ll see what happens!

Lessons Learned

Lots to discuss. Mostly photography nerd stuff, but some other odds and ends as well, so let’s get to it.

On the tutoring front, things are going well. Surprisingly, I have enjoyed working with my two new elementary-school students (grades 4 and 5), so much so that I plan to pick up more younger clients down the road – I just haven’t done it yet as I currently have 5 clients total and am happy with my workload for now. But when I am ready for another wave of networking, I am going to send out my information to the elementary schools in the area, which I have not done yet, and offer my tutoring to the older-level kids; I don’t think at this point I want to work with emerging readers at all, but by fourth grade kids in general are definitely reading on their own, which is the point at which I can step in and help.

And on the art project front, a longtime blogger and follower Charlotte Hoather presented an idea to me in a way that really made sense to me, and gave me a path to follow with some of the opportunities that are on the horizon.Not that I’ve actually put a package together yet; I am still working out the kinks of functioning productively with my new schedule (meaning for the most part, I am still wasting WAY too much time goofing off as opposed to working on projects) but even that is getting better. It’s been almost a year now since I left my former school, after all, so at some point I was bound to get used to my new life; it seems to finally be happening.

So now, on to the photos:

antionette1

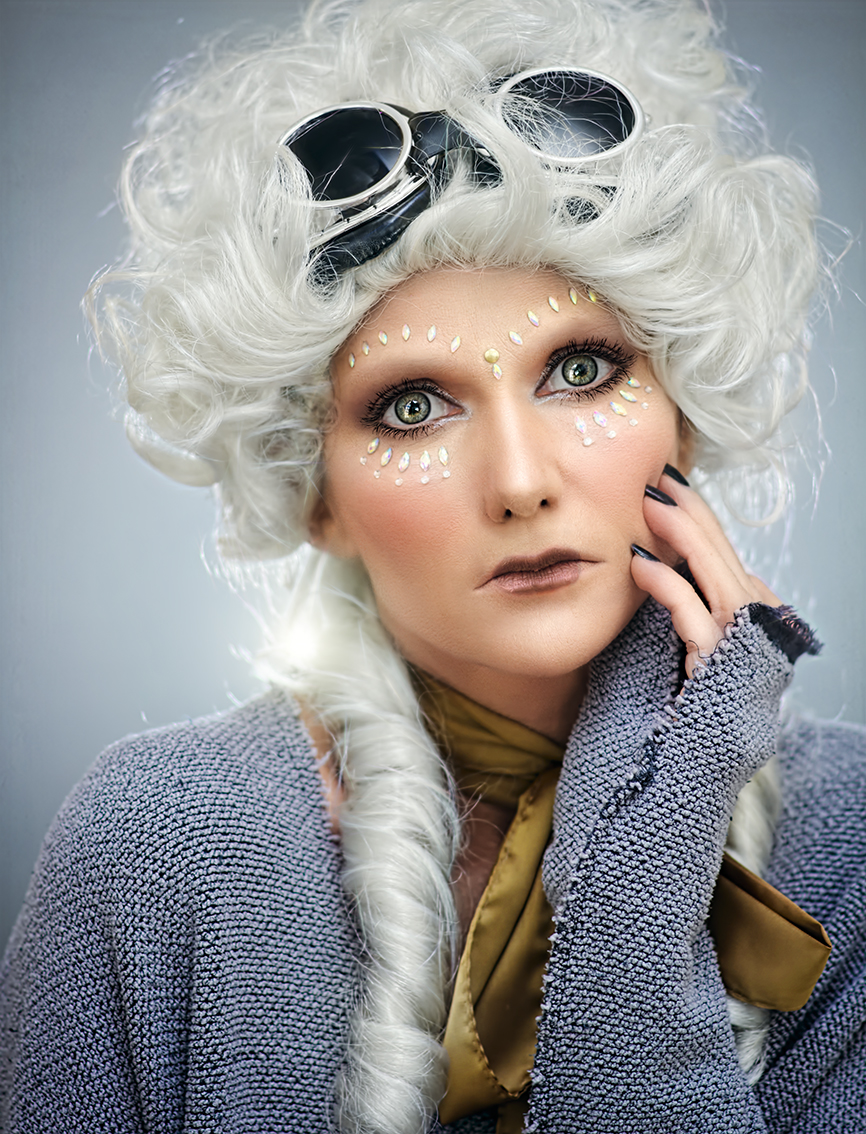
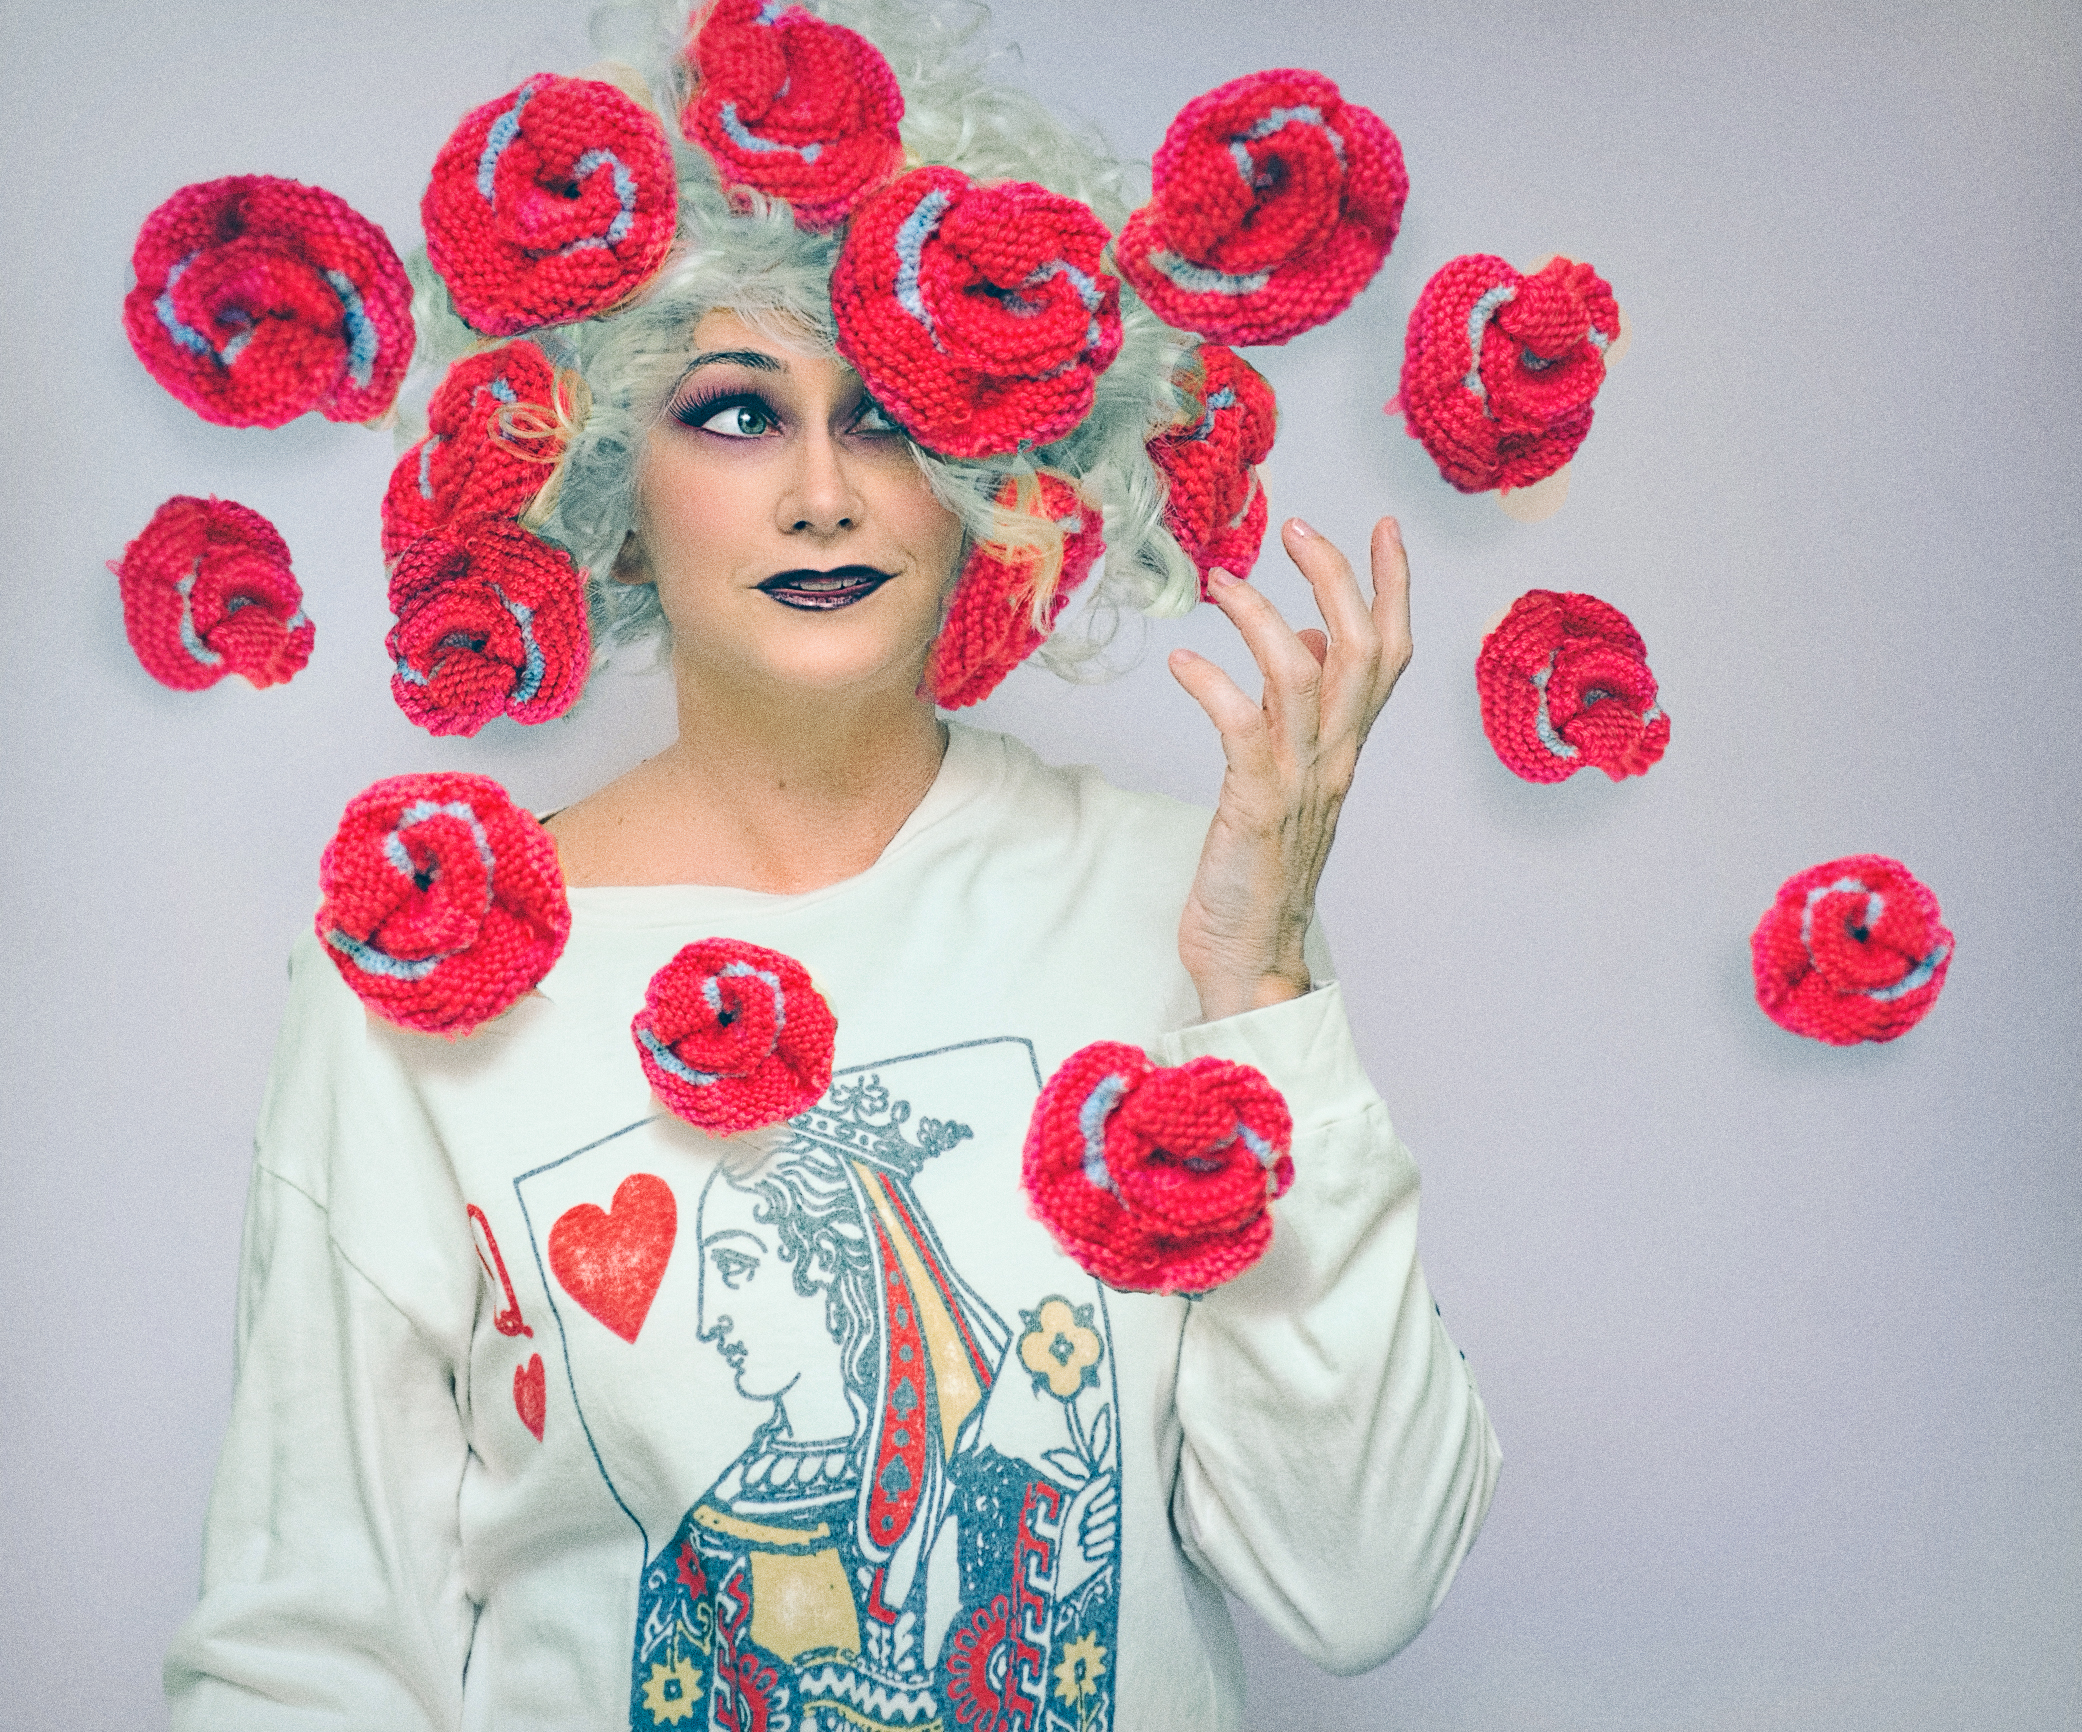
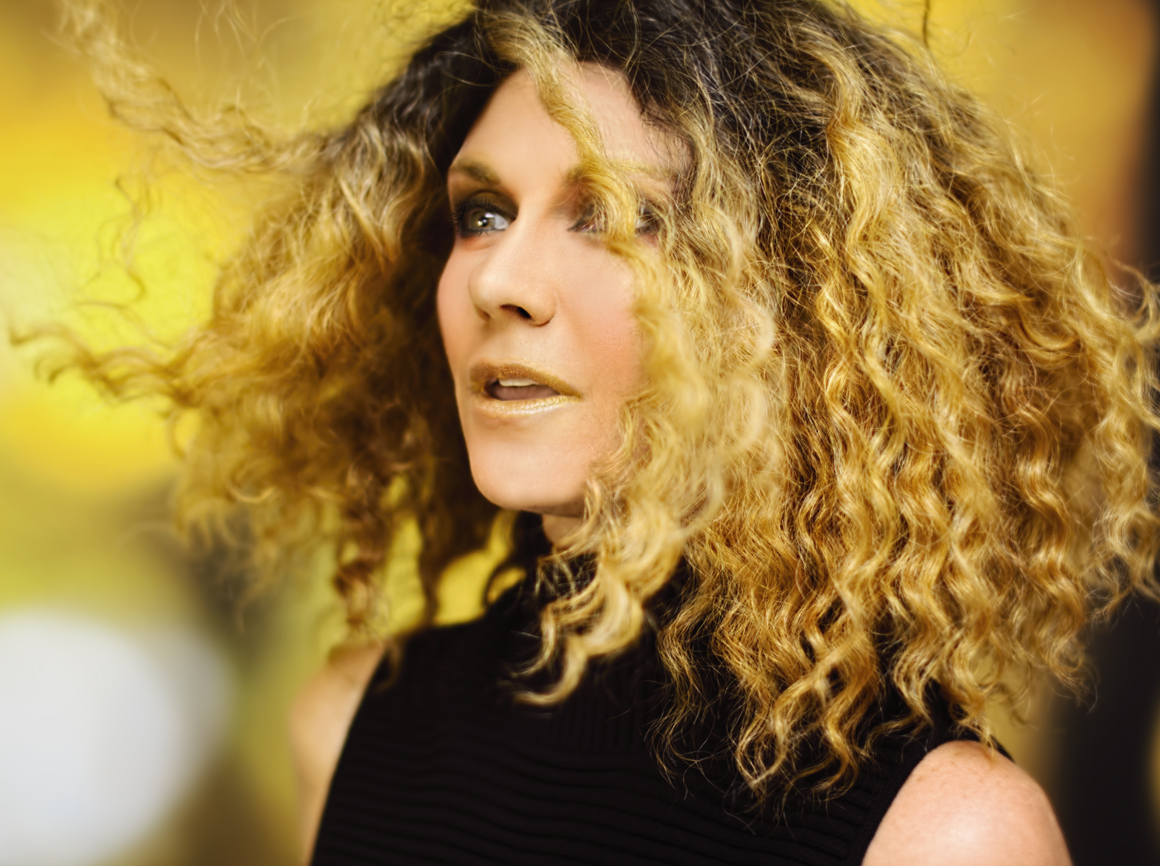
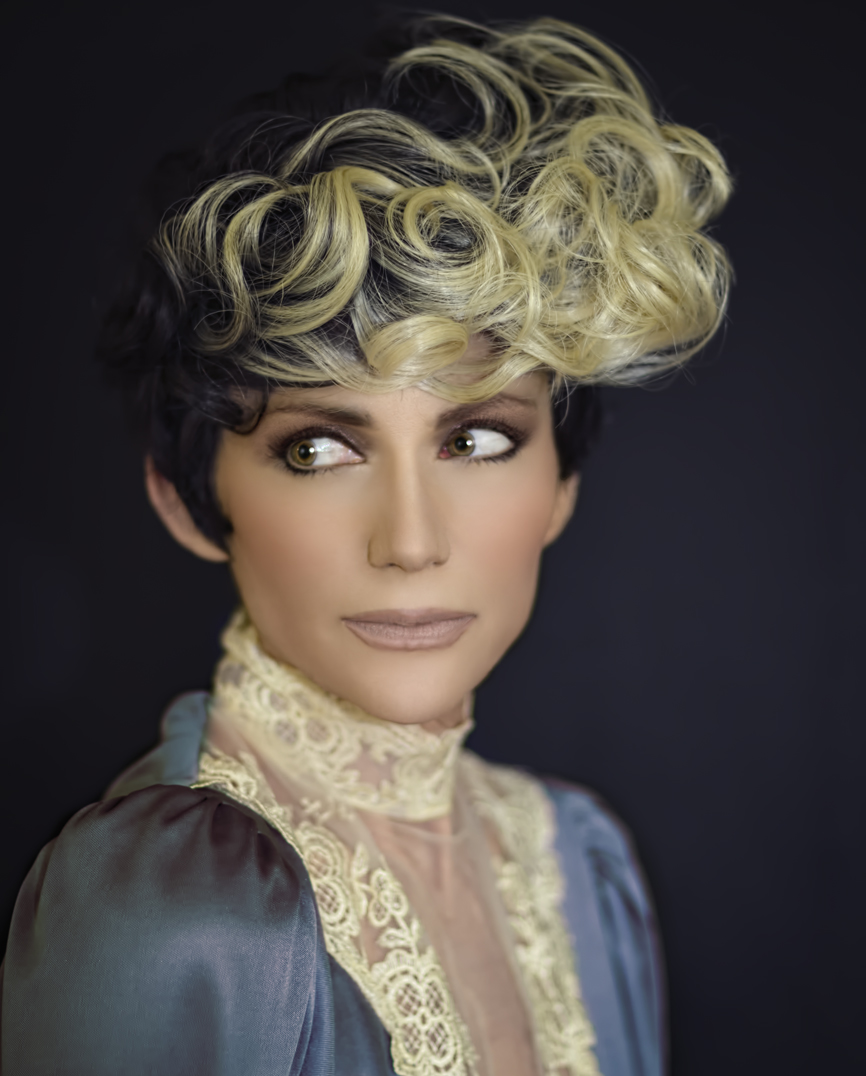
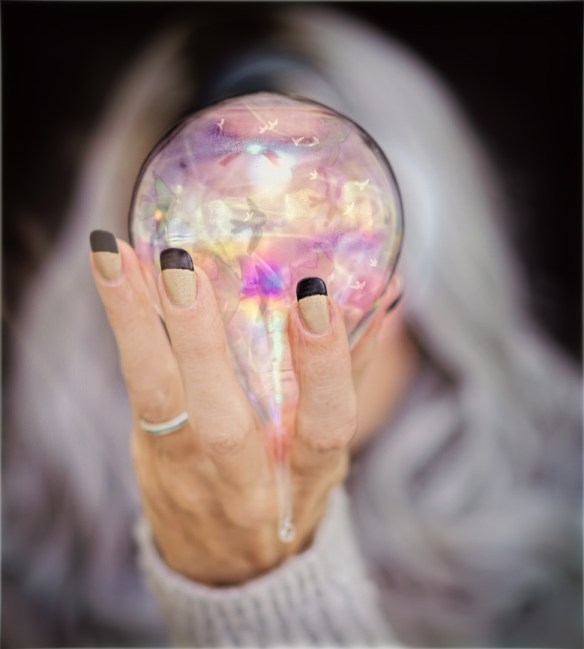
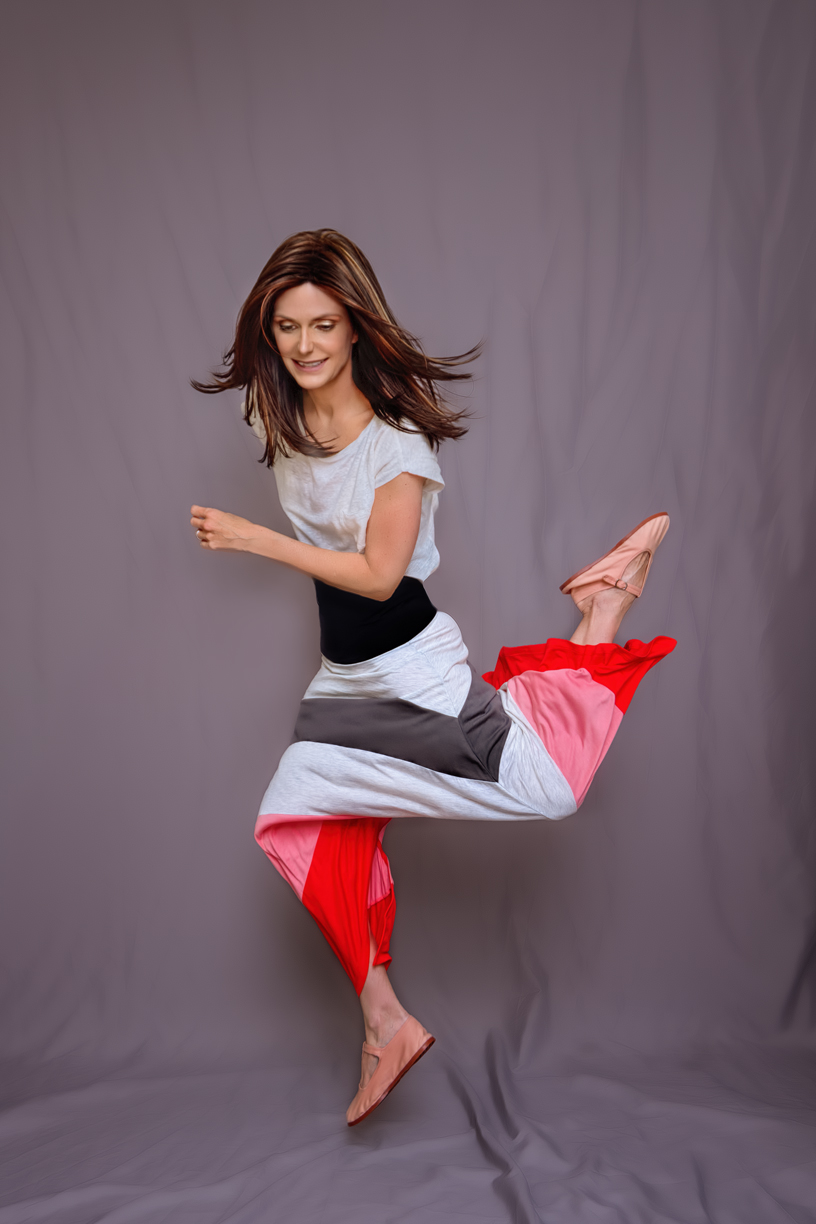
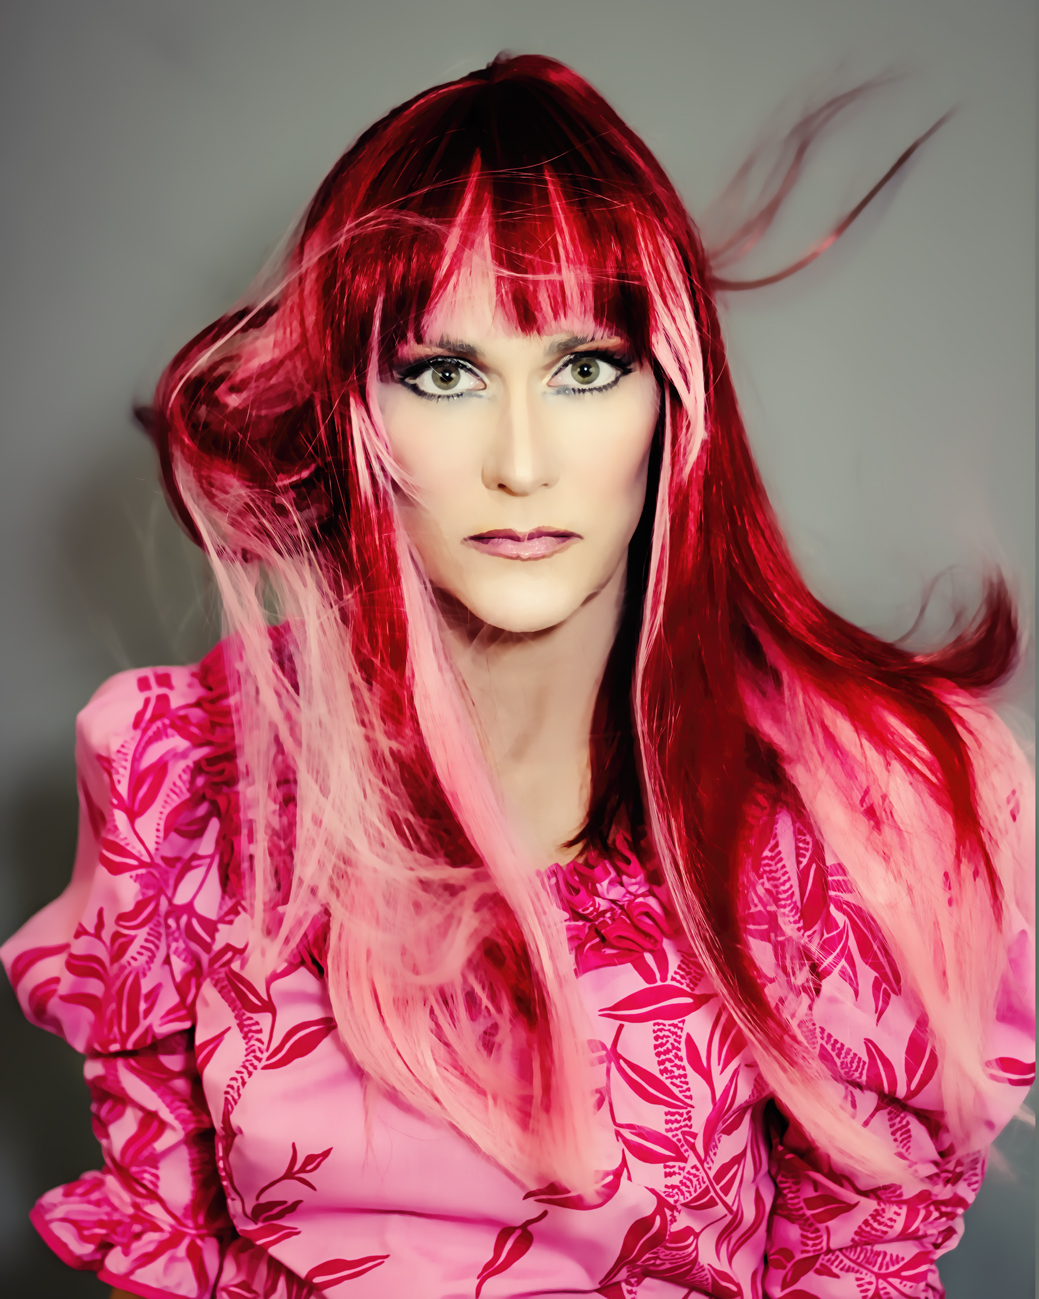
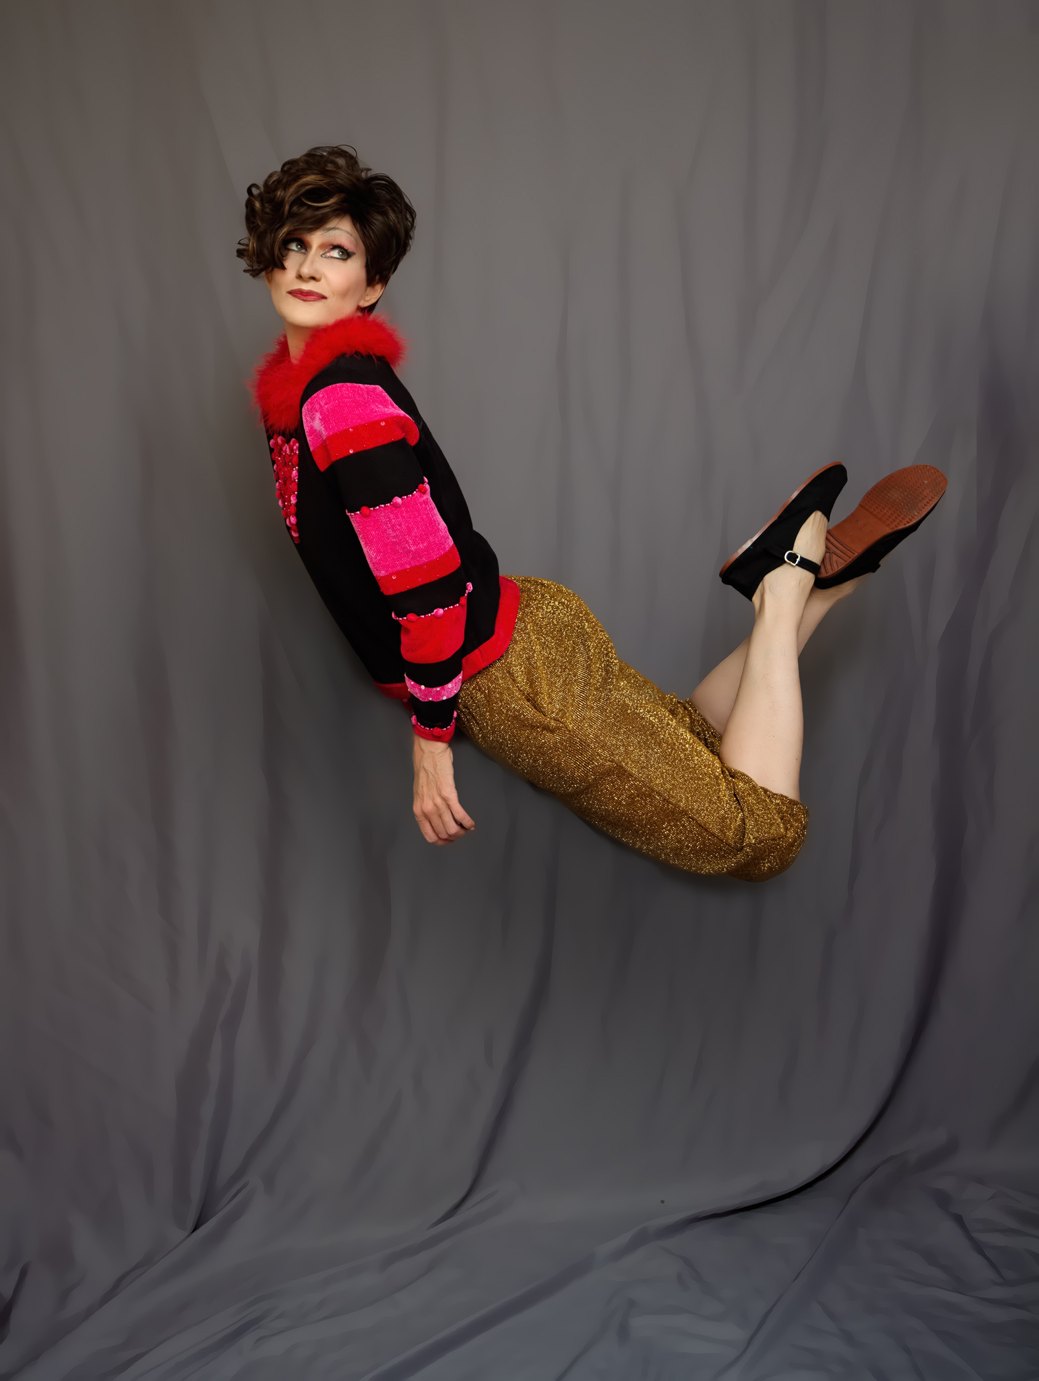
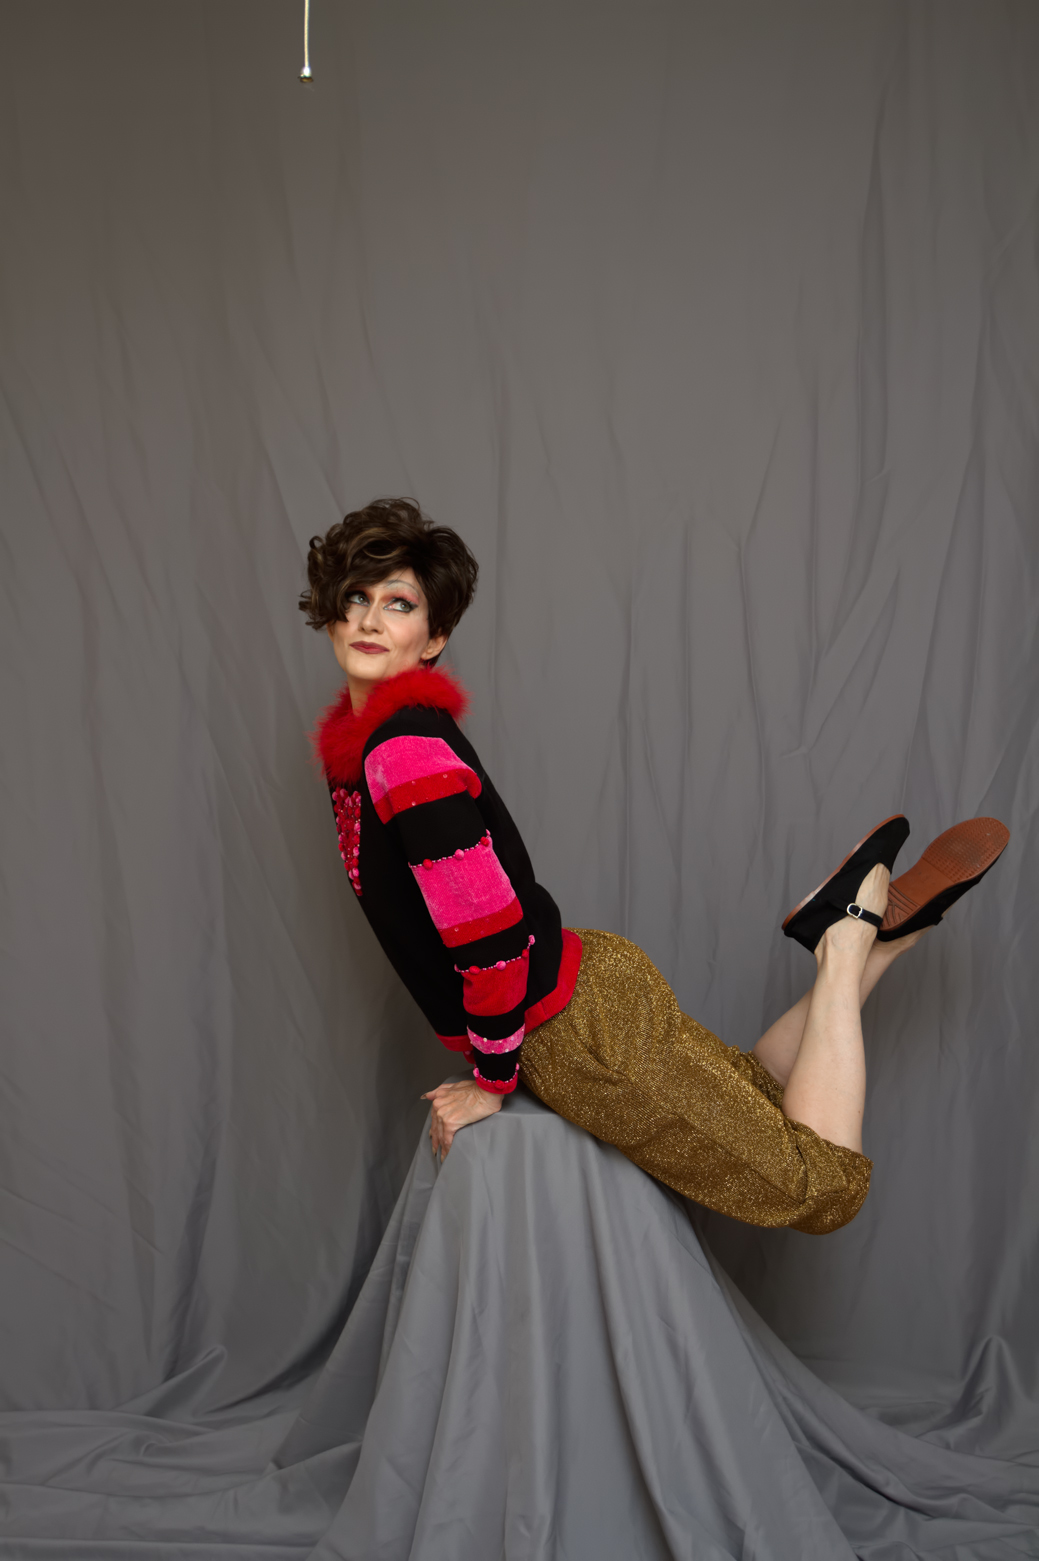
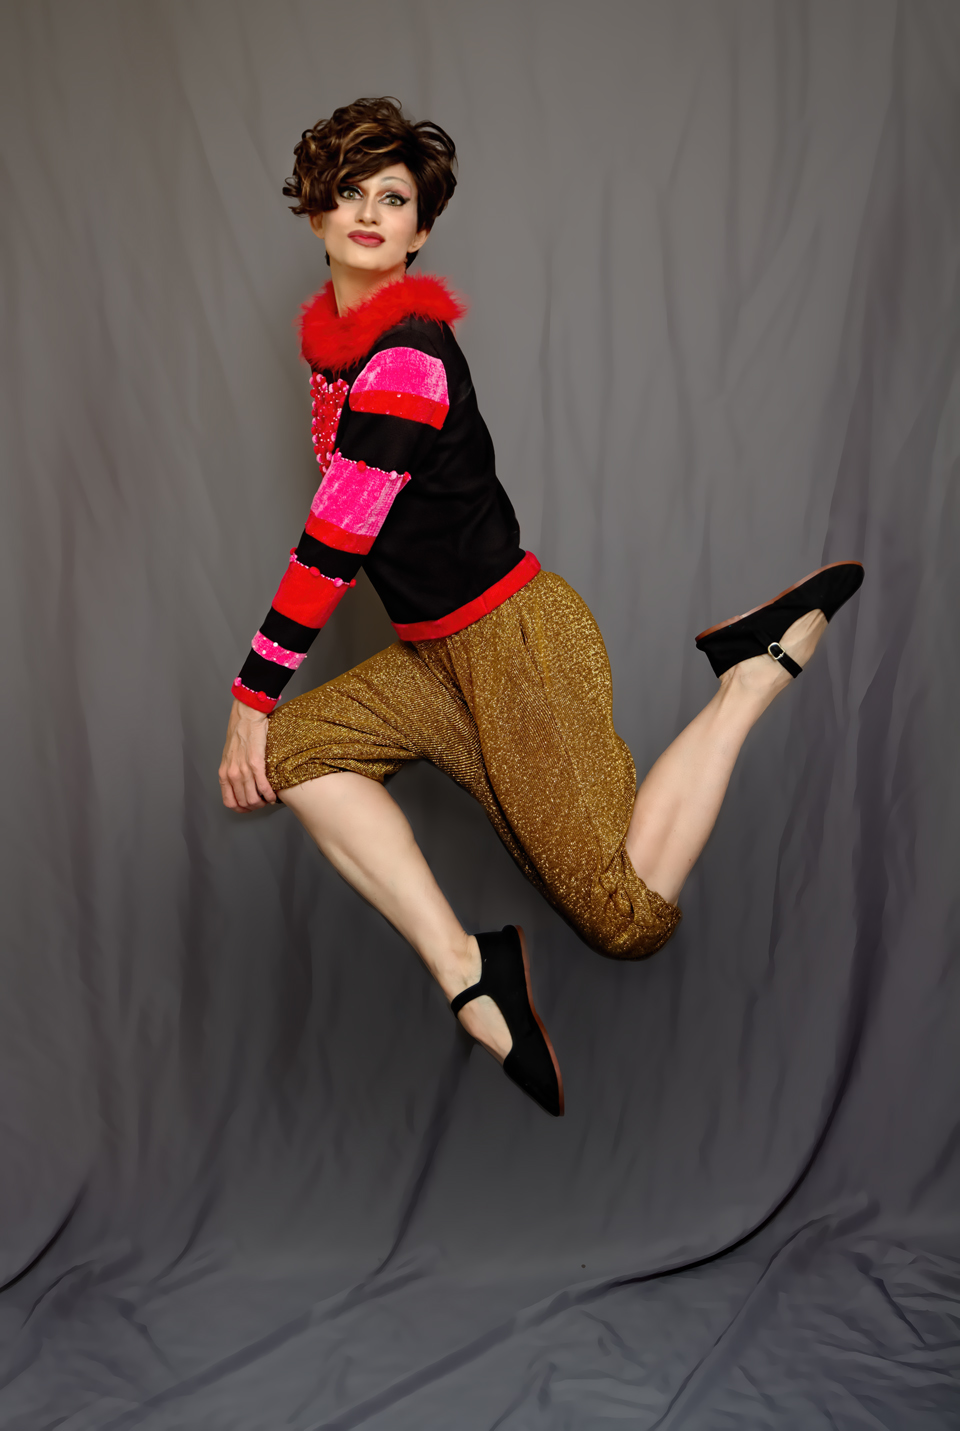
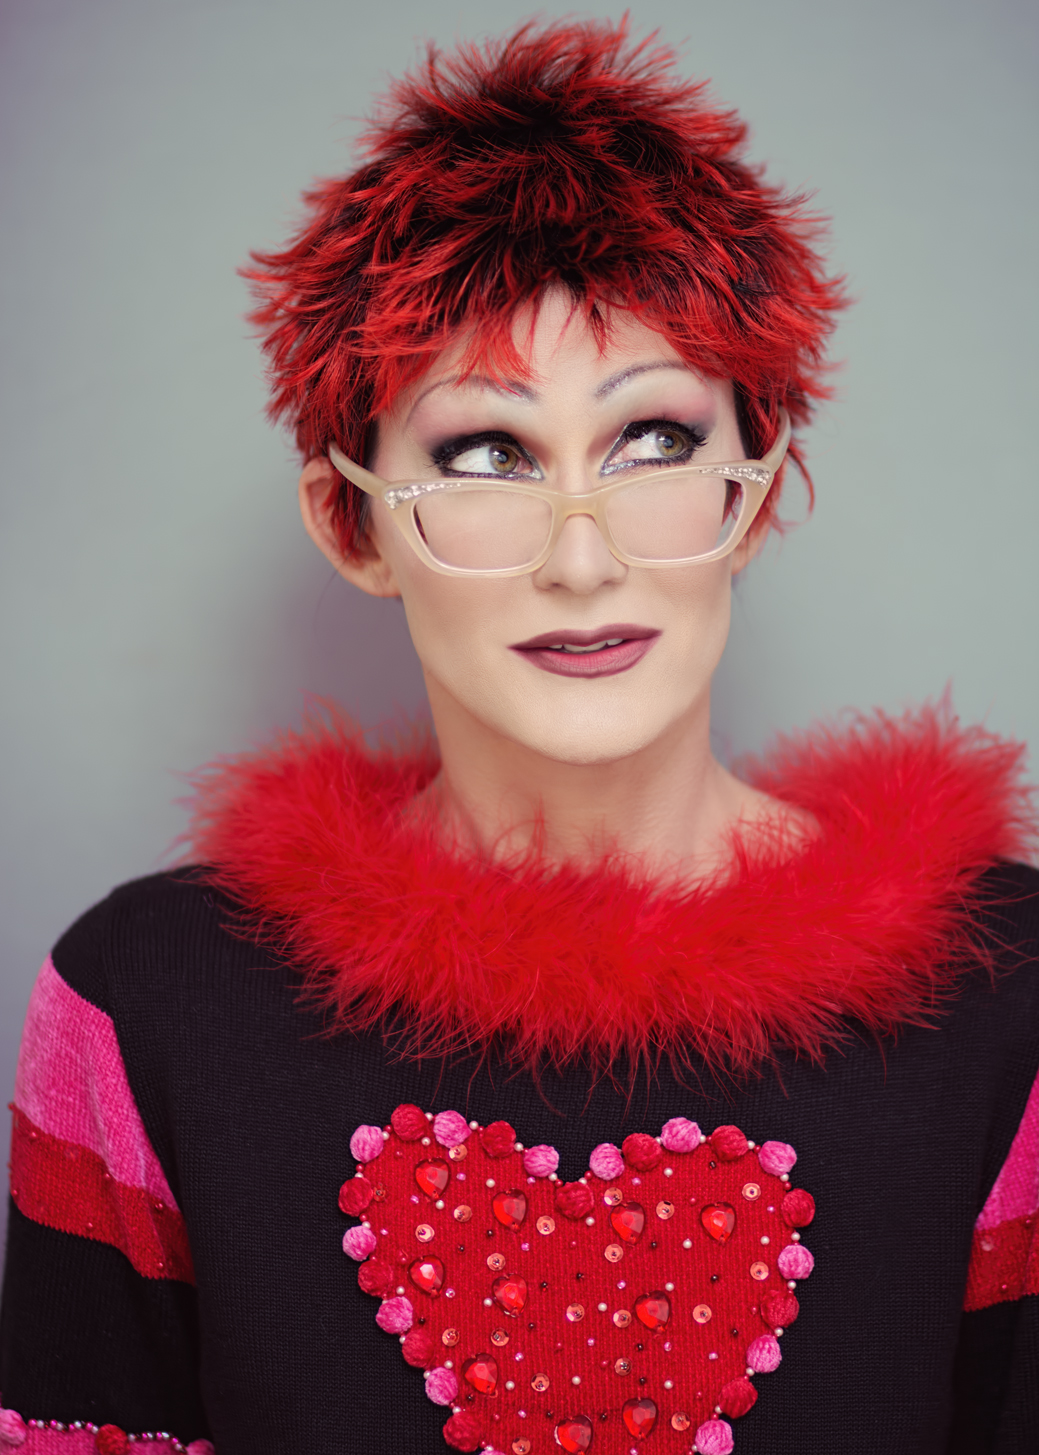
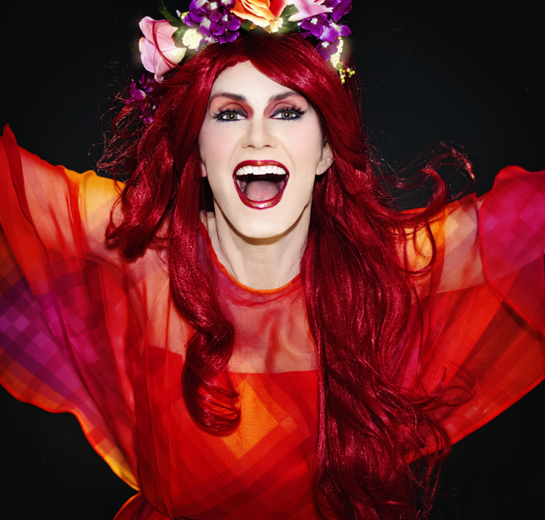
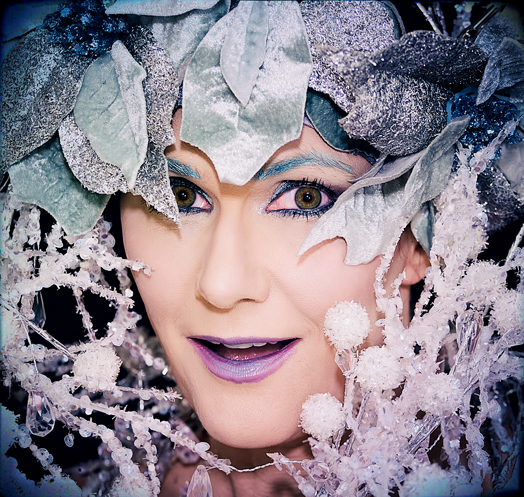
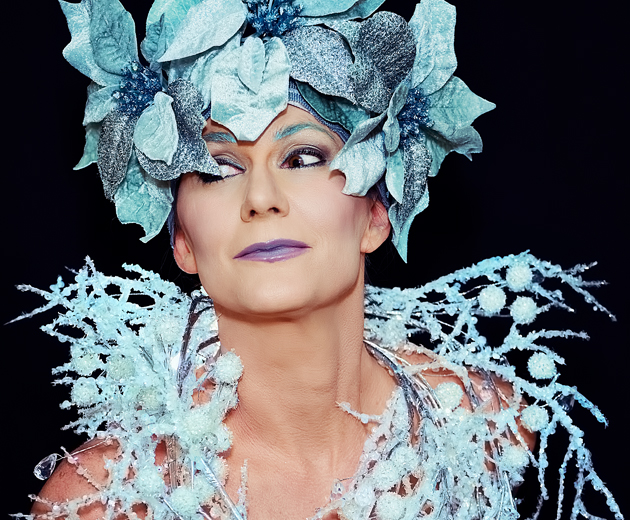
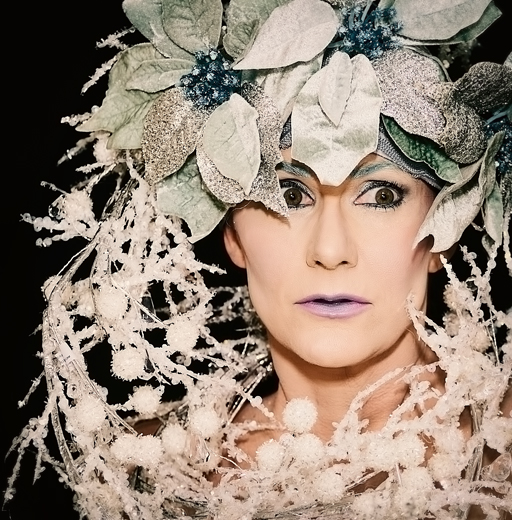
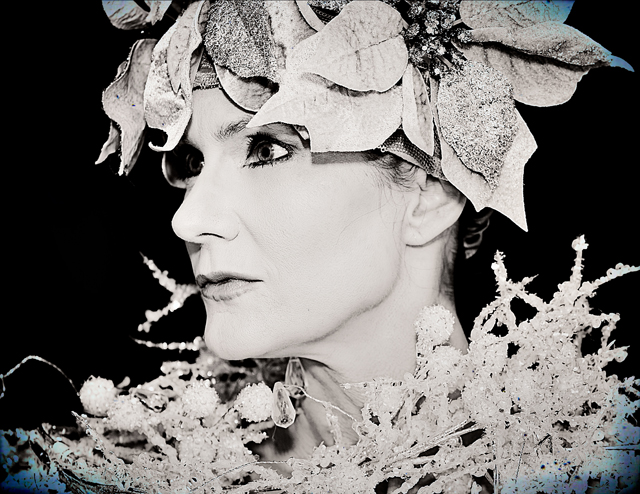
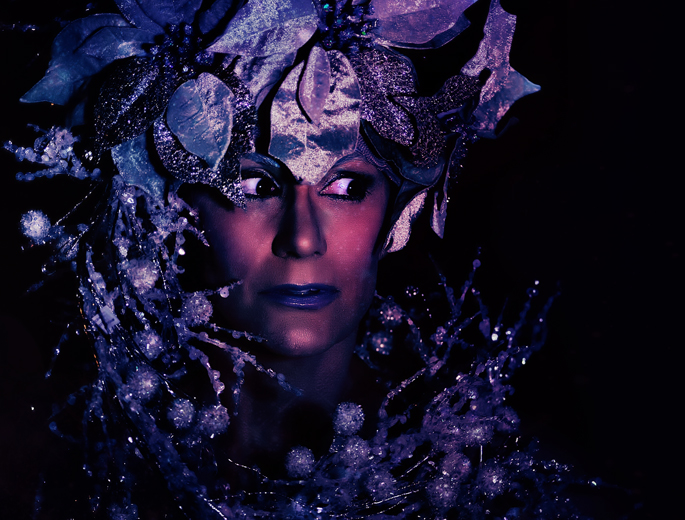
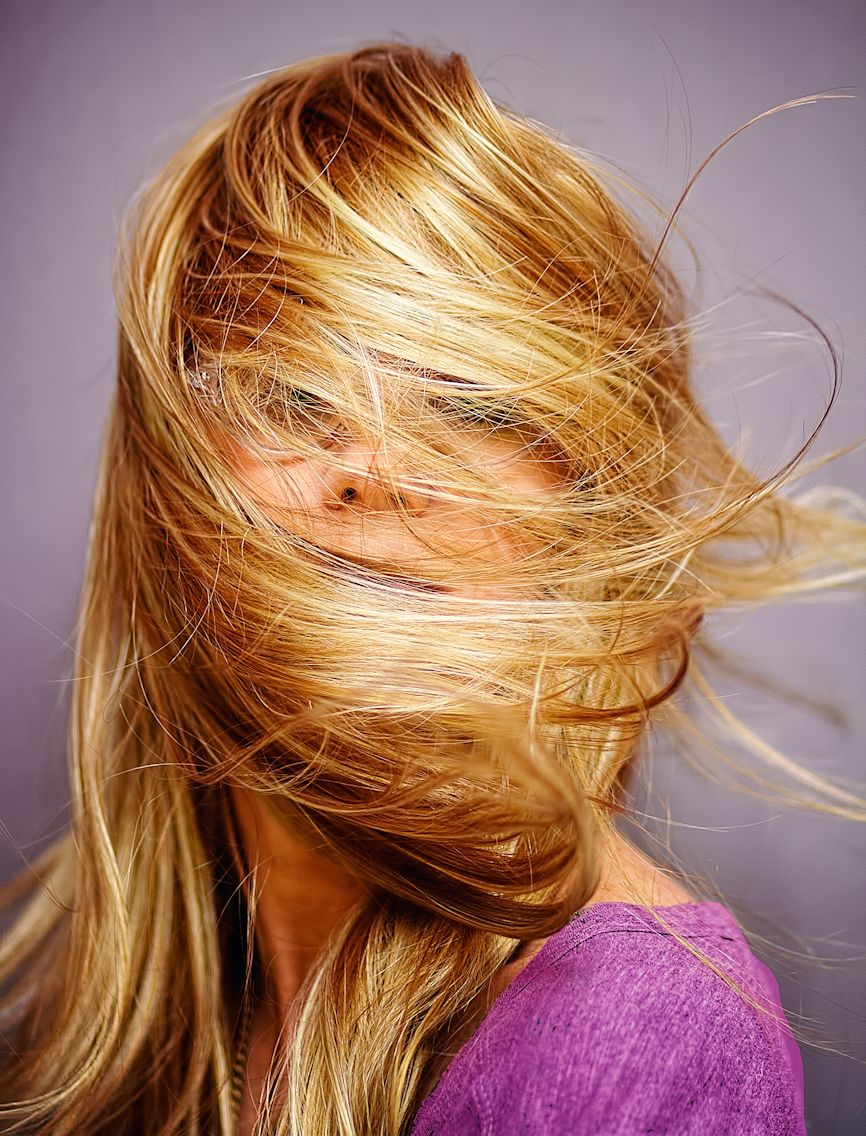
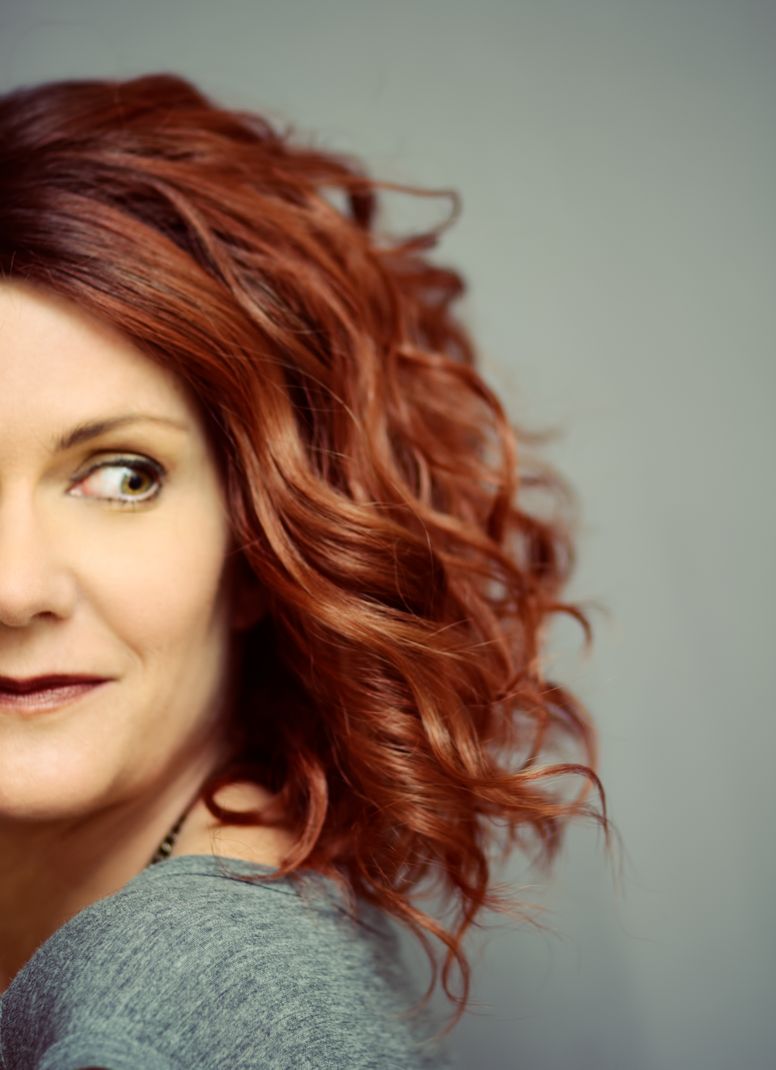
I have been in a SERIOUS photo-taking mood lately; partly because I have had whole days to myself here and there, partly due to making some cool purchases lately I’ve been excited to work with (of the prop, costume, and software variety), and also due to learning some new techniques I am still perfecting. The results of all this have been mixed for various reasons, but the photo above is one example of a slam-dunk I’ve pulled off recently. Everything about that shot just works for me, and I’m really happy with it. Let’s get down to the specifics, for those that care. Or if you don’t, stop reading and just scroll and view the pics.
lion1a

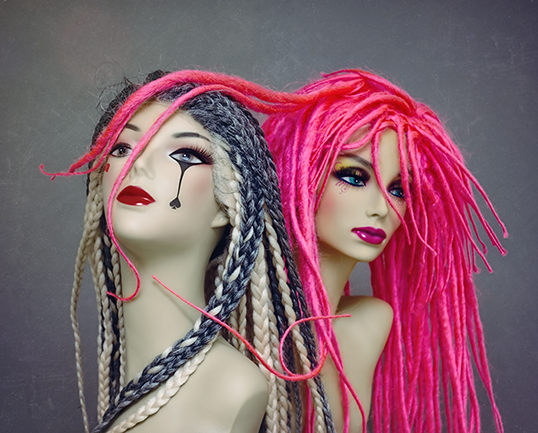
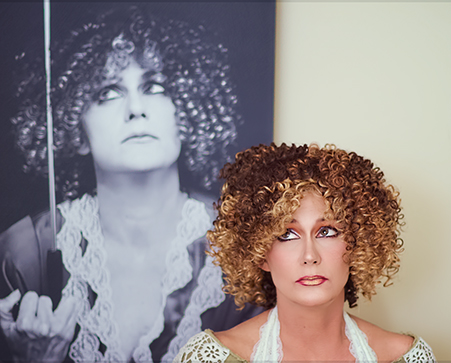
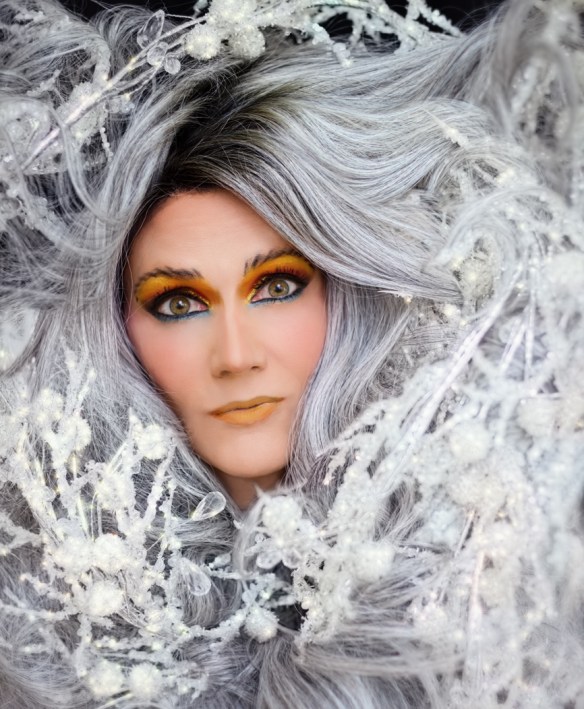
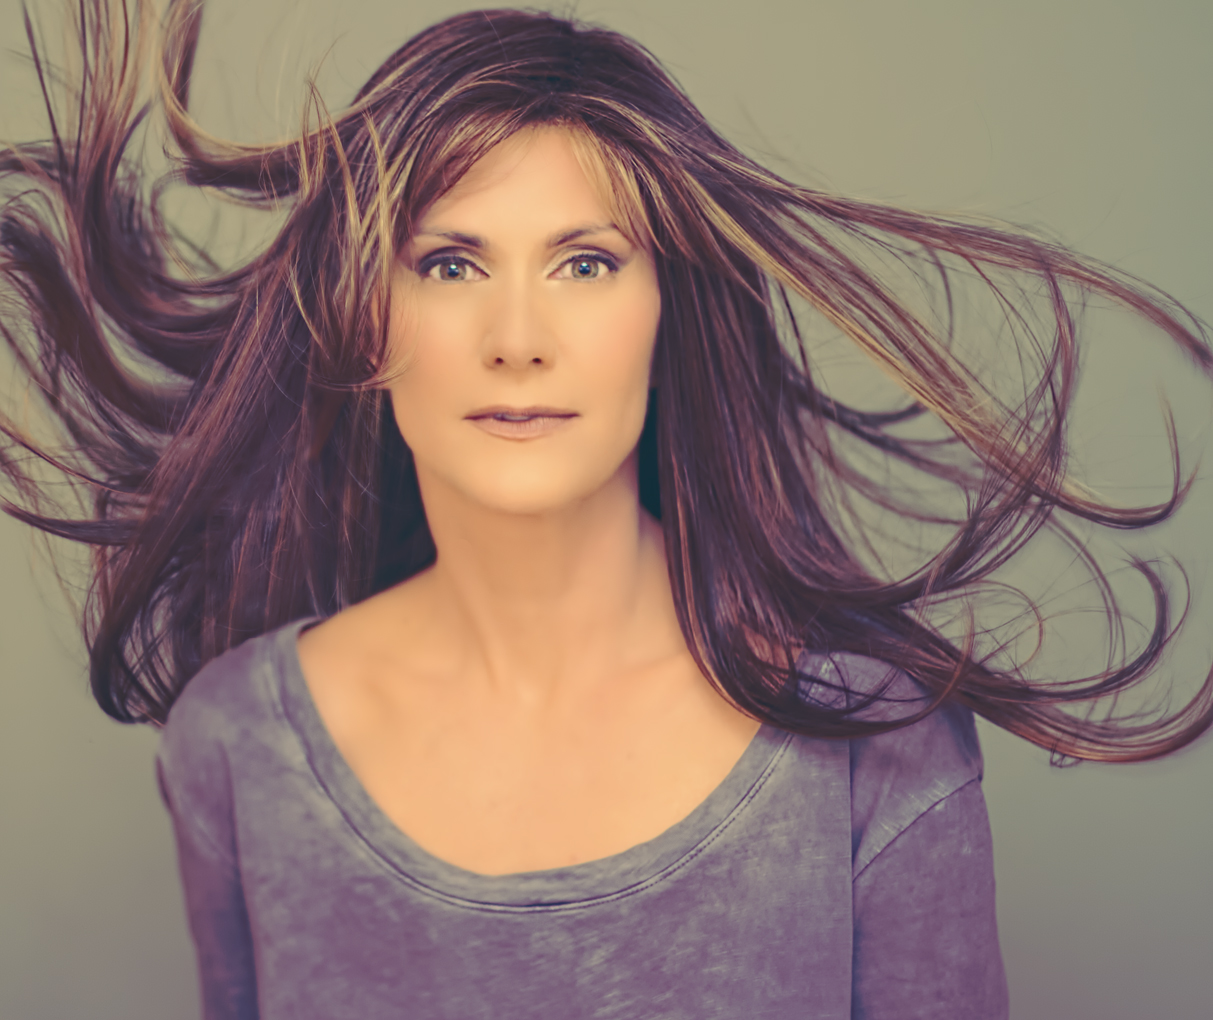
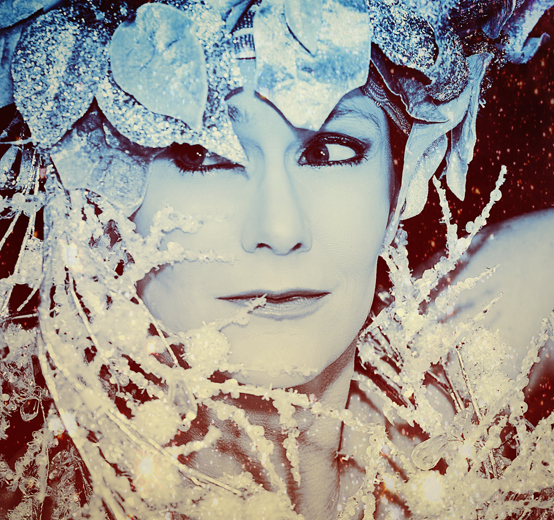
There’s two wigs on my head in this shot

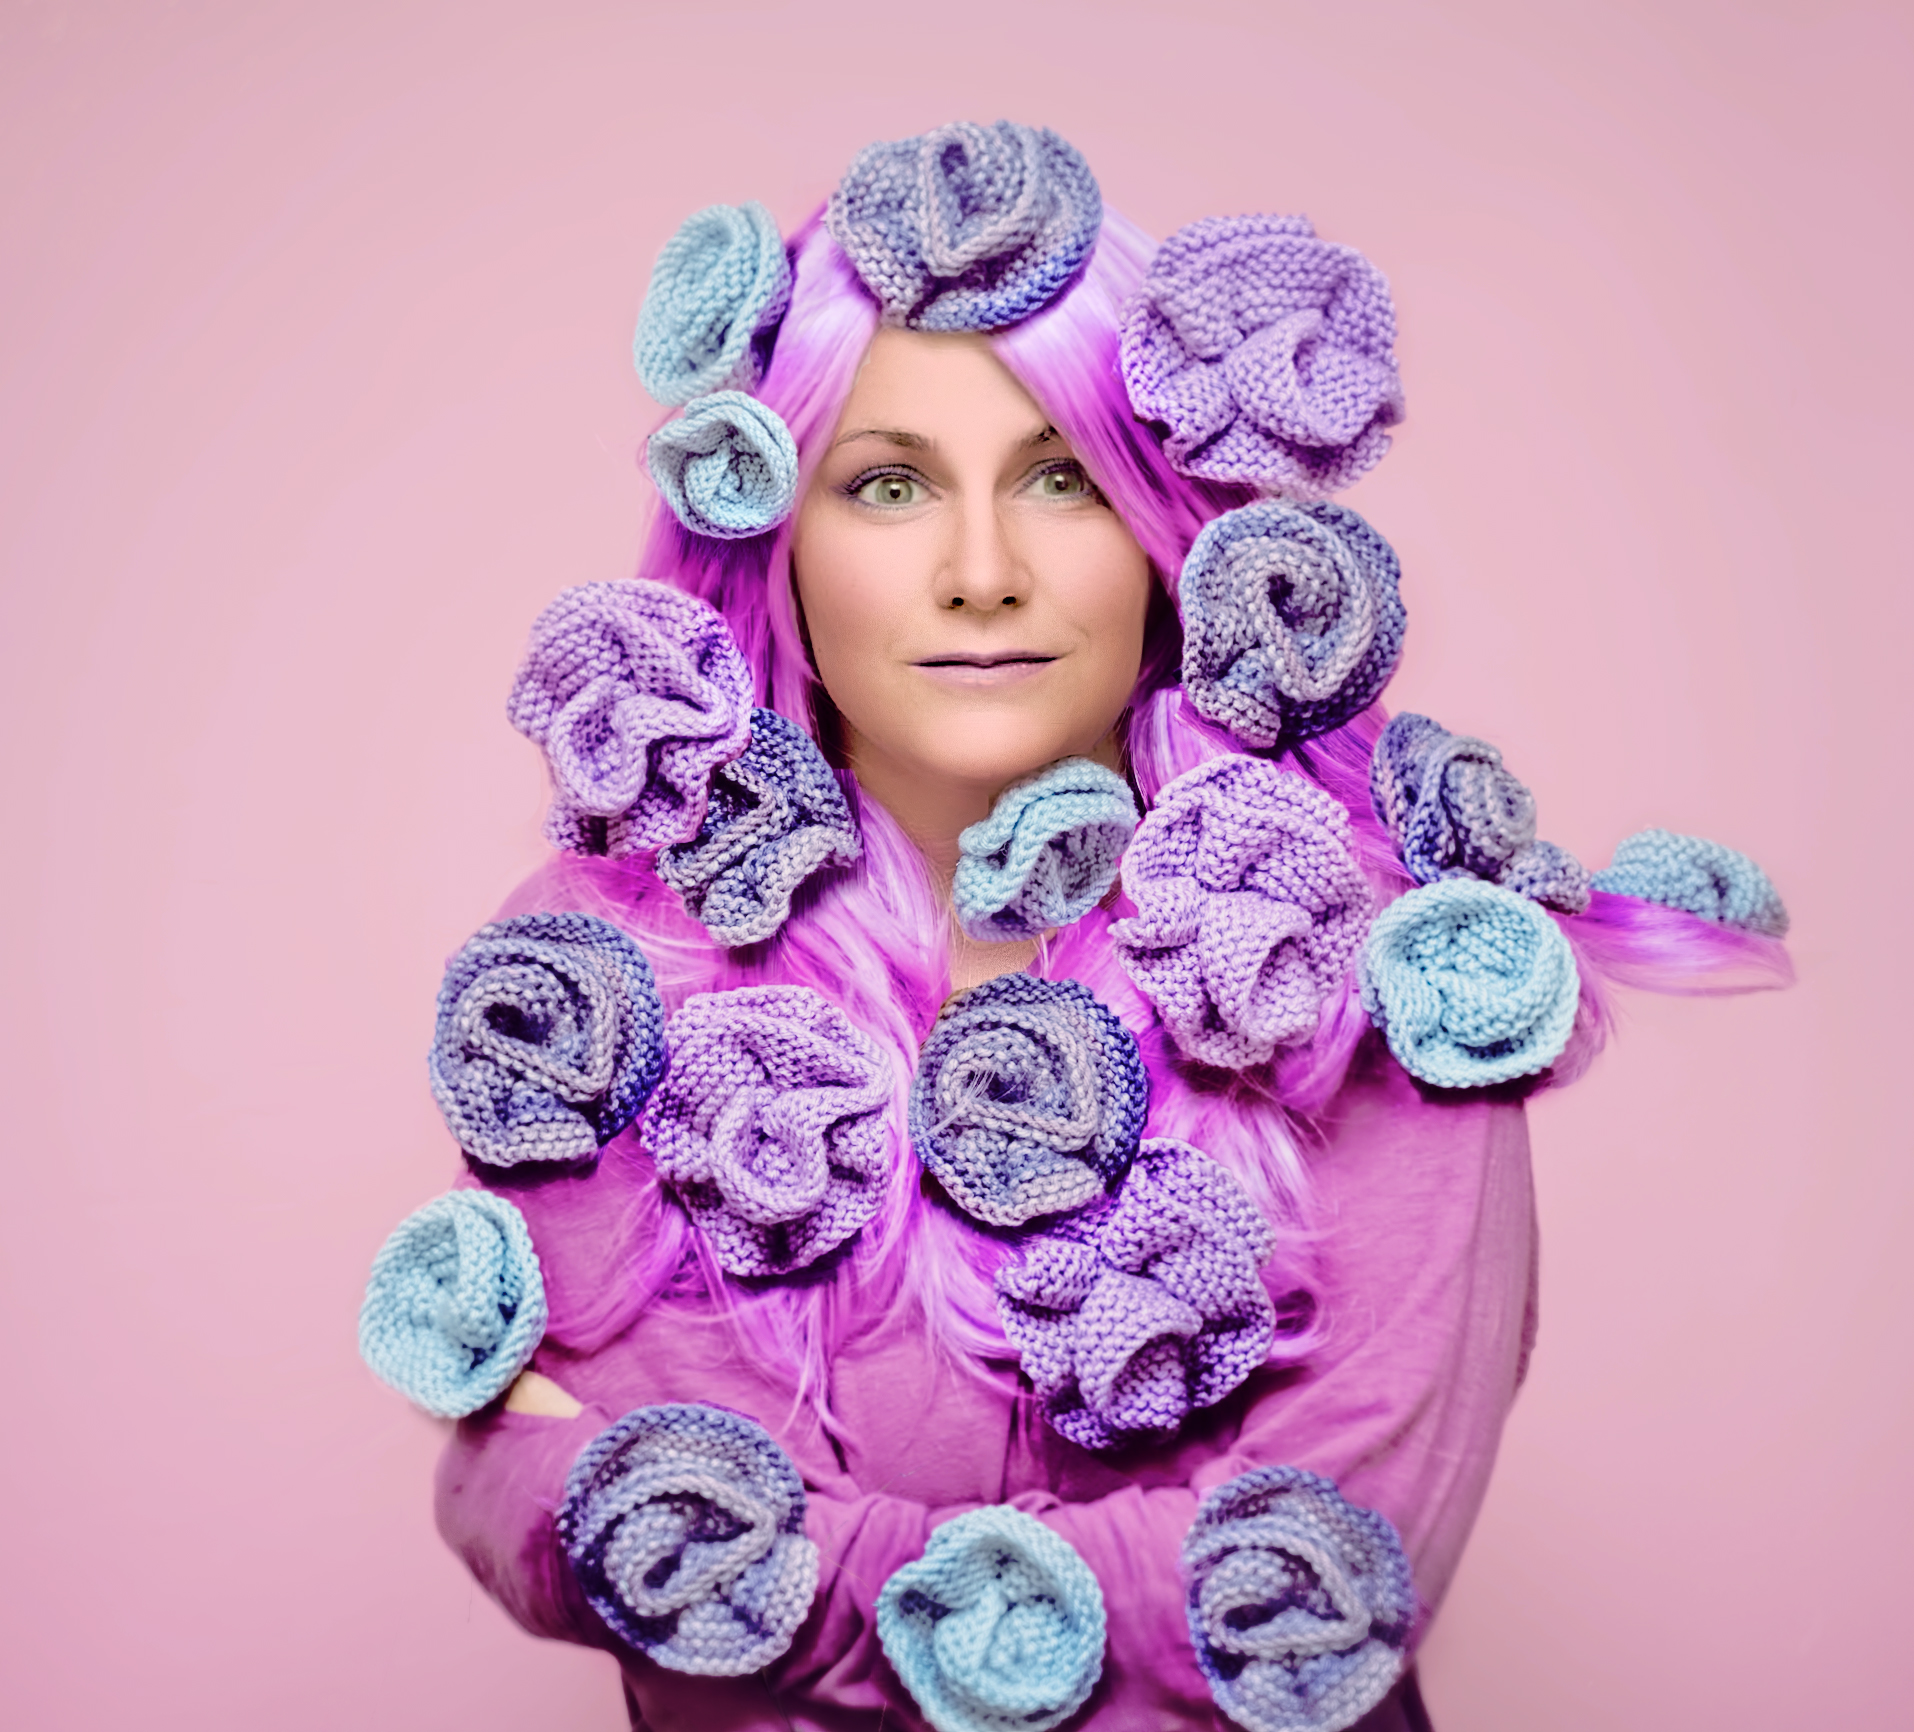
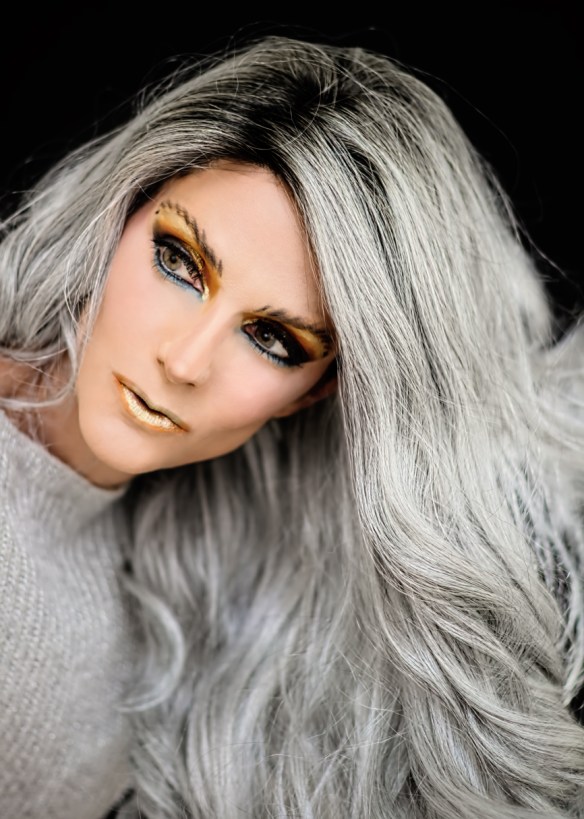
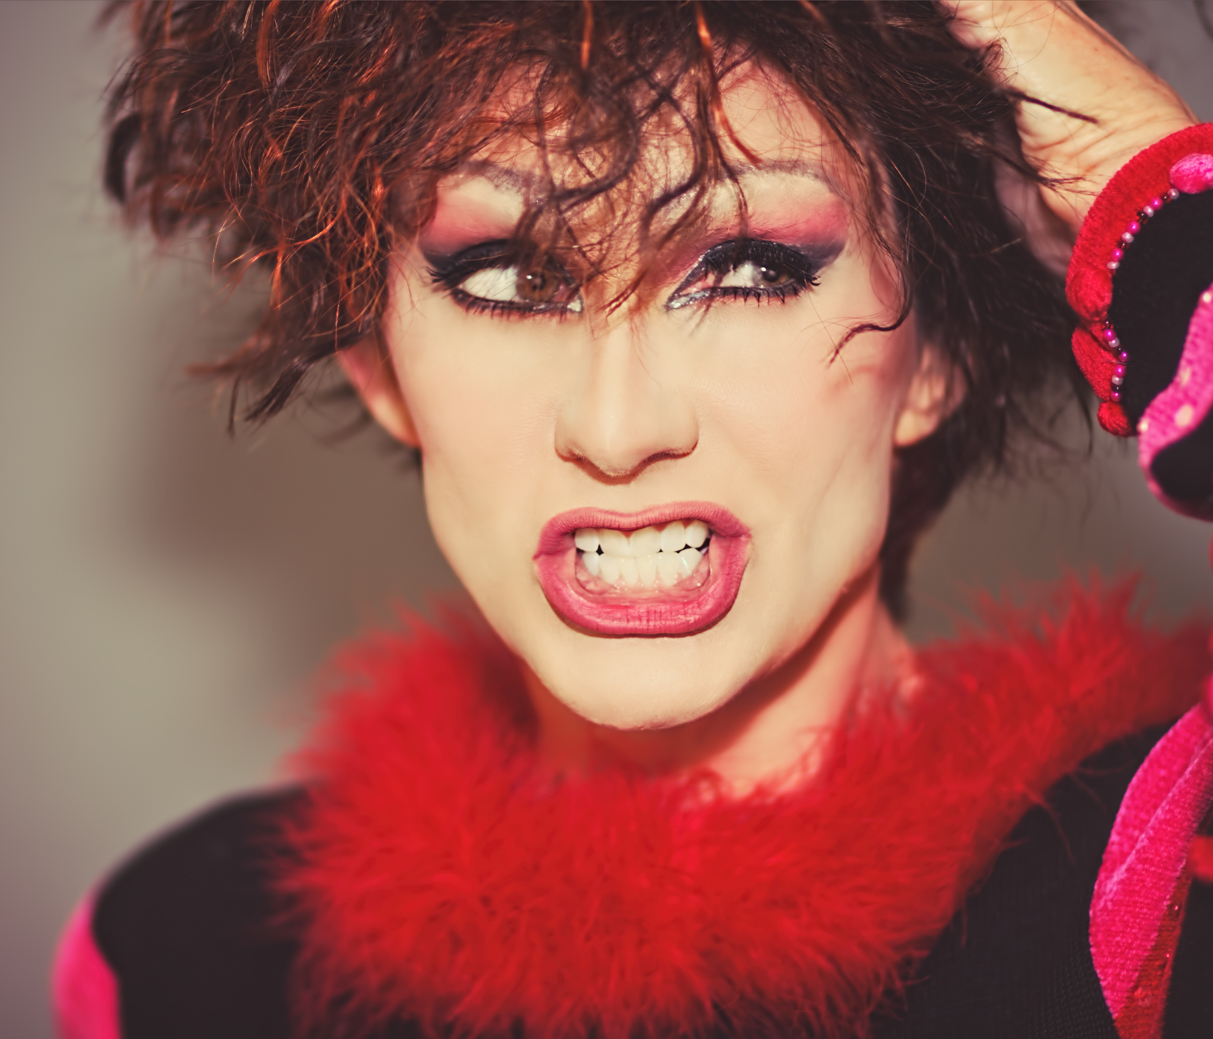
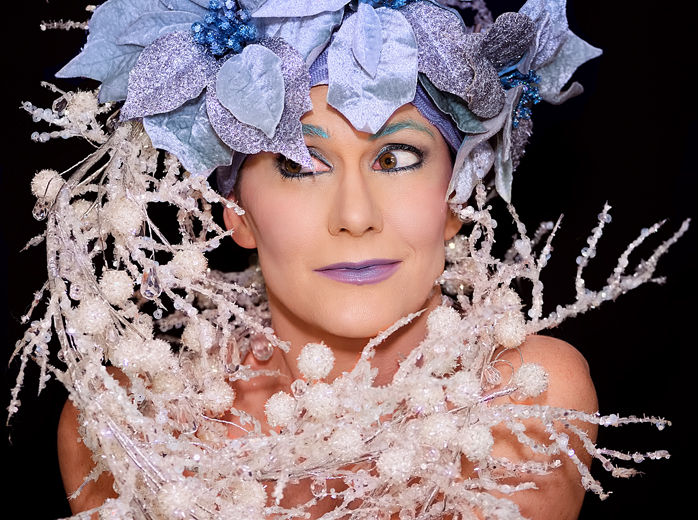
As far as props and costumes, back in December I purchased a few of these face crystal sets from Free People and I loved them, but they ran out and didn’t replace the few styles they had with anything new. The brand name FP was selling was called Body Baubles, and a quick Google search turned up a website where I could buy more sets to work with. I had a hard time choosing, but in the end I picked up 3 or 4 more sets to use (I can’t recall off-hand exactly how many). These first two shots above are using some of the “baubles” from that purchase. They are really great little accessories; the adhesive is pretty tacky (although I haven’t found them wearable more than once, and haven’t researched if there’s a way to extend their shelf life) so they definitely stay on for the duration of a shoot. I do wear them with a ton of makeup on, so maybe with lighter makeup they last for more than one wear. When editing photos, they are really easy to manipulate and move to different areas of the face, which is fun – I can put them on once and use them for several different looks, then change up where they are placed on my face via editing later. Sweet.

bighair1

A processing issue I’ve been addressing lately is my ongoing struggle with skin retouching. It’s so difficult to get it right, and for the most part the skin in my portraits has always come out too soft. It’s been bugging me for forever, but a few weeks ago I finally decided to do some internet research to try and add something to the skills I’ve already acquired via YouTube that could up my game. I found a pretty easy, albeit tedious, technique from another photographer that was pretty astounding in its simplicity – basically, you take a section of the skin that has good texture, copy it, run it through a few filters, and then paste onto sections of the skin that have lost texture and look too smooth. Not sure why I didn’t think of this before, except for the fact that it is very time consuming and boring to execute.

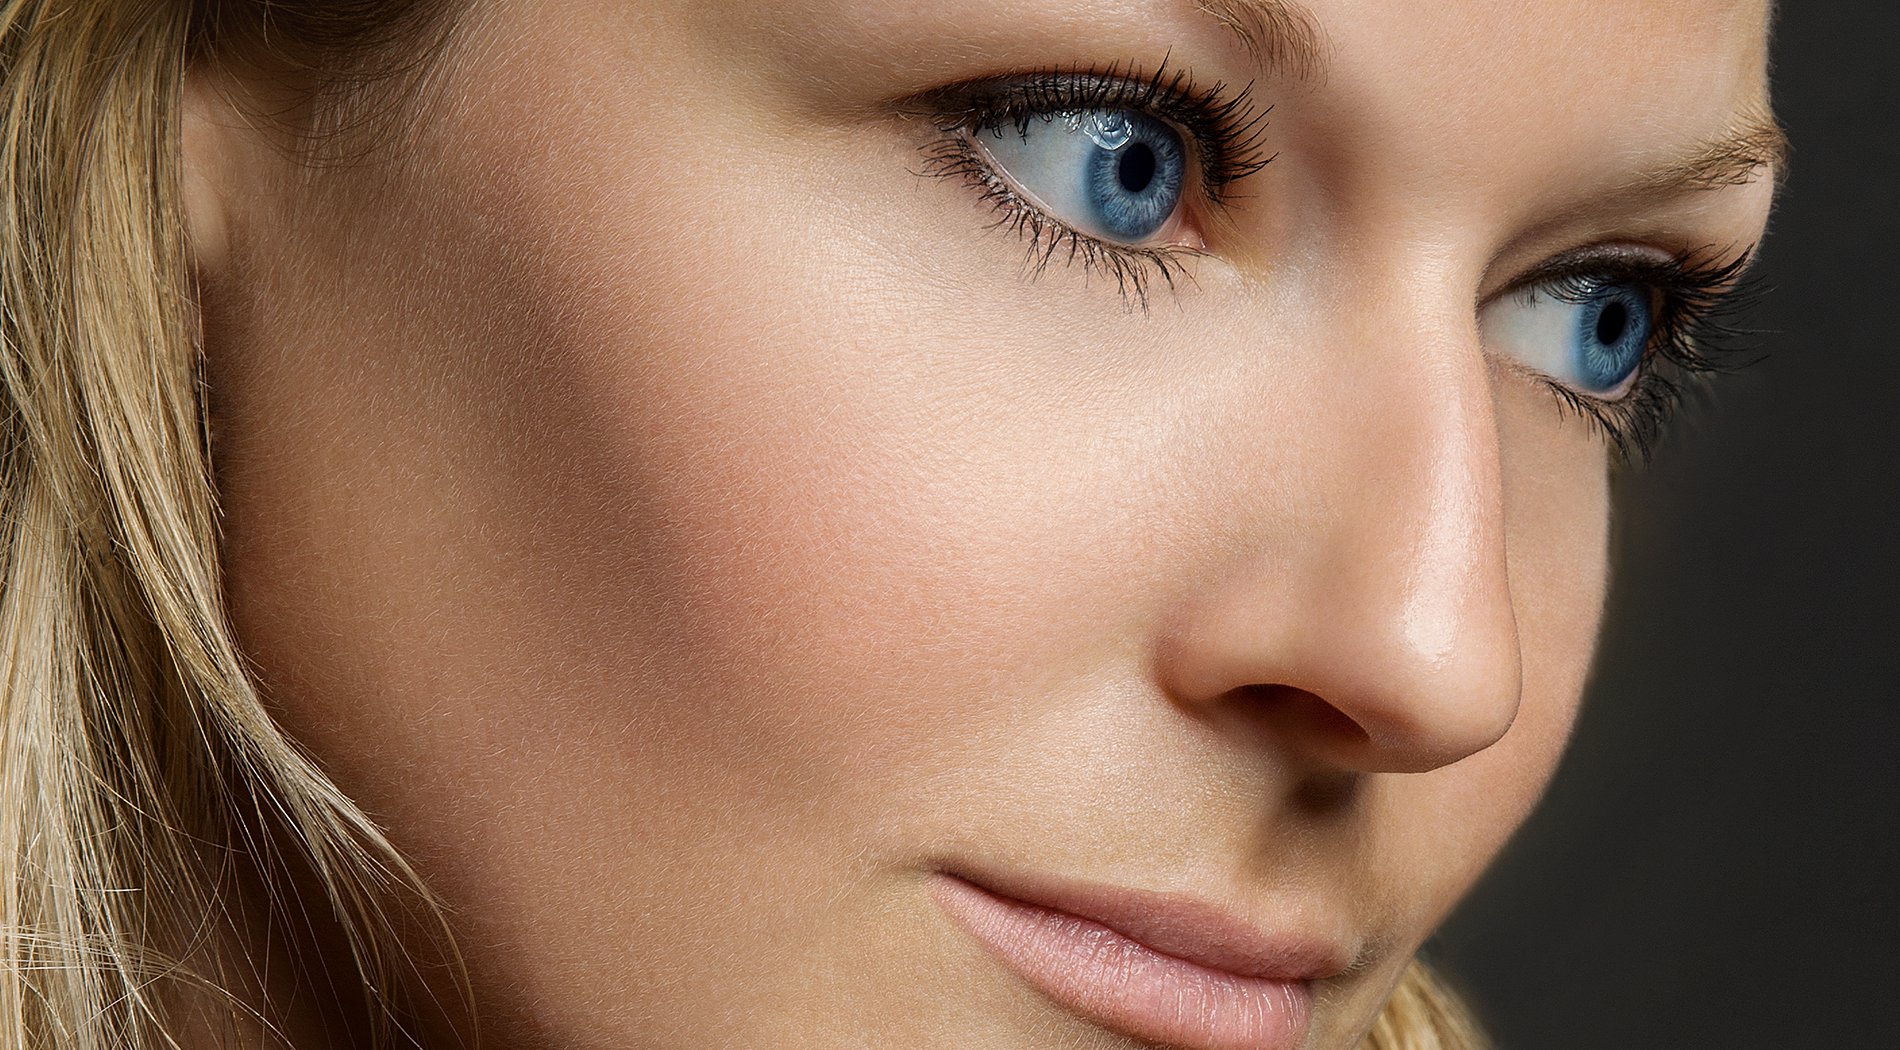
The idea is for the skin to be retouched so that unwanted wrinkles, shadows, and pores are minimized, which is what loads of filters will already do, but to keep the texture that makes skin look like, well, skin. Here’s an example of really amazing skin retouching, of the sort I still cannot do:

skin-retouching

And here is an example of ‘bad’ retouching  – no offense to the lovely ladies in the photos, of course. This is also what most skin smoothing filters will do to your skin, such as the ones you can use in a phone app or a basic photo editing program.

portraits1

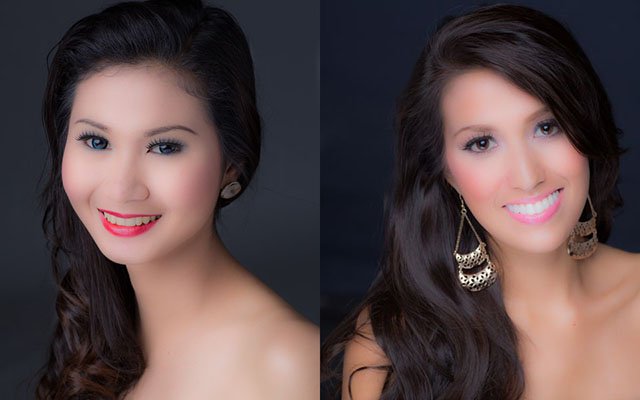
I always say that portraits like this look like the subject has been sculpted out of butter; when you lose all the skin’s texture, and yes, even all the lines and pores, you end up with a photo that looks unnatural and blurred. So how to keep the lines and shadows and textures that you want, while still getting rid of the wrinkles, blemishes, and large pores that you don’t want? Well, that’s been my question forever; usually I end up somewhere between the good photo and the bad ones, but still too close to the latter for my liking.

The first thing I realized was that I needed to soften the photo less when working with the raw file, so I have more texture to work with from the beginning. The tendency is always to soften a portrait because in general that’s more flattering, but if a RAW file is softened too much you can end up without enough texture to use later. So, in my last batch of shots I was sure to keep the original sharper than I usually do, even though that means my original shots of my 47 year old skin are less complimentary than I would like. No one but me ever sees those, anyway.

The second thing I’ve been learning to do is add the right sort of texture back into the skin after attempting to retouch OUT the textures I don’t want. As I said, this can be tedious, especially if I have only really small patches of texture to work with and re-distribute over the face, but once I get this down I think the end results are going to be worth it.

fuzzyscarf1boa

Some early attempts; I keep them bigger so hopefully you can see the skin. I think the second one is better than the first. I actually really don’t care for either one of these shots all that much. Nothing wrong with them, I just think they’re both kinda boring.

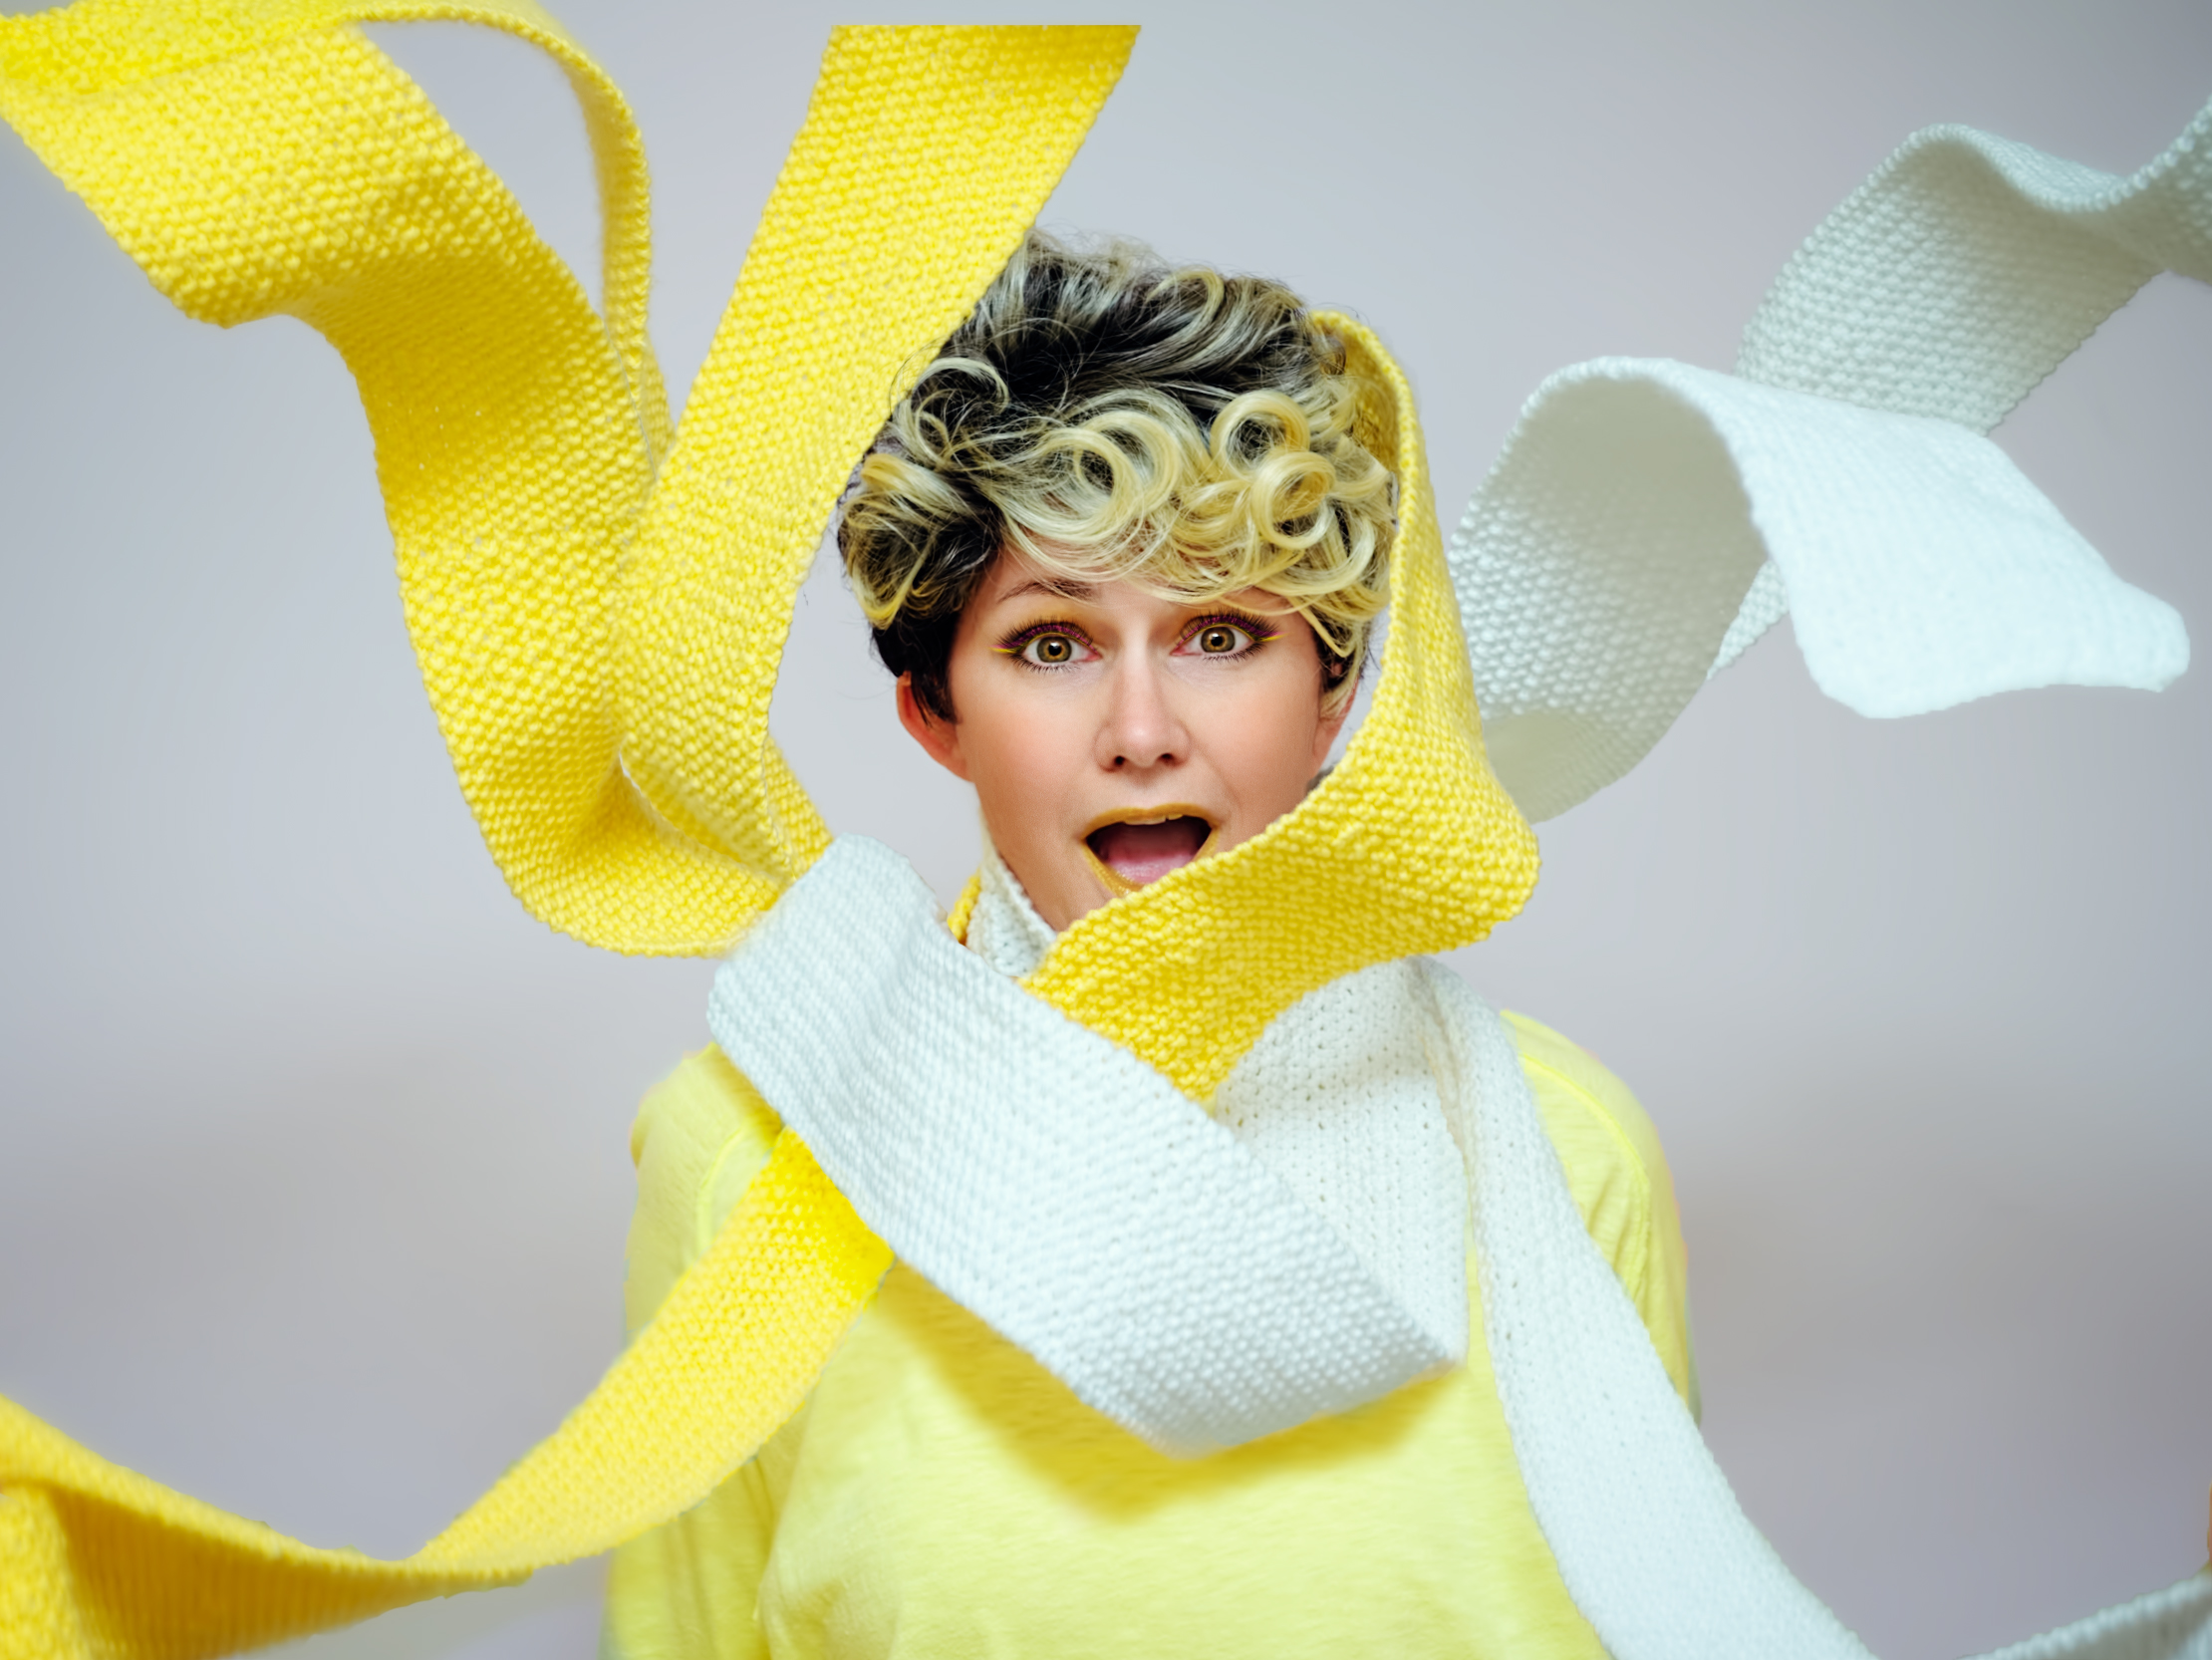
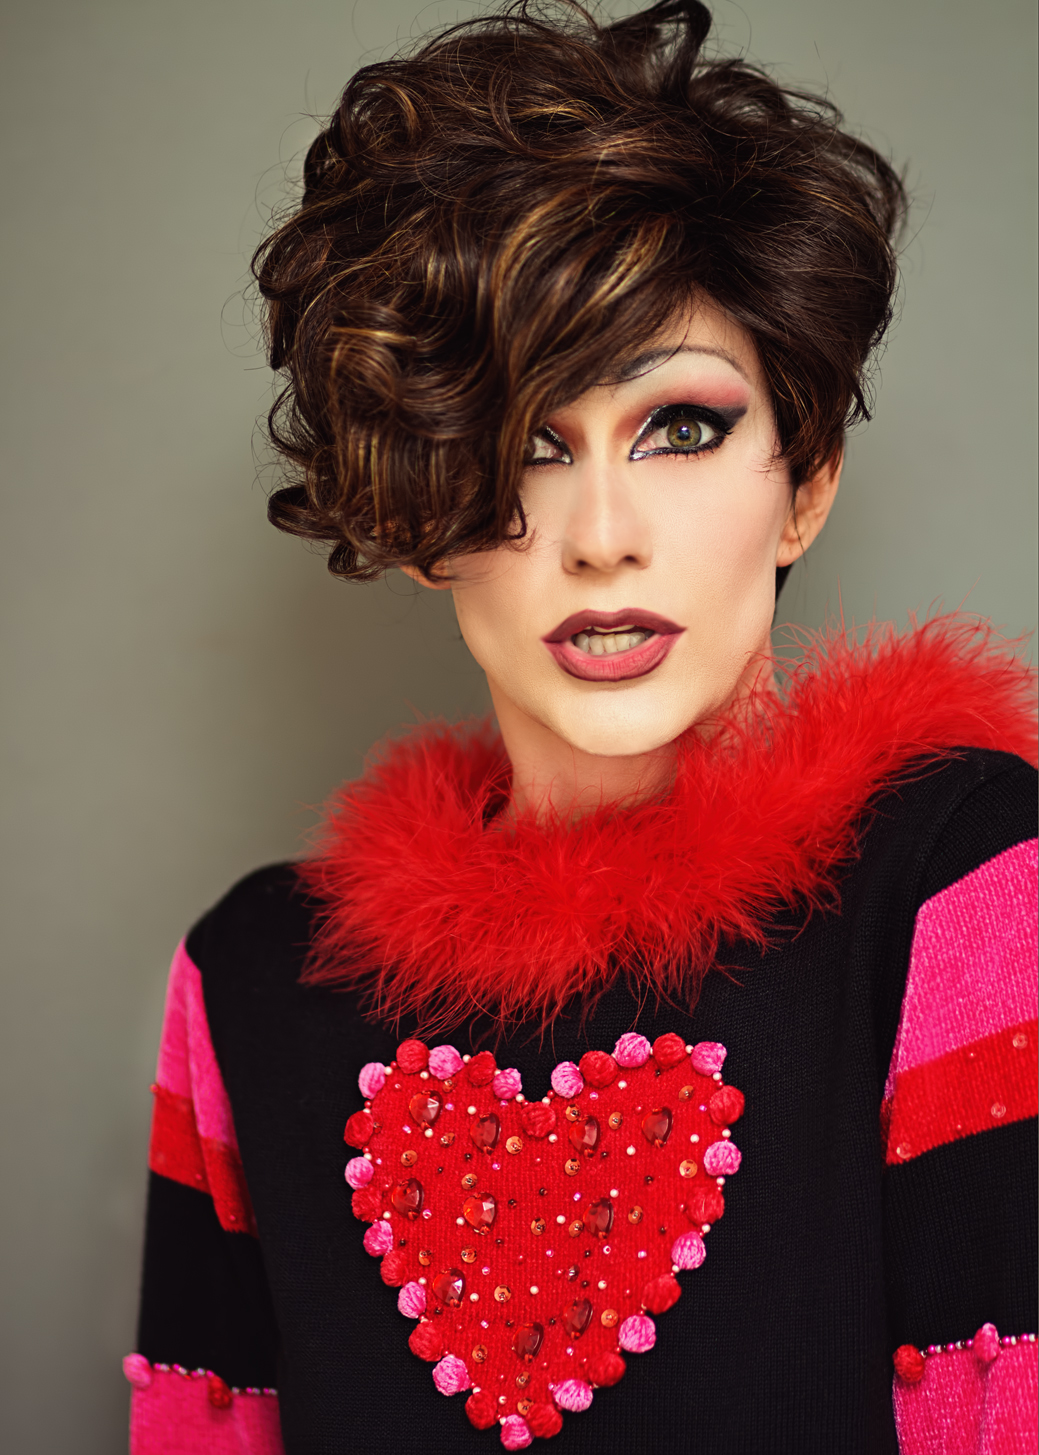
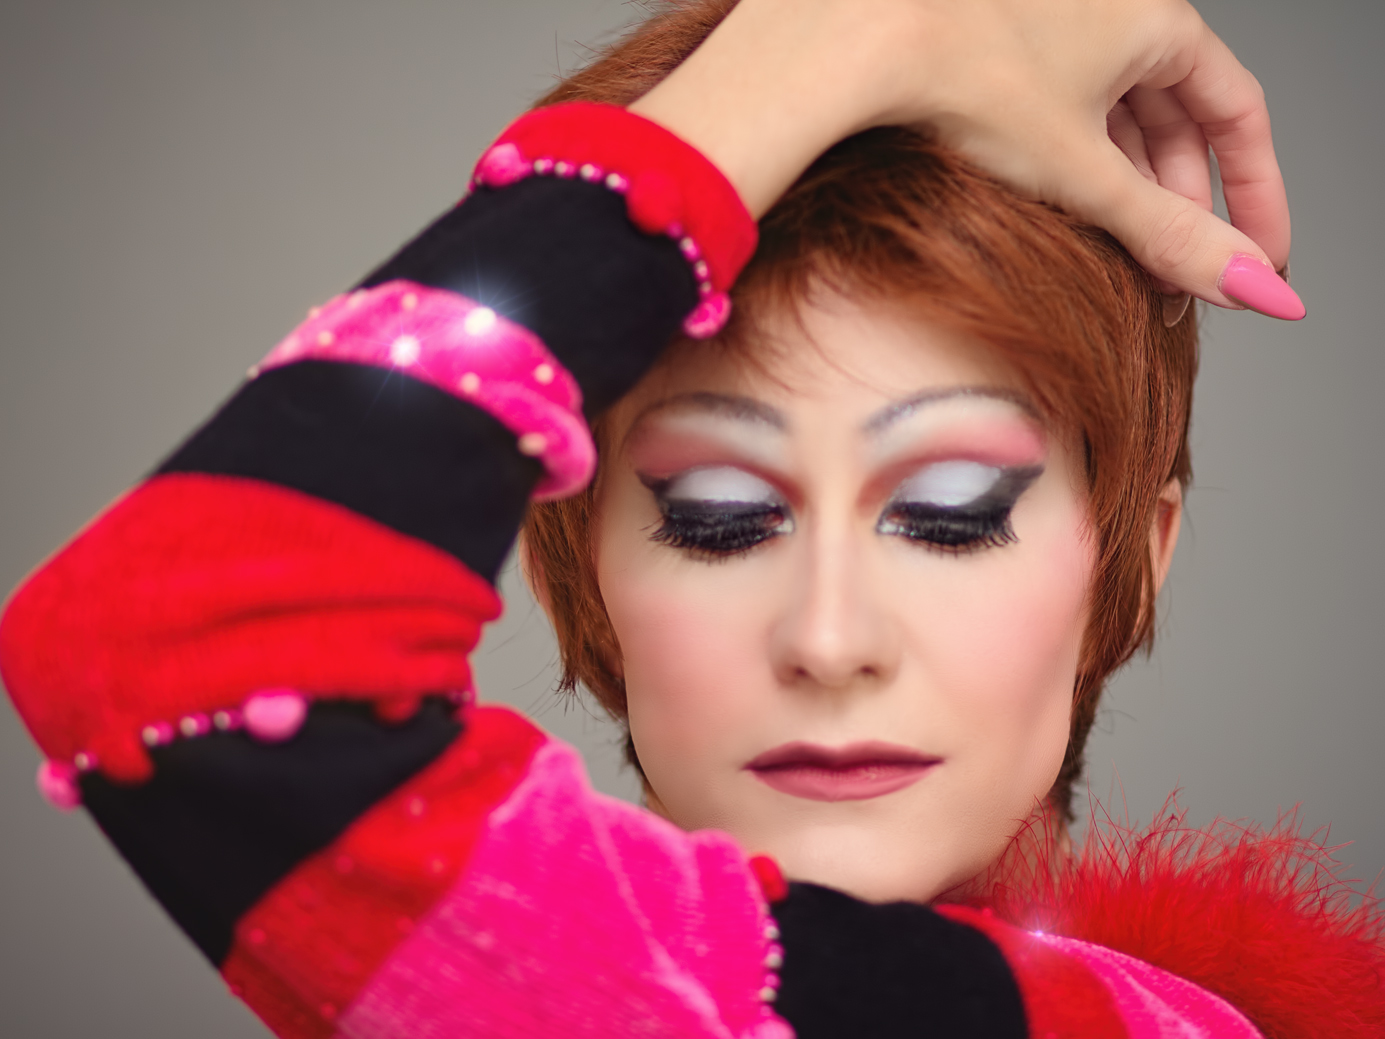
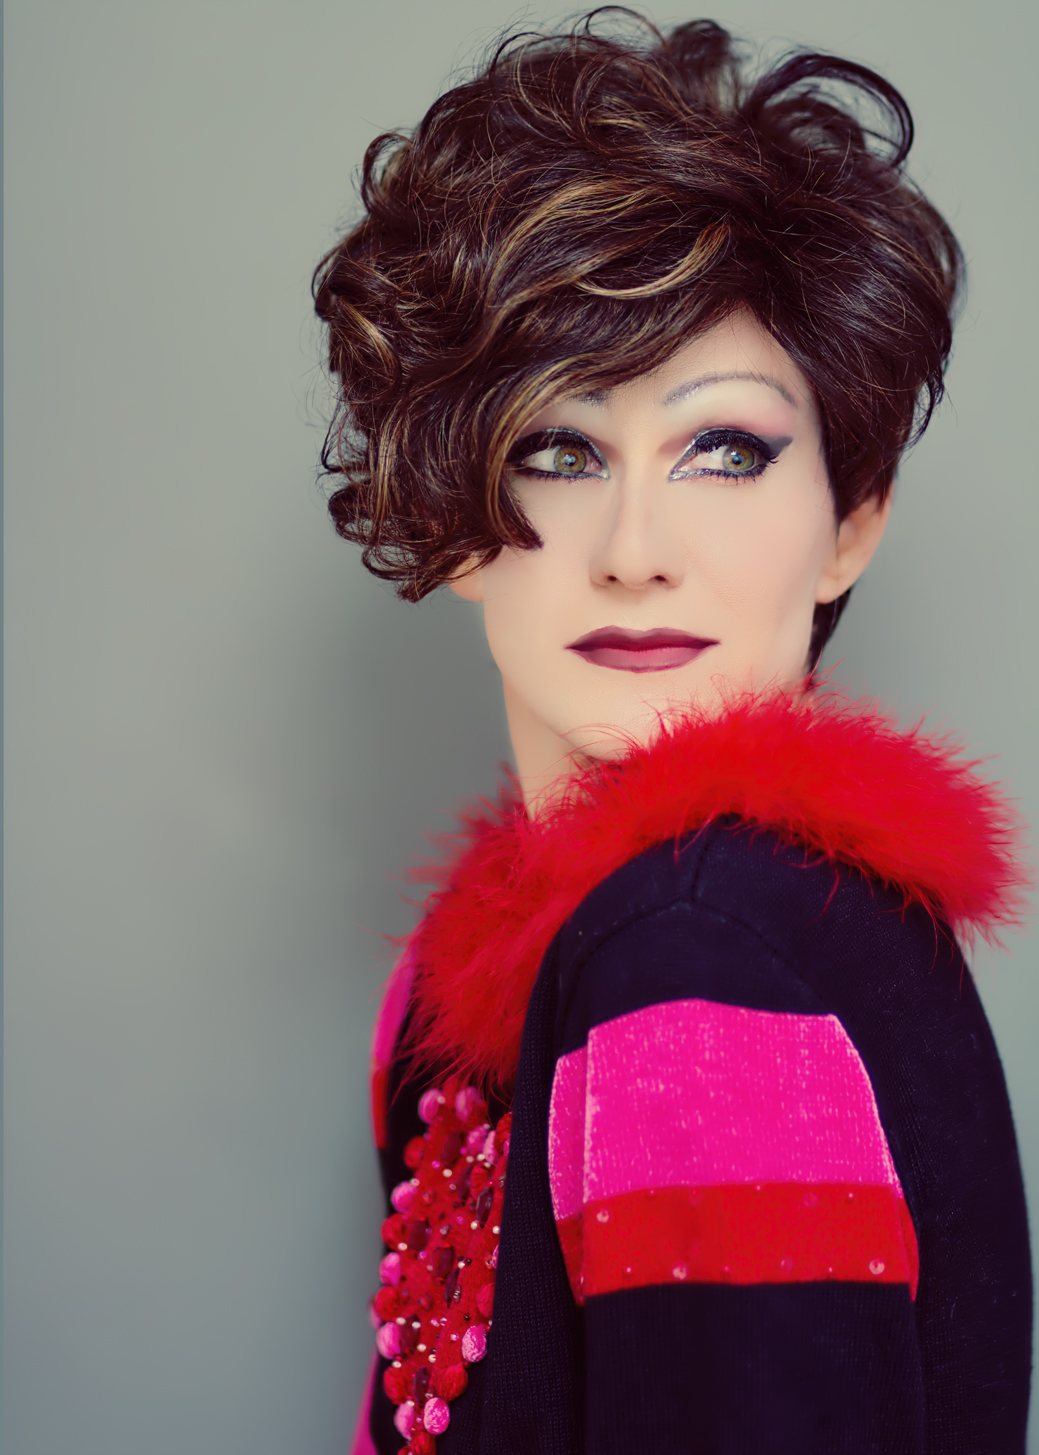
By the way, back to props: in the two photos above I am wearing this faux alpaca-fur scarf I saw a while back at Nordstrom; it really is that bright, and it is huge – when throwing it over my shoulders it looks more like a big, long fuzzy vest than a scarf. I saw it at the Galleria store and was dying for it, but it was too pricey for me at the time; later on I saw it on sale half off online and snatched it right up. I am glad I did, even though we have had NO winter here this year and I have had no reason to wear it out of the house.

All of this skin retouching stuff got me excited about working with portraits, so last Friday I decided to try another shoot and give myself some newer stuff to work with. I’ve got my Portrait Pro software down to the extent that, in most of these photos I’ve already shared, I had nothing but foundation, highlight and contour, and powder on my face in the actual shots. ALL of the color on the face, including the mascara and the eyebrows, has been added digitally. This really helps me with prep-time for taking self-portraits, as so often the amount of time putting on a full drag face is so long that by the time I am done applying, I don’t much feel like doing the work of posing for the shoot. Now I can slap on the basics fairly quickly and get to work, although applying more makeup on the front end is always going to be preferable  – something I REALLY learned in this last shoot.

face16

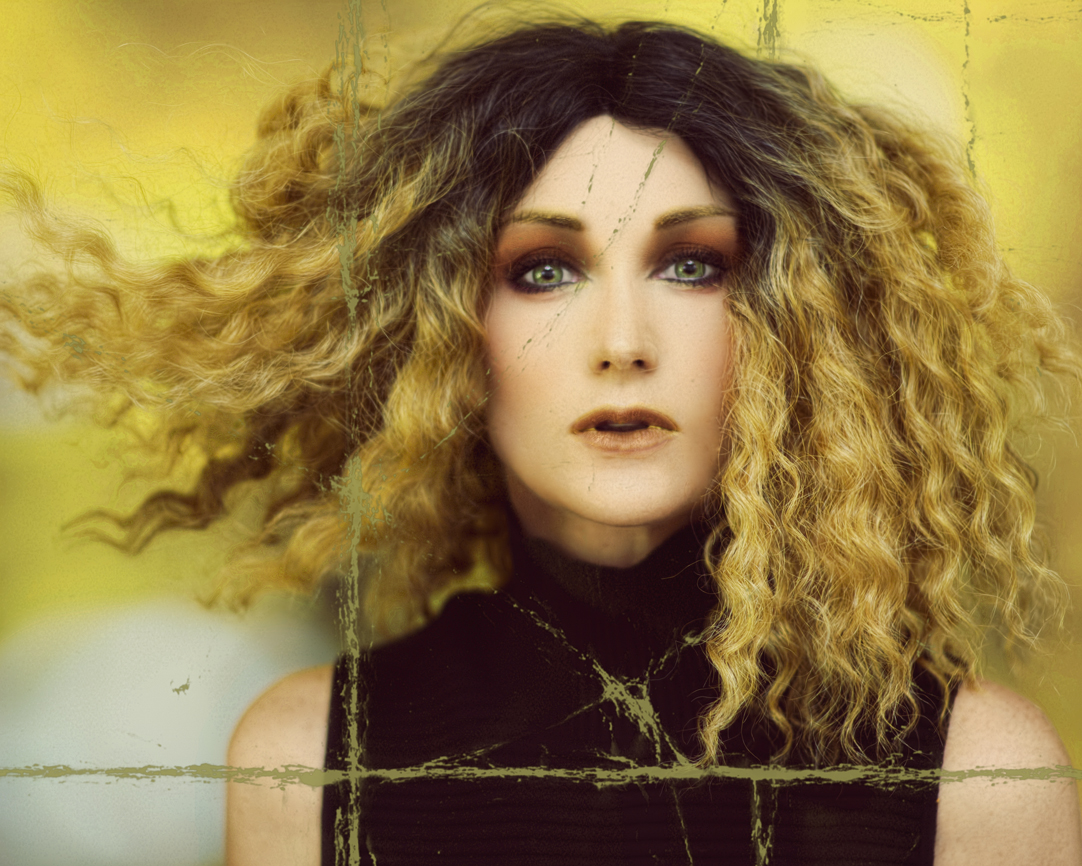
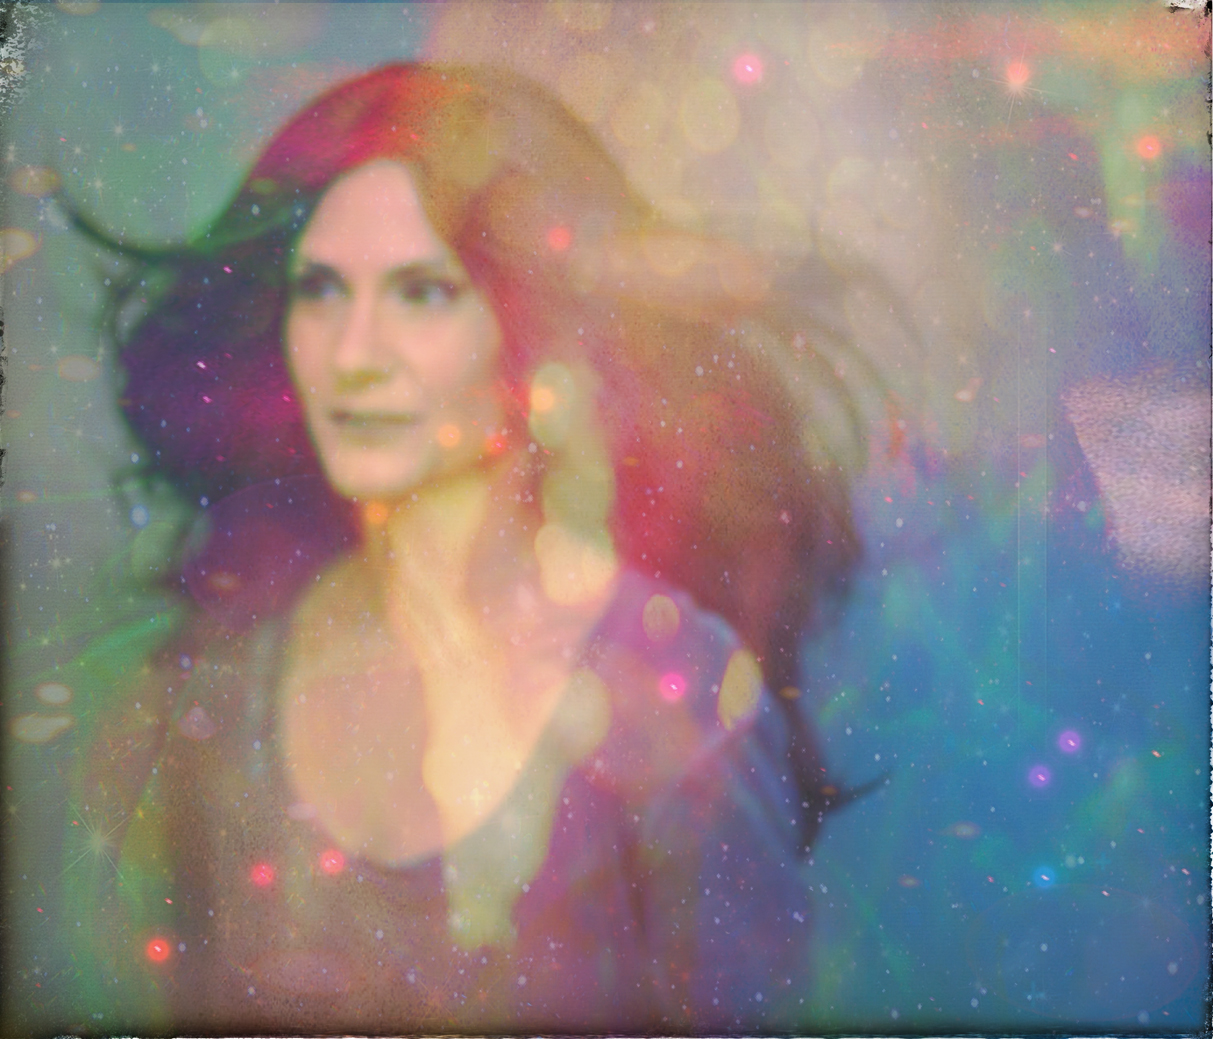
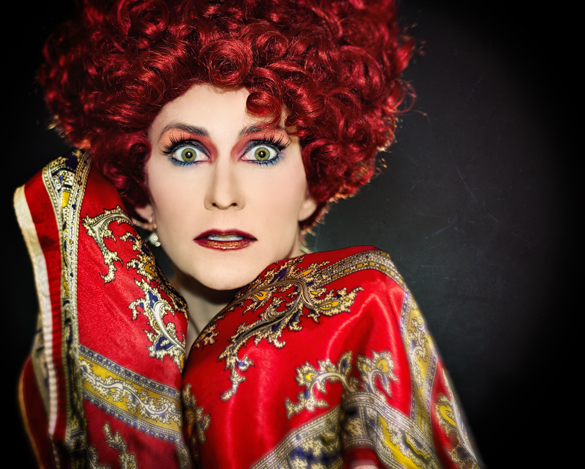
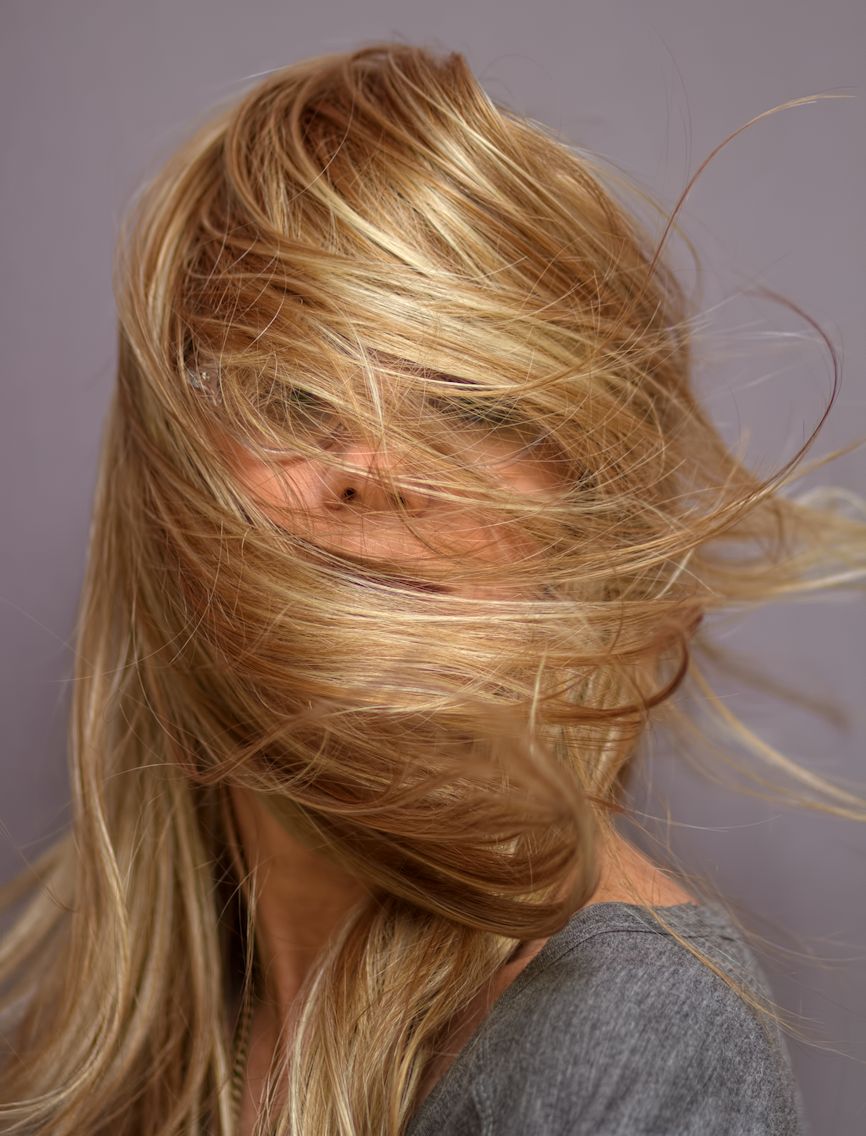
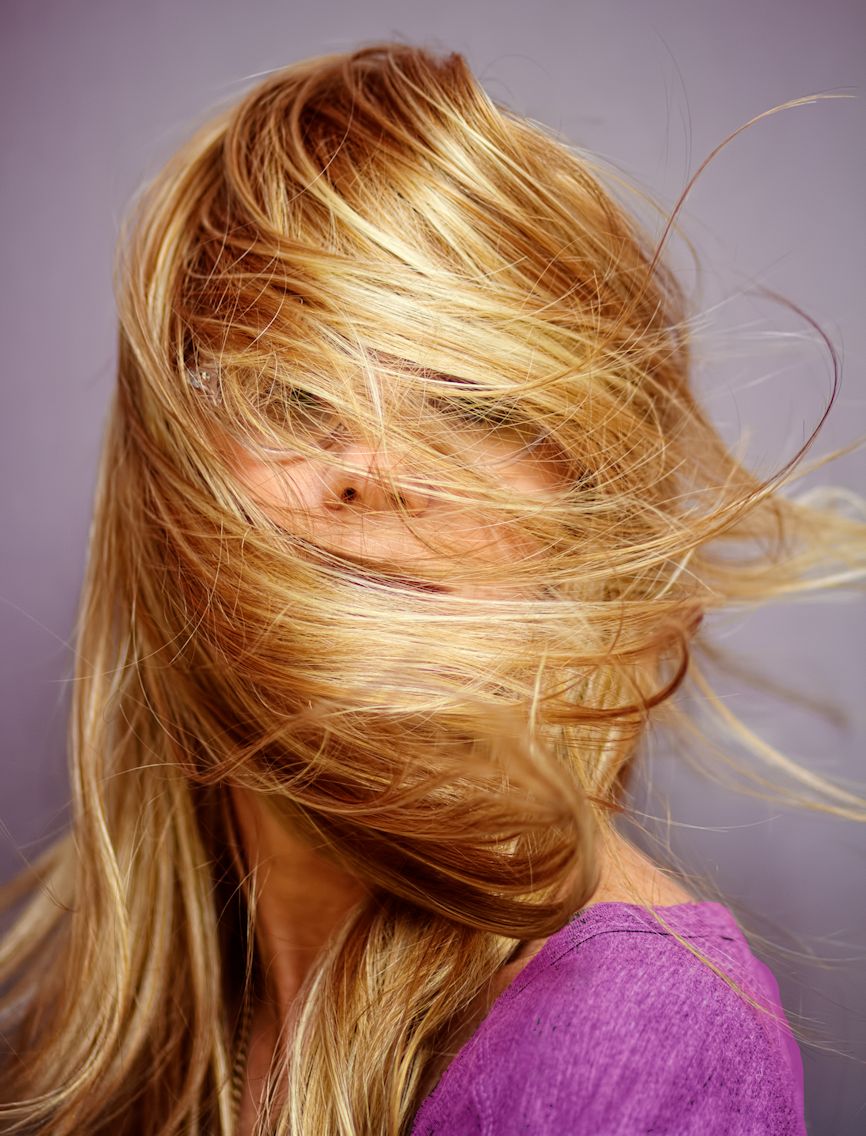
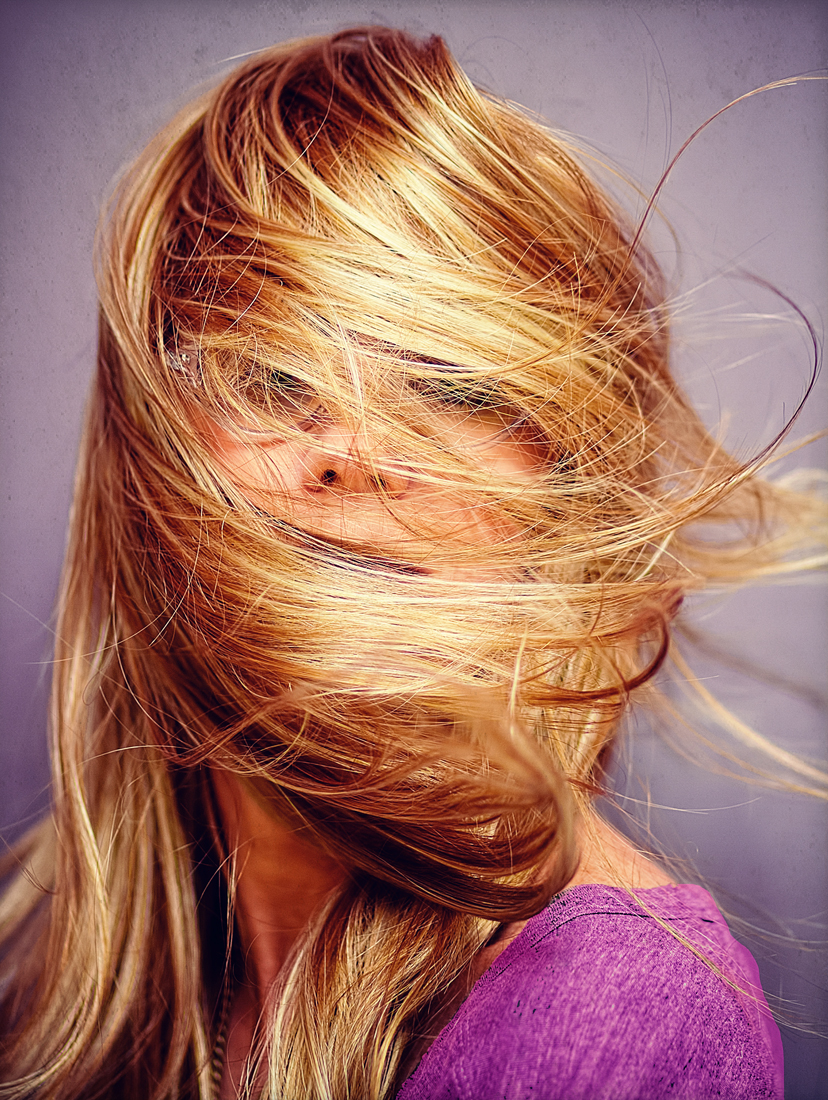
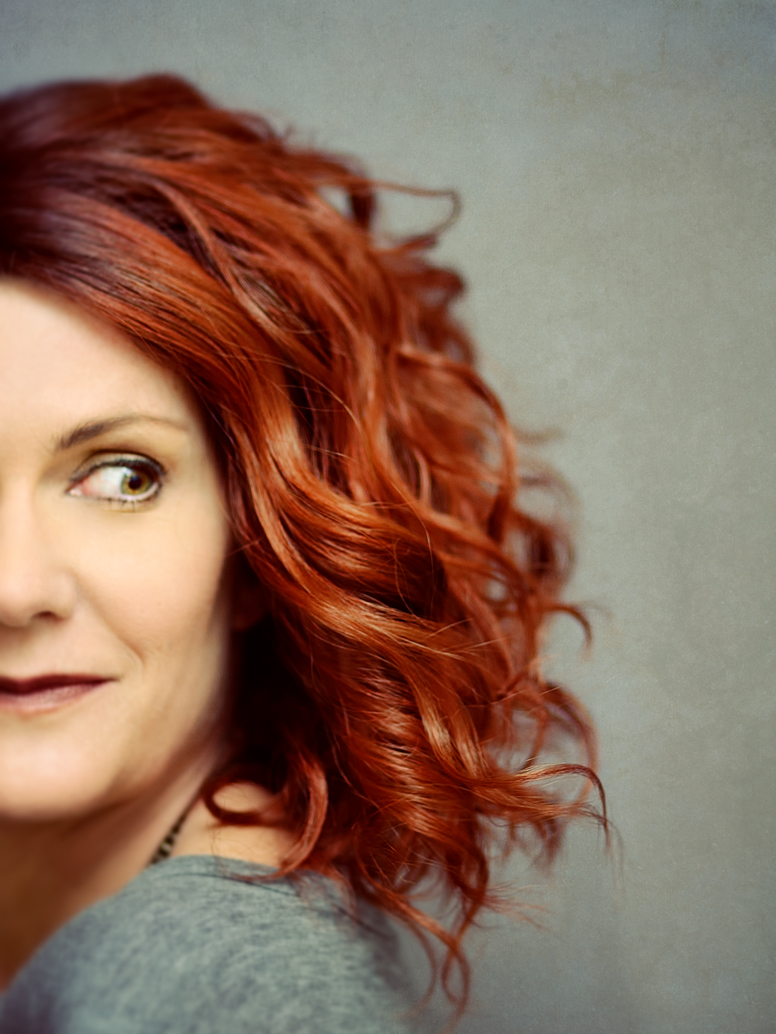
So, my basic idea was this: I’ve had some luck in the past taking half my face from one shot and layering it over another face to get the “perfect”look – in one case, for example, I loved the movement of the hair in a shot, but there was so much hair in my face it wasn’t usable as it was. I figured out how to take a section of my face from another shot and paste it over the hair-covered one, and not only did it solve the problem, it actually created a new-looking face that didn’t much look like me, but was still cool:

badwig4a

You’ve seen it before, but here it is again

I am always looking for ways to make me look less like me, so I got this idea to take a bunch of shots of myself standing in the same exact position, wearing exactly the same thing, but making a ton of different faces, with the plan being to use my facial features like a digital Mrs. Potato Head during editing and just steal a nose here, a mouth there, and create all these different-looking people out of them. However, this did not end up being nearly as cool as it sounded.

The basic ‘pose’ was like the one above where I have on the head scarf: I wanted to be looking straight ahead as that is the easiest way to edit using Portrait Pro as well as being the easiest way to pose in general, which I thought would help me keep all the different shots uniform. It didn’t though – you’d be amazed how much you actually move your damn head around even when you think you’re being perfectly still! So, there was actually a lot of variation among the different shots as far as exactly where my head was positioned, which altered the light and shadows hitting the faces, too.

But that could have been worked with – here was the real problem: these shots, even though they served their purpose of having at least somewhat interchangeable facial features to play with, were basically, well, boring. I am not sure why I decided to go with a head scarf instead of a wig, except that I must have thought the presence of wig hair would either be too limiting visually or just get too much in the way of the face. That makes sense, but then I should have gone on to do some shots looking at the camera wearing some sort of hair, because while it was interesting to mix up my facial features on different shots, the end results were just lame. Just me staring at a camera with a head scarf on, period. Very little color and no point of interest, unless like me you are able to look at them and appreciate the subtle differences in my face taking the Potato Head approach renders. Which, honestly, wasn’t even THAT interesting to me! So, I found myself spending a TON of time Potato-Heading myself only to end up looking at a pretty boring photo. As a result of that, I started to add a ton of weird textures and overlays just to cure my own boredom, which isn’t really something I care to look at in the end. I love filters and overlays, but I prefer to use them subtly so that the end result still looks somewhat ‘natural’ – in other words, the filter enhances the photo without overtaking it. In these shots, I got so bored that I let the filters take over.

face16

You’ve already seen this one, but I’m showing it again because it’s the best example of the problem I created for myself. Although, I WAS briefly interested in the fact that I inadvertently made myself look like Ivanka Trump. 

One other thing I did during the shoot to liven things up, but that also didn’t work out all that well: a few times I held up some props to my face, thinking I could edit those elements out of the shots and apply them to my experimental faces as well – sort of like Mrs. Potato Head bonus features, if you will. But even that was primarily a fail; even though there wasn’t much going on in the initial shots that I had to deal with when compositing later, there was enough that it made it hard to use the props without them being obviously pasted onto my face. For example, I thought sticking a peacock feather over my eye would be kind of awesome; on its own it’s not such a grand idea, but if the peacock feather could look like it was actually growing out of my face it could be kinda cool. Except, when I held the feather up to my eye I didn’t center it properly, and when trying to move it around on another head shot, all the places in the original photo where the head scarf and parts of my face showed through the spines made it impossible to work with without looking totally ridiculous and I am not talented enough to highlight and copy something this intricate without screwing it up royally. To compensate for that, I filtered it to death, and what I ended up settling for in the final version was pretty much laughable and lame – when I look at this, I just think, and why does this photo even exist, exactly? It literally serves no purpose whatsoever, except to confuse the viewer as to why the photographer even wasted her time on such foolishness:

face16a

So, Ivanka Trump, in what appears to be a swim cap, sticks a peacock feather in it and then, what, takes a shower? Gets caught in the rain? WHY AM I LOOKING AT THIS?! And why is that peacock feather looking so much like a fish skeleton – I NEED ANSWERS!

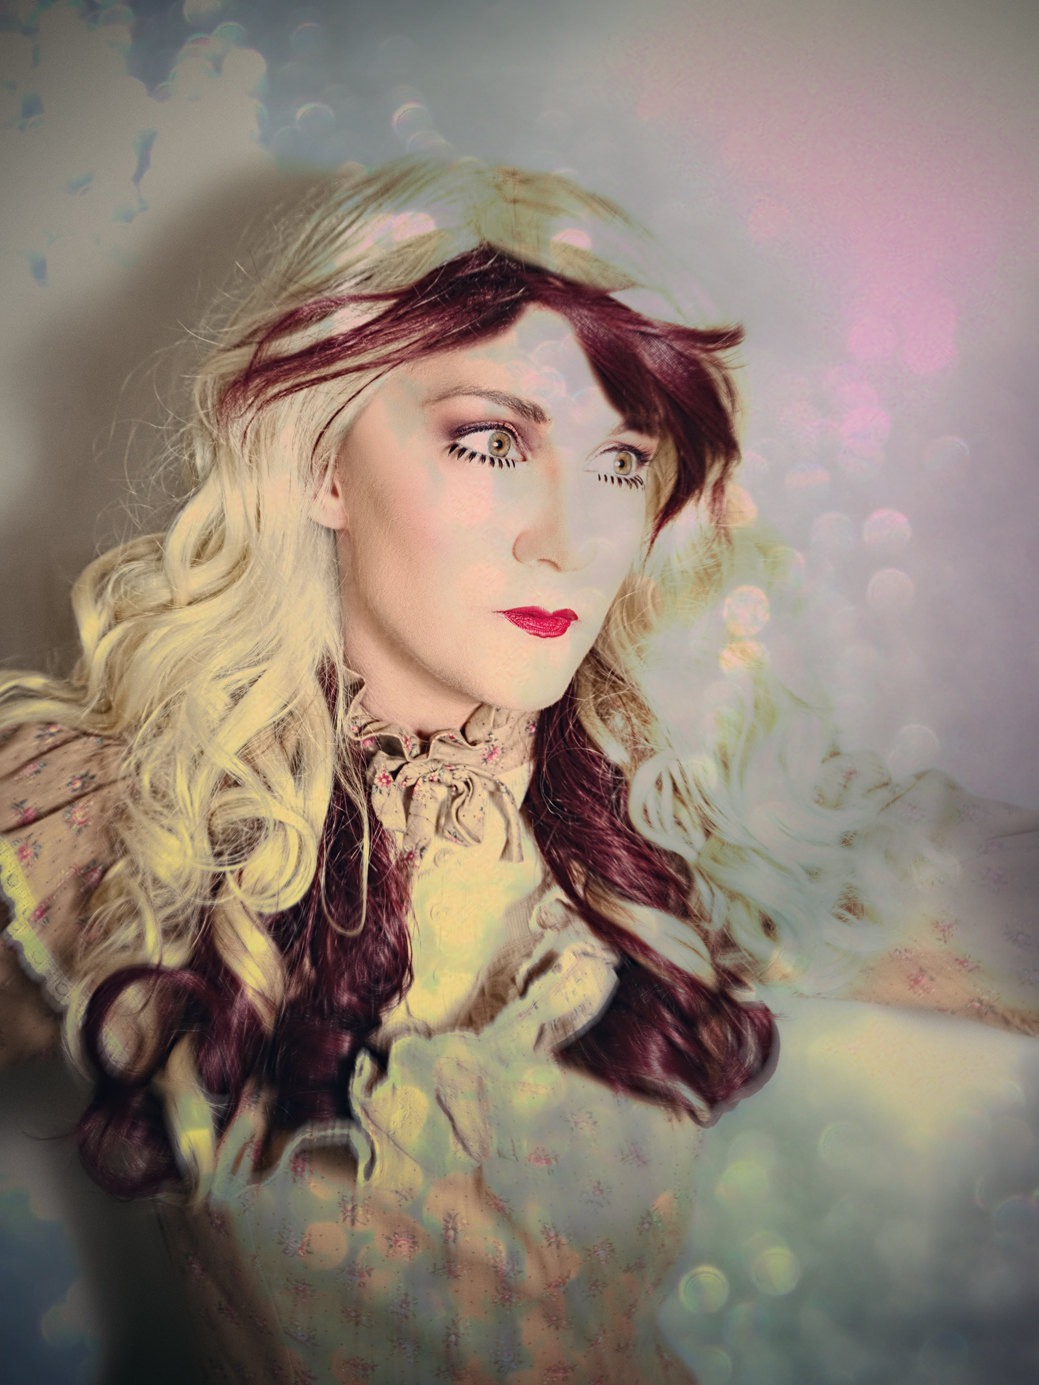
Then there’s this beauty – that’s a Christmas tree ornament I held in front of my face in one shot, that once again I failed to put properly over the eye and had to adjust for that error:

face18a

For fun, I actually took the pink center of the star, stretched it out into a lip-like shape, and stuck it over my real lips. Then I stretched it out even more and put the glitter pattern of it into the head scarf. All of this took a crazy amount of time, and in the end helped the photo not one bit. Still boring. Although, I continue to be impressed with how good I can make fake makeup look.

face18ab

Over-edited heavy filter compensation photo. There are actually elements of this one I like, but still, they don’t go together at all. Once I got the idea to use these different wall textures on it, I wished I hadn’t worked so hard to get that star placed on my face, because it literally makes no sense with what else the picture has going on.

Now, this next one I think was somewhat more successful. The placement of the silver tree branch was more workable, and the end result of putting it up against my face in a different shot is more interesting. My goal was to make it look like the branch was actually growing out of my face, but I’m not skilled enough at Photoshop to have made that happen in any convincing way, so I kind of abandoned the idea and decided to just say, hey, here’s me with a silver branch in my face. Enjoy.

face17

At the time of editing, though, I wasn’t as satisfied with this as I am now, because I actually kept going with the filters until I’d gone WAY too far. Remember, I’m still getting used to the novelty of being able to use all my software on my new laptop, so I do tend to get carried away. Thankfully I saved a copy of the version above and didn’t totally trash it without having a backup to that previous, much less chaotic version.

face18

Sinead O’Connor hiding out in the forest? Stop, already. Just stop. 

However, all hope was NOT LOST! Apparently I’ve learned something over the years I’ve been doing this (well and now, I’ve actually learned more, namely, that taking 50 photos of myself standing in the same spot wearing a swim cap is a bad idea) because I did take the time to throw on a few wigs, and some of the new Goodwill costume purchases I’ve made lately, and get some interesting shots before I packed it in for the day. So at least I can have fun editing those. Although – I can’t say editing this one was an easy ride:

clown1

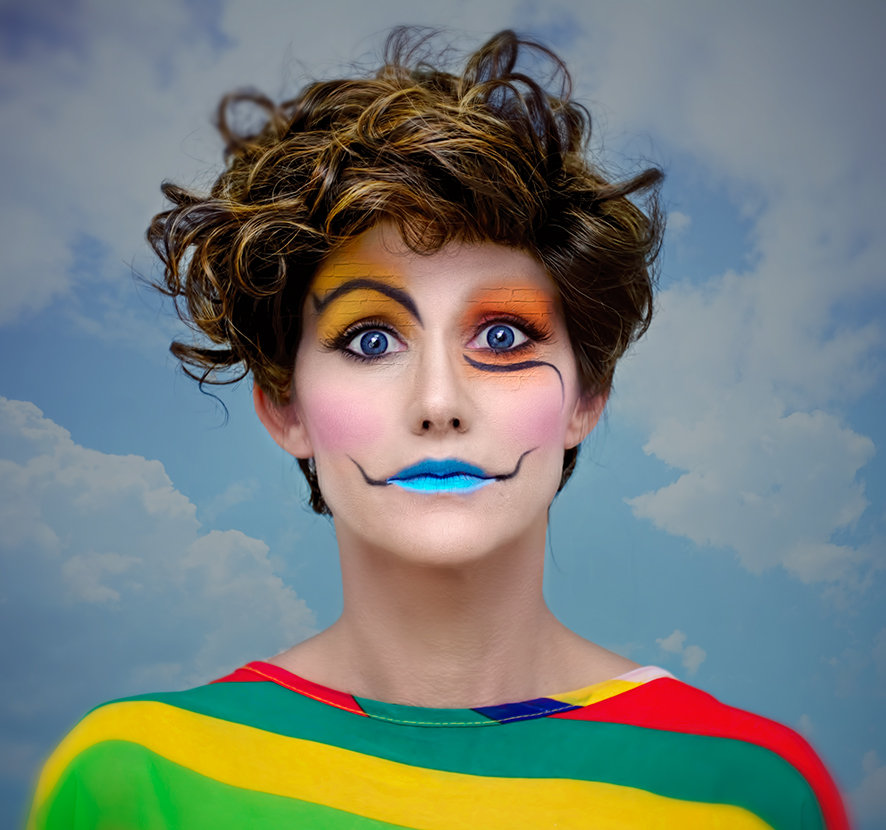
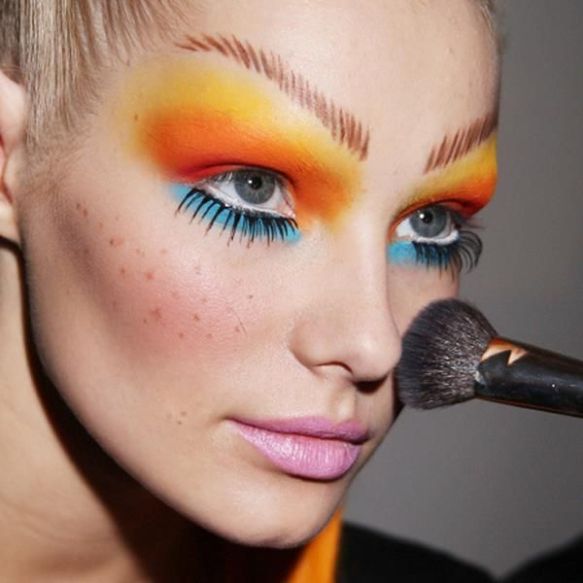
It seemed I was just determined to make life hard for myself on this day, because right before I called it quits I decided to throw on some crazy makeup and take a few shots with it – I managed to draw those thick black lines onto my face PERFECTLY, then decided to try and blend them out a little with black eye shadow and effed that one over the eyebrow COMPLETELY. I was able to fix it in Photoshop, but it was a huge pain in the ass and took forever, so I’m not sure I’ll edit any more shots from this part of the shoot. That’s probably fine, though, because this is a pretty distinctive look, and I don’t think anyone needs to see more than one of this. Not sure I should have kept the brick wall effect on the orange and yellow eye shadow, but I am a bit obsessed with that particular texture and how I can cleverly incorporate it into shots without allowing it to take over. And that top is AMAZING for photos – it’s big and sheer and very caftan-y and it was only $3.99 at the Goodwill up the street.

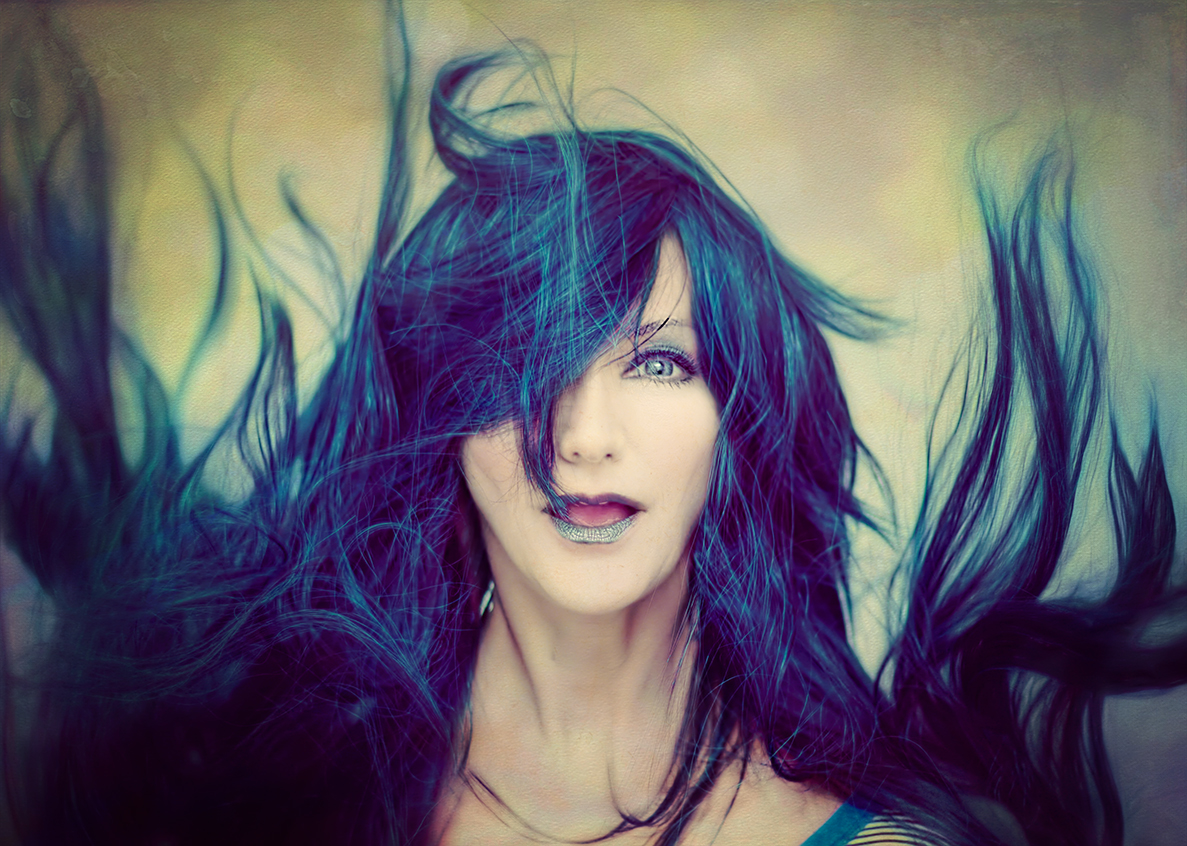
Now, last but not least – from the ashes of a basically failed photo session comes this lovely Phoenix!

oilslick1

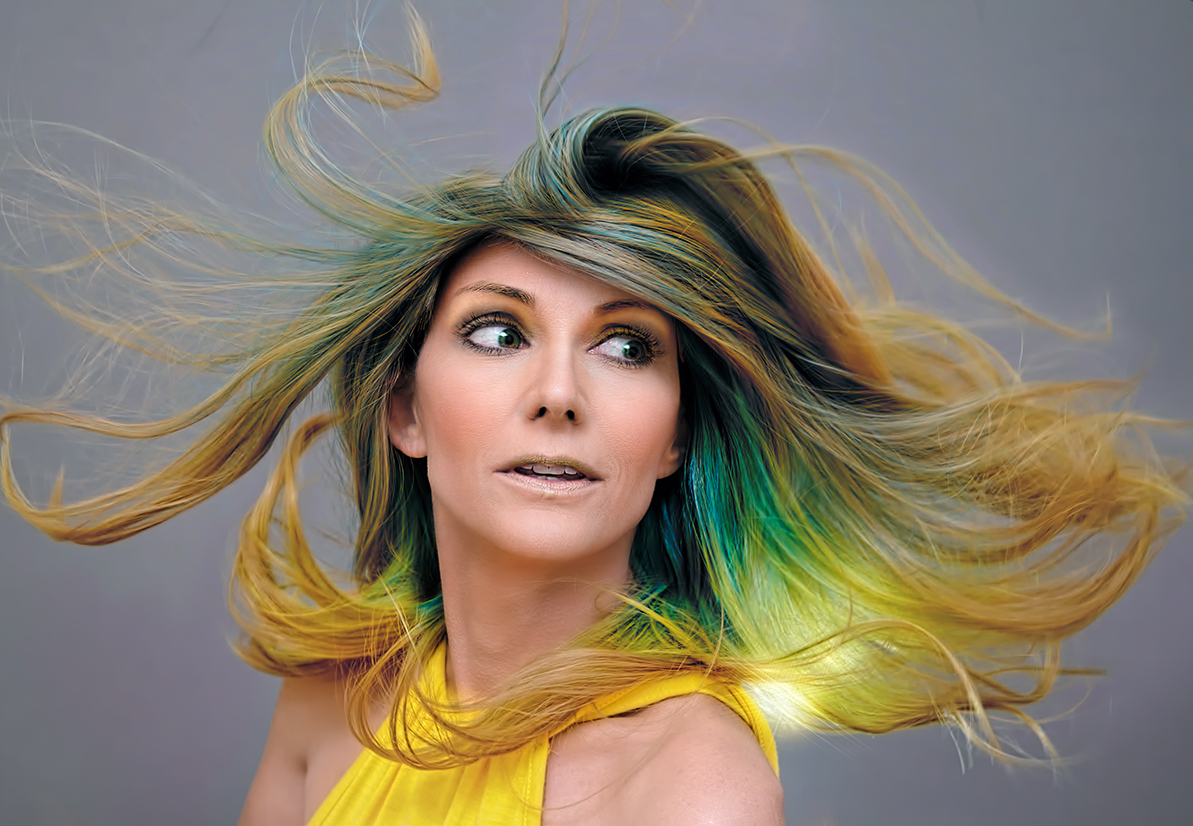
BOOM! Take THAT, Mrs. Potato Head! In reality, this wig is a dishwater-looking blond with a very drab green, although a bit of teal and yellow shows up in the underneath side of it. But using Photoshop I was able to draw out a ton of beautiful color, plus I feel like I really got the skin texture right here, if maybe a bit TOO textured. All of the makeup was added in PS, and the hair is actually taken from two different shots of it while I was blowing it around with a fan (the bit where it’s curling up towards the ceiling is from one shot, as well as the bit that is swooping over my forehead and back over my shoulder; that big swoop at the top is from another shot where it was almost falling back off my head, as well as all the strands coming forward onto my shoulders). Even the cheap cotton-knit yellow dress I’d just picked up at Goodwill and put on backwards (since that’s where the interesting detail was) really worked with the wig far better than I thought it would. I absolutely love this shot, at least as much as the very first one I posted in this long-ass thread, so, lesson learned – when it comes to portraits, I really need to start with some color, and some movement and interesting poses that I can enhance in Photoshop, rather than starting so basic that I have to rely on editing to do ALL the work. A little bit of PS magic is fine and fun for me, but if it’s ALL the photo has to work with to make it successful, it just isn’t my bag. Some people are really great all of that image manipulation, but it turns out that I do have my limits. So, onward and upward; more wigs it is!

Speaking of wigs, I did buy three new Rene of Paris ones over the weekend – a Zuma, a Sonoma, and an Evanna. I got one of them in the new pastel blue, then the others are in some of the new brunettes they came out with. The prices are very nice, which helped me decide to make the purchases. I should have them in to review soon!

Back Dropped

Let’s catch up and look at random photos while we’re at it, shall  we?

apples
And I do mean random.

I’ve processed some more of the photos from the Ruah retreat, but I have to say that I’m not thrilled with the pictures overall. Granted, my outdoor/landscape/architecture photography skills are weak already, and I definitely did not shoot in the proper light at the time (which due to the cloudiness and storms could not be avoided) but I also think I chose the wrong lens for these shots. I used my wide-angle lens so I could get into some tight spaces, and also to get some lovely panoramic scenes – but there really weren’t a lot of panoramic scenes to photograph, and most of the tight spaces weren’t that interesting (the chapel was the main exeption). I think the outdoor shots would have been prettier with my 50mm, maybe, or perhaps my telephoto lens for better depth of field. Everything looks too sharp and crisp and ultimately chaotic to me, and I’ve had this issue with the 17-40mm before, just have never identified it as the problem.

ruahside
Ah, the joys of being a self-taught photographer who basically knows nothing.

So I did my usual – filtered and textured the hell of the shots to make them interesting, even if I couldn’t find them aesthetically pleasing. I may be taking another trip there sometime this summer, since I didn’t feel like I stayed long enough the first time to get everything I needed to out of the experience, so perhaps I’ll try again.

villatest
Photoshopped myself from another shoot into this shot – it was only marginally successful.

One thing I’ve gotten into the past few months is purchasing and using different pop-up backdrops for my photography; I’ve been using some basic ones (black, white, and gray) for years, but when I started making wig videos again I became really irritated with all the grain and banding I could see in the solid background I was using. I tried using software to reduce the noise, but it would soften the video too much and I’m a stickler for clarity. So in the end, my solution was to buy a gray mottled background which would camouflage the grain, and that’s the background you now see when you watch my vids.

Statement Piece
Exhibit A

In searching for a gray pop-up, I stumbled across tons of other interesting ones that I wanted to try; unfortunately the more interesting the background is, the more expensive it is, so I haven’t tried as many out as I’d like.

popup_collage
A few examples

Once you get away from basic solid colors or mottled ones, these suckers get pricey. The two pictured above (they’re reversible) run anywhere from $150 up to $220 depending on where you buy them, so I haven’t pulled the trigger on them just yet. And by the way, they are called pop-ups (if you don’t already know) because they fold down into a small circle the size of that blue case you see in the left and right pane of the collage (the middle shot is just to give you an idea of their size). Fun fact – folding these backgrounds down to fit into that circular case is A BITCH. As proof of this, there are probably about eight million videos on YouTube of people showing how to fold them, and I STILL struggle to do it every single time and have to watch at least ten of them to get it done. In fact, the gray one I use for wig vids is still popped open and sitting out in the hall because I haven’t had the energy to put myself through the anguish of wrangling the thing back into it’s case – I am literally almost in TEARS every time I have to do it because it’s so frustrating! I am incredibly challenged spatially; I have no sense of direction and have to stop and think if you even tell me to raise my right hand because I am not sure at first which one of two hands that is, so that’s probably why it’s so difficult for me to do. Here, allow me to show you a video example so you get the idea of what I’m talking about:


Make sense now? Yeah, I still don’t get it either.

One day I’l have to make a video of ME folding one of these suckers; it would start with me wrangling it to the ground using my legs to hold it to the floor, then getting popped in the face when one end snaps up, then me falling over, getting up, picking up my glasses that have been thrown across the room, then me wrestling it to the ground again, getting popped by the other side when it flips back open, then me picking the whole thing up and throwing it across the room and throwing myself on the ground in a fit of tears, then leaving the room and coming back with some chips and a soda and sticking the background, fully open, into a corner, and giving the cat the little round carrying case to play with since I’ll never figure out how to put the background back into it. DONE.


Although I love how this chick does it so quickly the hooker in the corner doesn’t even have time to put down her phone (just kidding, I ‘m sure it’s just a model. Or a drag queen.)

ANNNNYWAY…my real point is that in all my searching around for interesting backgrounds to use I came across two that I just had to have, even though they were $180 each. After I got them in, I used them for some quick test shots – some of which you’ve already seen.

oof_collage
These are called Lastolite Out of Focus Backgrounds, and they’re the only two styles available that I’ve seen. Wish there were more, even though they’re pricey.

The set on the left I’ve already used and I shared some of the photos from that shoot in a previous post:

oofex_collage

I am pleased with the green foliage background, but the so-called “city lights” side didn’t thrill me all that much. After using this one a few times, I became obsessed with getting the other one; both sides looked like they’d take some lovely photos, but I had to wait awhile for it to get back in stock in one of the three places I managed to find it on the internet. I thought the beach scene side was, obviously, seasonally appropriate, and I was anxious to try it out:

ocean1
Yep. This works for me.

I actually went ahead and bought a stand to hang these behind me, because they are smaller lengthwise than my other backgrounds, and I couldn’t just stand them on the floor like I can those.

blue2
What do you mean Photoshop? Me? Never heard of it.

I couldn’t be more pleased with how lovely the beach side turned out. I love the subtle wash of color it creates, and you can’t see it in these shots but there’s actually a little bit of the sandy shoreline running along the bottom edge.

ocean2
Another totally natural shot. I hate makeup.

Now, I was pretty excited about that beachy side, but the real deal-clincher for me was that fiery yellow autumn background. When it comes to photography, I am a sucker for some fiery reds and yellows and golds – I love it in makeup and I love it in fabrics, and I LOVE IT in this background:

autumn1
Yeah this wins.

That wig, by the way, is one of those fabulous $19.99 ones I get from Sam’s Beauty online (don’t go there, seriously, you will lose HOURS looking at hair) and cannot ever wear out of the house but will wear AROUND the house for days feeling like Carole King or Oprah Winfrey in a curly phase. And that background! GAH! It is beautiful. So worth the money.

golden1
Photoshop trick stolen from drag queens: I am not skilled at blocking out my natural brows the way drag queens are, but I do sometimes use Photoshop to raise them. Really changes the look of the whole face. Here, I moved them to just above their natural placement, then used some other trickery to cover the natural brows with “eyeshadow.” 

I also finally switched out the big, wall-sized background I keep tacked up in my office from  black to gray, and did a few jumping shots that I haven’t work with much yet. In fact I only have this one:

plaid1

The leap was pretty boring, but I’m not gonna lie – I processed this shot solely (no pun intended) because I was happy with my feet. I almost never jump in bare feet, because I am so NOT a dancer and my feet usually end up looking awful; but this was just a test shot so I hadn’t put my shoes on yet. But, I actually managed to point my toes pleasantly, so I had to work with this one. Since it wasn’t very thrilling, I did the usual and filtered and textured the hell out of it in the hopes that someone might find it interesting. I actually think most people are just gonna notice the feet.

That’s all I have for now; I have some updates to my work situation that I’ll post later on the private blog – as I move out of the classroom and venture out on my own, I may at some point go back to posting the more personal stuff publicly, but for now I’m still keeping it locked down. Happy Wednesday, everyone!

Photo Phun

I’m really running out of title ideas, sorry. But this poorly-titled blog post is brought to you by my RuPaul’s Drag Race Season 8 obsession, Acid Betty:

9079-1600-wide
Gee, I don’t know what it is about her that fascinates me…

Betty is a controversial queen, because she’s really playing up her bitchy side for the cameras and the editing is responding by presenting her as the villain of the show; it happens every season and usually I cannot stand the girl who gets the ‘bitch edit.’ But Betty’s look is right up my alley, and when she presented this look for the Oscars Runway challenge I had to pledge her my allegiance for the season:

download
I LIVE
It’s also easier to love her because she is clearly PLAYING at being a bitch and not just behaving that way by accident; it’s a role she’s been sharpening for years in NYC, but the reality show audience is interpreting her as overly harsh. Whatever. My beloved Pearl from Season 7 was a controversial queen too, but ultimately it’s the look that wins my heart, and Pearl and Acid both have mine in spite of whatever shortcomings might get highlighted by a reality show. Rumor is that Betty doesn’t make it much farther in the competition, though, and that is going to seriously bum me out if it’s true – usually the queens I favor go far in the competition so I will hate it if this time my idol sashays away too soon. But, there is a hell of a lot of good talent on the show this year and plenty of other queens to root for if this is the case. Moving on.

I’m also bummed because I have to  travel tomorrow for a work conference; sure, the destination is San Diego, CA, which is great, but still, there’s the traveling part to deal with, and I hate that. I don’t like flying in spite of how much I love airplanes; it’s not that I am at all afraid to fly (and in fact I actually quite like that part of it) but I hate dealing with airports, meeting deadlines, and most of all I hate packing. The day before a flight I always go into a complete panic, feeling like I am not prepared to travel at all and going shopping at CVS to buy as many tiny bottles of things as I can find, making list after list and double-checking everything out of fear I am going to leave something behind, or get to my destination only to realize that I packed the wrong shoes or am in a climate with dry, cold wind that leaves my lips parched and in need of the Blistex I forgot to bring. This is completely illogical, of course, because unless one is traveling to a remote location boots and Blistex can be purchased in any number of stores, but there it is. I panic nonetheless. I think it has to do, psychologically, with my need for safety, routine, and familiarity; I have a very CERTAIN WAY I like my mundane daily activities to proceed, and when in another location far from home I am thrown off completely. I unpack and immediately realize I don’t want to wear ANY  of the outfits I brought to wear (especially if someone with whom I am traveling brought clothes that look better than mine do; yeah, I’m that vain). I realize I should have brought a comfy pillow since the hotel ones are cheap, or that I really would like to have the flat iron with the 1.5″ barrel instead of the 1″ one I brought along. In short, I am high maintenance, and traveling just ain’t my thing. But off I go anyway.

lighting12a
Praying I bring the right flat-iron

This past week I worked more with Portrait Pro on the photos I was able to take over Spring Break, and on occasion I continue to use too much skin softening and coming out looking a little plastic. That happened in this case, so I did my usual and added a bunch of texture and overlays to hopefully disguise it a little bit. It’s funny, because clearly I don’t care if people know I edit the hell out of my photos for effect – my face shape, nose, and eyes in particular are completely re-created here – but when I overdo the skin smoothing it reads ‘phony’ to me. And the reason why I end up overdoing it so much is pretty silly too: after sharpening the photo (which is generally the last step) I can magnify the photo to full-size (which is freaking HUGE) and see all sorts of flaws in the skin that the sharpening accentuates, and it bugs me so badly I have to go back and re-soften all the big pores, fine wrinkles, and color inconsistencies that you really can only see if you magnify the hell out of the photo – AS IF ANYONE BUT ME EVER DOES THAT. No one, and I mean NO ONE is blowing my photos up to full size to look at my pores or messed-up makeup application aside from me, and yet I do it every time and obsessively correct all the errors anyway. And there’s the rub: it’s the little lines and flaws that add depth to the face, so when I edit those all away the end result is a face that looks like it’s been sculpted out of butter. I do a better job than most at keeping the texture and sharpness of everything else without going overboard, but try as I might I just CANNOT leave the skin alone. Some day I’ll learn.

Another new feature I’ve tried out a few times with Portrait Pro is the hair-coloring feature – in the photo above, the wig I’m wearing is actually black with dark auburn highlighting in the front (it’s the same wig as the second photo posted here), and in the one below my hair was actually a highlighted blonde (it’s the wig from this video review):

lighting14

The software does a pretty damn good job with changing haircolor and maintaining the texture of the hair, if you do it right and have time to play around with it, at least. It’s all so much fun and gives me hours of entertainment; I remember when I was a kid how much I loved to turn the ‘tint’ knob on the television while watching ice skating, because the skaters’ dress colors would change (yes, I am old enough to remember when there was a ‘tint’ knob on televisions, and I was weird enough to actually spend hours doing this). That’s kind of what it’s like to play around with changing my makeup and hair color in Photoshop (I also used to use markers to re-color all the makeup on the models in the JC Penney catalog when we got it in the mail, so I’ve been strangely entertained by stuff like this for awhile). Speaking of re-coloring my makeup – in this shot I was originally wearing bright orange lipstick that really looked horrible on me (I can pull the orange off, but not while wearing watered-down colors like peach and ash blonde) and another fun side note is that the peach top is actually a cardigan, and to use it in these photos I put it on backwards – something I do quite a bit if I really want some of what I am wearing to show in a portrait (see this collage for other examples, all three portraits were taken with a shirt or dress on backwards).

lighting6

OK now, I know this photo is over-edited all to hell (especially  based on all the comments it got on Flickr which pointed this out, albeit in a good-natured manner) and yet, I think it really works. I don’t know who I look like here, it’s someone I can’t place right now but it’s definitely not me; I really liked how I was able to bring out (i.e. totally fabricate) the peachiness of the skin and makeup and man, in spite of its flaws that wig takes BEAUTIFUL photos. I hope my friend Lana can doctor it up and wear the hell out of it, because it is lovely.

After over-editing the skin and thinking it looked too flawless (no, I did not wake up like this) I tried out a black and white version, but in the end decided to stick with the color, as I usually do since color is my THING.

lighting6_BW

It’s quite interesting to work this closely with my face and learn what tweaks I feel take me from perfectly acceptable to fabulous; I always widen the distance between my eyes because they are a little close-set, and I definitely do slim down my nose, even though my original nose isn’t a feature that has ever bothered me – it’s just more visually appealing when it’s a touch thinner. I also mess with face shape a bit; I usually prefer to shorten and slim my chin a little and widen my brow, making my face more heart-shape than oval, and even though I already have a nice neck (length-wise anyway; age-wise it’s seen better days, but COME THRU Photoshop and it’s all good), I tend to go ahead and make it longer anyway since for a portrait it’s more appealing. My cheekbones are pretty good, and I’m good at using contour to add depth to them anyway, so I don’t have to do much there; and then I go to town playing around with color, completely changing my makeup shades and usually doing something to change the color of my eyes. And yes, in the first photo shared here I made one eye blue and one brown, just because.

Honestly, the main thing that I feel I would change about my face if I could isn’t possible through plastic surgery, which is widening the distance between my eyes. With glasses on they can easily look even MORE close-set, which is why I am so particular about the size of the frames I will wear. But you can’t go to a plastic surgeon and ask him or her to MOVE YOUR EYES TO A DIFFERENT LOCATION ON YOUR FACE, and if you do and the surgeon agrees, please run away quickly and save yourself. So, Portrait Pro and makeup tricks it is. Moving on.

Two more I messed around with this week; I’m OK with these two, but they’re not thrilling, so I don’t have much to say about them. The cloth over my face in the second photo is just a shirt I was flinging about for the hell of it, and believe it or not I captured this shot without trying at all to frame my face with it; the top just flew up that way as the camera went off, so I thought that was pretty cool.

It’s past 9 PM here and I need to get my butt to bed so I can wake up at 4:45 to make my flight, so I’ll leave you with this last shot, which is one I really like; one thing it makes me think to mention is that the Portrait Pro software really only works in shots where the face is looking directly into the camera. The program uses adjustable placement points to determine where the features of the face are, so when the face is in profile or greatly off-center it just starts guessing where the eyes are, or the nose, or whatever. The result of this can be amusing, but unattractive, so I’ve learned by now to use PP sparingly in shots where the face isn’t basically head-on. I used it to shorten my chin, slim my nose, and touch up my lips a little here, and that’s it – but, because the software insists on finding TWO eyes even when there is only one showing, before I edited it out there was a random, misshapen, floating eyeball hanging out in my hair, complete with wonky eyebrow. It was amusing, and I should have saved a copy of it that way for posterity, but I did not. So here she is, without the hairy eyeball, and with this I will say good day, until next time:

lighting13
Yep, it’s the backwards cardigan again. And you can see some of the wonky wig hairs at the crown that I mention in my video review, too. But other than that, it’s a lovely wig.

Spring Brake

Once again I have to say I’ve been way too busy to type up blog posts, so there it is. And here’s a new one, since although I can barely believe it, Spring Break is here and I have a week off. It feels like we’ve just barely gotten past January, but it’s mid-March already and the school year is zooming by quickly. It’s been a tough year in many ways, some of which I’ve written about on my private blog, and some I’ve yet to share because I’m still processing it all. But for those of you who follow me there, that big old blog post of crazy will be going up soon.

For everyone else, there are more wig videos to come (have two more arriving tomorrow) and a few new photos to share. I finally got a chance to dress up and shoot the last Saturday, so I’ve worked on a few since then and will continue to work on more. I haven’t taken real photos since December, so it’s been awhile. I also worked over some old shots back in February when I didn’t have anything new to edit:

old_collage

I’m still playing around with the Portrait Pro software I bought recently, and it’s a real blast. I over-do it a lot, but I’m learning how to apply the effects with a softer hand – although on occasion I still do too much and the photo comes out looking way more edited than I’d like. In those cases I usually just add some texture or surface effects to disguise the over-smoothed skin (which is my biggest downfall).

lighting1a

For my last set, I also played around with lighting a lot, which was great fun, but it means my usual editing techniques don’t work as well, and sometimes the end result isn’t quite what I want. In the photo above, I’d used a softbox to hit my face with more light, which eliminates a lot of soft shadows and small detail from the face. The result is a more ‘high-fashion’ look (in my opinion) which a lot of hard shadows and angular edges, so a face can end up looking a little ‘flat.’ It’s not a bad effect, but it requires different editing, and although I really love that photo it doesn’t look much like a real person. So, I added a texture to it to give it an even more animated feel. Sometimes you gotta go where the photo leads you, after all.

lighting3

This one worked out better; I wasn’t using the softbox when taking the picture, so you can see how much softer and more dimensional the face looks from the start. Also, in case you’re interested, that dress was actually a mauve color that I edited to look gray; I didn’t really realize it when I chose the dress to go with that wig (I really chose it because I ran out of my usual photography makeup and was trying to find something that would cover me all the way up to my neck; in photos I use makeup on my neck and decollete that’s a different color from what I use on my face to get a good match, but I ran out on the last shoot and forgot to buy more) but when looking over the shots I noticed that the white curls on the wig mimicked, at least to me, the flowery swirls in the lace on the dress, so I wanted to emphasize that more by making the dress the same color as the dark black hair on the wig. Black was a bit too dark, though, because I also wanted some of the shine from the material to show, so I went with a dark grey. The result was a much more unified and interesting photo.

lighting5

In this shot I was once again using different lighting, but I think I did better at editing the skin even though it’s probably a bit TOO alabaster-looking to be considered real. However, I think that works with the dress and the hair anyway so I’m fine with it. And although the dress color in this shot was also edited, I went with more of a dark blue this time than gray. I’ve also been continuing to mess with the face sculpting controls in Portrait Pro to alter my look; in some shots I still look like me albeit a much better, less-wrinkled version; in others I let Portrait Pro edit me until I was practically unrecognizable. I usually use the program’s pre-sets first and then, if I don’t like what I get, I go back and change things on my own – in this next photo, PP gave me a serious Angelina Jolie/Julia Roberts edit, and who was I to argue with that?

lighting4a

This is another one I shot using the softbox, so again you see how much depth is removed from the face when using it. Also, I thought this shot was going to be impossible to get right, because in the original my face was about 15 different shades (from not having my photography makeup again and improvising with my day to day stuff, which isn’t nearly as heavy in coverage) AND on top of that there was a big shadow on my nose from the hair blowing around that made it look gray. And yet I actually managed to salvage it, albeit with a TON of editing. The wig in this shot, by the way, is the Bennett I reviewed last week. This next one is another one of the wigs I recently reviewed – the Aria by Rene of Paris. It’s a gorgeous color to photograph:

lighting2ab

And yep, this is one of those shots I felt I over-edited then added a bunch of texture to try and conceal. My skin looks practically plastic in it, but I love the way the hair is moving and that color – it really can’t be said enough – is unbelievably gorgeous both in photos and in person. And keep in mind that in all of these five new photos, I was wearing the same makeup, and used Portrait Pro to make all the color changes. I can’t say enough about that program, if you love working with portraits it’s the best thing I’ve ever come across for processing.

Coming up soon – more photos, and of course, a few more wig reviews. I still need to film the Soft and Subtle by Gabor (a major disappointment, so stay tuned), a new Kristen by Renau in one of the new Chocolate Collection colors, the Tessa by  Noriko in Butter Pecan-R, and another Robin by Noriko in Harvest Gold (I’ve always wanted to see what a longer wig would look like in that color, and we all know I love Robin). So stay tuned! And for those who follow the private blog, keep an eye out for a new post there, too.

Plugged-In Christmas

redchina4a

Among other things, I treated myself to some new Photoshop plug-ins for Christmas, and I’m having a hell of a lot of fun trying things out.

redchina5abc

The frames feature is actually my least favorite aspect of Mister Retro’s Retrographer plug-in; most of the frames chop the hell out of the photo to fit it into the frame, which bugs me to no end. But, many of them are pretty convincing (the one I used above is cheesy, but they have a bunch that are cool):

skintest2a_RR2

Frames aside, I am enjoying all the options Retrographer offers me as I was getting bored with the software I’d been using steadily for the past year and half, so I’ve been going processing-crazy with all the new bells and whistles.

skintest4_RR

This has also allowed me to dig back into past archives, work with old stuff, and see it in a new light (by filtering the hell out of it, of course). As a result, I haven’t taken any new photos, because I’d rather just sit down at the computer and play with my new editing toys than spend all day doing a shoot; but with thousands upon thousands of photos to choose from, this is hardly a problem – especially since I get bored with photos from the same set quickly and end up overlooking a lot of good shots.

skintest3_RR

I also bought a program called Portraiture, which focuses on correcting skin tone and texture – one of the aspects of portraits I am the most picky about, and often the most dissatisfied with in my own photos. Early test results are promising, but as usual I tend to get too heavy-handed with the smoothing and look a little too plastic, at least when first learning something new. Still, even for plastic results, these are better than I’ve been able to pull off up to this point:

skintest1

Once I had a feel for the Portraiture plug-in, I started going to town with the Retrographer effects and used WAY more processing than I’ve done in quite awhile:

RR_collage_1

RR_collage_2

While going through old photo sets for stuff to play around with, I came across this idea I’d had a year or so ago, where I would throw clothes into the air and shoot it in motion, then composite it into a shot of me with clothes flying around me. At the time, I didn’t like the shots of the dress I tossed around and didn’t pursue the concept with my final shots; but this time, I decided to give it a go. Although i still struggle with shadows when it comes to creating composites (a skill that is made more difficult, I think, by the fact that I shoot against solid backgrounds rather than shooting with a set behind me – the shadows’ imperfections are much more obvious against a solid gray background than they are against, say, a grove of trees) I am definitely better at it than I was at the time of the original shoot, and the fact that I still really struggled with it may have been why I didn’t pursue it at the time. In fact, when i took the photos, I think I was still using Corel Paint Shop Pro as my main editor and barely knew how to use Photoshop at all.

So – I took one photo of my body as the main photo, took a second photo of myself and layered my head from that shot onto the original since I was making an unattractive face in the original, then composited two shots of the dress in motion into the same shot, with them flying above my head to fit into the frame (and no, I don’t think “composited” is a word, but I used it anyway). I then pulled the whole thing into Retrographer and used a lovely film filter than took my background from gray to purple and really brightened the pink of the dress, and topped it off with some subtle pink lens flare. I am pretty thrilled with the results, and this has to be a favorite of anything I’ve done recently (this and some of those red dress shots, like the first one in this post):

oldleap1_RR_notexture

Ain’t technology grand? Just when I start getting bored with myself and what I can and can’t do, along comes some new stuff to revitalize me all over again. I’ll probably have more to share later since I’m working with pictures at least a little bit each day right now. I also have some plane pics to share from my recent outing with my father, which wasn’t much of a success due to bad weather and poor camera settings I forgot to check, but I managed to snap a few. One more week of vacation before the insanity starts up again, so let’s get to it!


Quick Silver

As I mentioned in my last post, I finally got a chance to put on the full face and take some portraits while I was on vacation last week. So here they are:

tuesday2a

That wig cost about $35 and is called Elveen, by Janet Collection. After a few hours of shooting, the synthetic fiber was starting to frizz and dry out noticeably; I have to comb through a wig every few shots when posing in them because they get thrown around and messed up so much, and brushing isn’t good for even a high-quality synthetic fiber, much less a cheaper one like this. On the plus side, though, the fiber here is heat-friendly so I could probably use a blow dryer or curling iron to smooth out some of the frizz. I wasn’t looking for longevity anyway; I was just so curious about this lovely color that I decided to try one. It is gorgeous; at least for photos. Although as a so-called “ethnic” wig, the lace front is way too dark for me. Moving on.

tuesday8

Many people who’ve seen these photos have commented on the interesting makeup choice I made here; truth be told I didn’t intend to take all my photos in this wig and had several other costume changes planned, involving far more colorful stuff that would work better with all that orange and gold. However, I got the wig on and started snapping, and everything was just working in it so well that I decided to stick with it; I didn’t end up shooting much in the other wigs and costumes I’d picked out at all.

tuesday4_pxr (2)
This was one of the others I intended to use more – glad I didn’t

I was really surprised that even the makeup application process went smoothly; I found a stock photo online with makeup that inspired me and decided to copy, and even though i didn’t completely go in the direction of the photo, everything from contouring to shading and even applying false lashes went off without a hitch, turning out almost exactly as I planned and without any major screw-ups to correct.

Reasons-to-choose-your-makeup-artist-wisely

The photoshoot went the same way; well, at least until I took off the silver Elveen and tried some other hair choices – nothing else worked as well, and I was starting to get tired and bored by that time so my heart wasn’t in it. I tried a few leaping and levitation shots, but I’ve only processed one so far because by the time I got to that point in the shoot (I always save the jumping and movement stuff for last, since it tends to mess up the makeup) I was way too sloppy in my execution for anything to look stellar. Plus, it was really the silver stuff I was interested in processing, and I knew that by that time, so I probably shouldn’t have bothered. I did process one though:

tuesday5

But back to the silver wig. After some straight up makeup and hair shots, I wanted to play around and create some holiday looks, so I dug out the Christmas stuff I bought last year at Pier One and decided to mess with it a bit:

tuesday7

When I processed this one, I was annoyed with all that orange and gold glaring at me – although it did really work visually, I wanted to compliment the silver hair and sweater more than all that bright color was able to do. So, I actually used a black and white filter to change the makeup and layered it on over the original shot. Notice I even managed to pull off the stripey eyebrows – yeah I told ya, the makeup all worked out well for some reason this time.

tuesday9a

I was just goofing around here, obviously; I don’t think you can tell but I used Pixlr to add in a bunch of patterns to the ornament. If you look closely you can even see tiny birds flying around in there – those came compliments of a Pixlr filter. And yes, my nails were fabulous.

tuesday1a

One thing I noticed when working with these photos was how nicely neutral the silver was; I could really manipulate color in all sorts of ways and create different looks entirely. The only issue that created was skin tone; I struggled in most of these to keep my skin from going too gray, and in some shots I don’t think I pulled it off very well, but hey, I tried. Skin tone is always a bitch in photos anyway. Here I obviously added a lot of blue, and I even stole the sparkle from the center of the magnolia in my hair and placed it over my real eyes.All that glittery-goodness was added to the sweater in Photoshop, although in real life it does have a bit of shimmer.

tuesday4_pxr

This one wasn’t working for me at all, mostly due to the skin tone issue, until I pulled it into Pixlr and attempted to cover it with some sort of overlay that might disguise the splotchy, odd-colored skin that was bothering me. I often do that with photos I can’t get quite right (I did the same with the one photo with the short blonde hair); I figure if Pixlr can’t save it for me, it probably isn’t worth saving. This overlay was from a very geometrically-shaped collection that I almost never use, but lo and behold this one gave me exactly what I was looking for. It added just the bit of interest I felt it needed, as well as covering up my skin a little and distracting the eye so perhaps no one will notice it’s weirdness.

tuesday3_final

I also struggled with lips in this set; mine are quite thin and dry (I often widen/thicken them in post) so this is nothing new, but I made matters worse by choosing to use gold glitter lip liner as lipstick and then outline it with orange – you can see it in the first shot above where I didn’t edit that mess out. For most of my other shots, I changed it in some way, because it looked pretty sloppy. In the photo directly above I just did my best to change the lip color to orange all over, and then soften it. This photo is my favorite, by the way – it’s a composite of three different shots of the wig since there’s no way it has near this much hair. And the wreath wrapped around me is a Pier One prop I used last year, too.

As always, there’s more from this set I want to edit, and it looks like my red dress from China is set to arrive today, so there will, of course, be more coming soon. Although I may not get to the red dress photos until Christmas break. We’ll see!

Drag Days of Summer, Part Two

OK, here we go with the actual photos! The ones I’ve had a chance to edit, at least, from Wednesday’s shoot. But first:

skirt3a

I actually have some shots to share from June that I never posted. First up is a few more with this fab striped skirt I got from The Gap – it really photographs well!

gapskirt1b

That was actually what I call an “unjump,” meaning an attempted jump shot that I timed wrong and did not capture properly. Both the unjump above and the next one are also composites – the top half of me is from one shot while the bottom half is from another:

skirt2a

In both cases, I just didn’t like something that was going on in the top half (I think in one my hair was completely covering my face and in the other I just didn’t look too graceful) so I did my best to layer two different shots together. Took a long time, but I think I pulled it off OK.

Also, not gonna lie – in the shot directly above, the shadows were hitting my face in an unflattering manner, causing my nose to look unnaturally big. So, I used Photoshop to make it thinner. Then, I realized my eyes looked wonky with the thinner nose, so I worked some more magic to move them a leeeeetle father apart from each other, and thus  balancing them with the nose. Have you ever heard how if you try to get plastic surgery on one part of your face, you often have to alter another to make it look right? Well, that’s kinda what happened here, only, not permanent. Still, in the end I look a bit less like myself than normal, but whatevs. I already had a torso from one shot and the legs of a different one, so why stop there, right? Moving on.

Here’s another shot I took of Robin when I was messing around with her after making my video review:

Robin3bb

As in the last shot I shared, this one is also two different pics of the wig combined to give it more interesting movement. And lately I’ve been experimenting with some softer light filters than I’ve ever used before; I’m in a phase of feeling less insistent on absolute clarity and trying out softer looks. Who knows why. Always something to change up.

Brandi1

This is a shot I took of Brandi during the same shoot where I took the Robin pics (obviously, since the clothing is the same). Brandi is much more full, so I didn’t need to layer two photos together to get that much movement. One more from this set, this time ridiculously Pixlr‘ed:

Brandi2a

The original pic was out of focus, but I really liked how it looked in spite of that; there was a really nice shape to the flowing hair, so I chose to work with it anyway. I think I may have over-done the Pixlr overlays, but they have added so many cool ones lately I kind of can’t stop tinkering (I love the ‘mermaid’ and ‘candyminimal’ ones in particular). Speaking of overdoing it with Pixlr:

dolly1aa

I’d really started to get bored with June’s shots by this time, and dug back into the ol’ archives to find something else to edit. In the end it felt a bit boring, so I ran it through the Pixlr grinder also. Another old one I worked with that I did NOT Pixlr-fy was this one:

pink1a

That’s one of my favorite photo wigs, even though I tried to trim the bangs myself and really jacked them up. Not too noticeable when I’m throwing the wig around, fortunately.

Okay, so now on to the most recent stuff:

heart1b

I already mentioned the makeup process I went through for this shoot, so can we talk about this sweater now? I got this from my favorite online store for vintage costume-like goodies, The Kissing Tree. Whenever I’m feeling a little bored with my current stash of costumes I go check them out (usually at their eBay store), and when I came across this thing I knew I’d found my next purchase. It is perfect for portraits because there’s so much going on, it can be used in many different ways even within the same shoot without it really looking like it’s the same sweater every time. It has a great feathery collar, and I love love LOVE clothing with texture; the sleeves are not only striped BUT they have little fabric balls AND beads AND rhinestones – fabulous! Just moving my arms around in interesting ways make very unique pictures – like this:

heart7

Then, for added fun, it also has that huge heart right in the middle. I didn’t actually use this sweater in nearly as many ways as I could have in this set, but I love any article of clothing that lends itself to a lot of different looks just by positioning the body in different ways. And at $34 it was a steal. The only downside is that it’s a sweater, and a heavy one at that, so for taking photos under bright lights in July in a small studio with tons of windows, it can get pretty hot, but I just stuck on some shorts and did the best I could – most of the shots I took were portraits; I spent two hours on that makeup and I was determined to get the most out of it! So for most of the shots wearing shorts that in no way matched the top was fine.

To maximize the shoot, I also made as many wig changes as possible:

heart3a

See what I mean about that sweater? This photo doesn’t even look like it’s from the same shoot! And there’s that softer lighting again. One thing I did differently this time was really neutralize a lot of the color in the RAW files so that I didn’t get some of the blown-out brightness and discoloration I tend to get when processing, but I think that resulted in my face looking too white later. That, and the fact that I used too much highlighting on my face when applying the makeup. Anyway, that led to me having to add some detail into the shots using shadows and filters, and I think I leaned towards softer light effects to help soften the face overall. If any of that makes sense. Also, my blending wasn’t great so I spent a lot of time smoothing out that eyeshadow, and I messed around with my nose a lot in most of the shots. I found that enlarging my nostrils just a bit really changed how I looked, so I did a lot of little tweaking like that here and there just to accentuate the drag-effect I was going for. Kind of the same technique I used for this one:

heart10

My face came out REALLY white in this one so again, the softer light helped to add some dimension and detail back to my face. And who knew that Rene of Paris Caitlyn would make such a great photography wig? I almost sold it, but in the end I decided against it because t was inexpensive and I thought it MIGHT be good for photos – that sure was a good call, because I LOVE how it looked in this set. I’ve been gravitating towards short wigs lately for photoshoots anyway, especially when I’ve just spent two hours on my makeup; they are so much easier to work with when posing, and they stay out of the face. I can’t get all that good flowy motion I love, so there’s always a tradeoff, but especially with the summer heat the shorties are definitely a good option to have.

They don’t look as good for jumping, though,but it was pretty hot in the sweater already so I stuck with Caitlyn for my leaps – which really weren’t leaps but levitations:

heart4c

For this one I was leaning over a stool, then I layered that over a blank shot I took of the background so I could erase the stool out of the shot. This was mainly tricky because of the hand I was leaning on in the original:

heart4a

That hand was a real giveaway; it did not look at all natural when I was “floating” and made it obvious I’d been leaning on something, so I went back to my other shots from this point in the set, and found a hand I thought I could layer over the original one. However, THAT hand had all my fingers spread apart, and it was an absolute bitch to essentially cut and paste properly without the edges of the fingers looking really unnatural and obvious. I am not sure why it took me so long to give up on that hand and just go find another one; I think I spent something like four hours working on this photo and a good two of those hours were dealing with that stupid hand! In fact I gave up for the night eventually and returned to it the next day – at which point the solution became obvious, which was, duh, go find another hand.

Funnily enough, the hand I used ended up being the original hand from the next shot I processed; I didn’t notice that until I was editing this shot and working to erase the stool and had to maneuver around the hand again and thought, hey, this is as easy as it was working with that hand in my other shot – oh hey! It’s the same hand! Hi, Hand!

heart8

So now you can scroll up to the first levitation shot and see the same exact hand in that one as is here. Isn’t that completely uninteresting? And aren’t you glad I spent an entire paragraph and half talking about it? Of course you are. And in this shot, I was once again posing on a stool in the original, and used the same blank backdrop shot to layer over. My lips were also wonky in the shot, and in trying to fix the wonkiness I made them huge, then decided I kinda liked how they looked and kept them. Oh, and shadows. They’ve been a bitch for me ever since I started trying to edit them into levitation shots to make them look real, and I finally figured out a strategy that works for me. Instead of using the burn tool with a fairly small brush and drawing an outline around myself, I just make the thing HUGE and slap it over the entire subject several times, then erase the shadows from my body and reduce the opacity, and BAM. A nice shadow every time!

In yesterday’s post, I mentioned that I was playing around with lighting throughout this set, too (remember, I spent two hours on that makeup and was determined to get as many different looks as I could out of this shoot!). In most of the shots I had my Speedlight attached to the camera and bounced off the ceiling for some nice soft light, but occasionally I’d attach a light bender to it and aim bright light directly at my face for a different look:

heart2

Much harsher shadows behind me, and a lot less shadows on my face with a much brighter light. It’s a harsher look, and overall I don’t care for this effect as much as I do the softer ones, but for something different it’ll do.

And to sum up for now (who knows how many more of these I’ll edit – I have a few wigs and looks I haven’t even processed yet) here’s one last wig change:

heart9

That wig is called “Sava” and I think it was made by Vanessa Wigs. I’ve gotten more photographic use out of that $20 wig than many of my costlier ones; it’s interesting, it’s easy to wear, and it works with so many different looks, believe it or not. Great wig. And those are some older Zenni Optical glasses I got and kept even though they are no  longer the right prescription, because they’re awesome.

Whoo I am all out of words! Which is great, because I’m also all out of photos for now. More to come though, as well as some new wig reviews: Camille by TressAllure (which is really Shilo by Noriko, but with a lace front); Miranda by Amore; Stevie by Amore; Kenzie by Noriko; an updated Code Mono by Ellen Wille; a Seville in Macadamia-LR by Noriko; a May by Noriko; and another Noriko Angelica (also in Macadamia-LR). Sheesh, did I really just admit to buying all of those?! As I may have said before, it’s my birthday this month, so I partied it up a little early with my purchasing. School starts in two weeks anyway, and I know my wig reviewing will either calm WAY down or possibly grind to a complete halt, so I’m getting it all in while I still can! Never fear though – I still have oodles of old vids to upload, so that should continue to either annoy or entertain you through the first semester, at least.

Oh and also – my July Stitch Fix will be here Wednesday, so that’s happening too. What can I say, folks – stay tuned!

Self-Possessed

Still working through the portraits from Valentine’s Day, so here’s more to share.

Valentine13
This expression is still a favorite

I may have mentioned this before, but I’ve been asked a few random times for prints of my photos, and for the most part I just blow people off about it because I don’t know how to do it. Although I should know all this stuff by now, it involves planning and thinking and numbers and math, so I’ve never bothered to figure it out. Well, I did that one time a rep for that florist’s magazine emailed me and offered me three hundred bucks for one of my pictures, but then I promptly forgot what I did. Anyway.

valentine14a
I don’t like this one; I completely started over on it three times but am still un-thrilled with the results

A friend of mine runs a little small-town art gallery in our area, and she asked me today if I’d like to hang some of my photos there – she’s also mentioned the possibility of a show. This finally prompted me to try and figure out just what I’d need to do to get my photos print-ready, and while I still don’t totally get it, I know that almost all I’ve done so far can only be printed rather small. The problem is that I have so many photos (well over 4,000 by now) that I never keep the edited TIF files once I’ve converted a photo into JPEG to save space on my hard drive, so I can’t go back and correct some of the formatting errors without compromising quality (I do keep all the original TIF files, but it would involve me re-editing them to use them, which I may end up doing). I only did so much research before getting bored and dropping it, so I’ll keep checking into it and see what I can come up with. I really thought because I keep my files as huge as possible that was all that mattered, but once again it turns out I am clueless. Moving on.

valentine15

I’m still getting mileage out of the shoot, primarily the shots with the vintage plaid dress since it moved nicely and created interesting images; I’ve had some mis-steps along the way but have still stumbled across a few winners here and there, like the one above. So far, that one has generated the most positive response; I think it’s all that color.

valentine18

I don’t normally smile when I pose since in general, I don’t think my smile is all that great. I always try, but usually it looks stilted and false. I’m not kidding when I say I’ve spent hours practicing my photo-smile but for the most part, it still reads false (this usually happens in non-studio photos too, when just hanging with friends or whatever). I swear I’m not being down on myself when I say this – I’m speaking from a photographer’s perspective and not from some negative perception of myself – but in general, smiling is not my best pose; it just isn’t. But this one actually worked; probably because it’s more shouting than smiling, but whatever.

valentine20a
This one was blurry but I wanted to try because I liked the idea; the end result is MEH

I’ve noticed that as I moved into the second costume of the set, the lighting I created for the curly red wig shots became too bright; I don’t know if it was the change in costume that create more flash bounce or if I just inadvertently moved in closer to the camera where the external flash was mounted; but my facial features were pretty blasted out in this part of the set for the most part, creating a flat appearance. I really should start hooking up my camera to my computer while shooting so I can catch things like this before it’s too late; the LCD screen really doesn’t work that well to reveal such things. I had to work pretty hard to tone my over-bright skin and bring back some of the definition to my face; I was only so successful at this and had to settle for merely OK facial features in most of these.

valentine21a
Used several Topaz filters here to mess with the color – can you tell I’m starting to get bored?

Not sure how many more of these I’ll work with, but since I haven’t had time for a new shoot, and probably won’t for a few weeks more until Spring Break comes around, be prepared for more of these or nothing at all. And who knows, maybe I’ll be able to print some photos and hang them in a gallery soon. It was a passing comment on Facebook, so we’ll see if she really even meant it, but still, it was nice to be asked.