
I finally got a chance on Sunday to drag myself up and take some photos! About three hundred and fifty, to be exact. Not sure how many I’ll process, but I’ve done a few so far, including a shot for my Day 32:
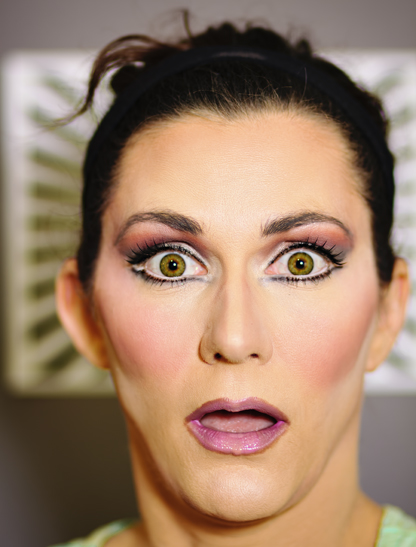
Processing one of my makeup test shots has kind of become one of my traditions, if that’s the right word, so I decided it would be the perfect addition to my 365 project. I had a few costume and wig changes throughout the shoot, but as it turned out I only edited shots from one of the outfits. I’ve not done any full-length or jumping shots in awhile, so I was initially more interested in processing those. I finally got to wear this great ball gown I bought from The Kissing Tree Vintage off eBay way back in May, and the skirt is just marvelous – or should I say was marvelous, as I stepped on it a few times during the shoot and ripped it a bit. Sadly, most of the vintage gowns that come through my door have come here to die.
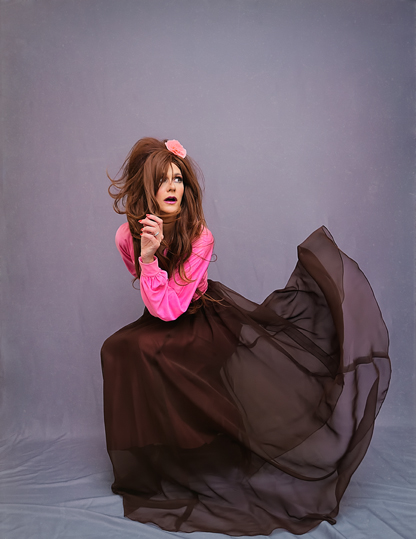
Maybe you can’t tell, but I was actually balancing on a little stool in this photo, then edited it out so it might look like I’m floating, but I’m not sure that comes across. I’m also not sure it matters. And by the way, that is one of my favorite wigs.
Anyway, it’s the next photo that I’m really excited about. For the first time, I actually managed to visualize a composite photo and then bring it to fruition almost exactly as I pictured it in my head. I’ve had the idea for a few months but have been scared to try it, based on my past disappointments with creating composites, but after watching a few videos from the composite class I purchased online a while back, I felt I had a bit more of a handle on how to do it (although not much more, since I only ever watched a few of the videos and never completed the entire class). I thought the key would be to keep it simple, and try to get as much right in the camera as possible, so to start, I took a fairly basic photo of myself standing on the little stool.

Then, without changing anything about the position of the camera or the lighting, I took the pink foam Target wig I got last year and placed it on a tripod at different areas of the set where I wanted it to appear as some sort of floating, magical thingamabob:


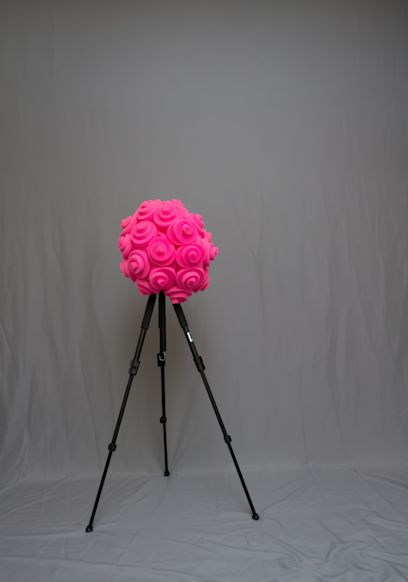

There was a time where I would have thought that all I had to do was take one picture of the wig, then layer and re-size it into different parts of the original photo, but I’ve learned my lesson about that. This time I knew that if I moved the wig around and placed it where I wanted it to be, then layered all four of those shots into the original, each wig would be in the proper lighting conditions in relation to the entire set and would look more realistic. I hope I’m articulating that properly, but poorly-explained or not, it made a big difference. I was able to layer all four pictures of the wig into the original shot, then spent a good deal of time dodging and burning to add shadows and create the illusion that all these little pink lumpy orbs were floating around me (I found a nice little tutorial online about adding shadows that finally made that particularly tricky step a little easier – although I still think I need work in that area). After a lot of fussing with color and shadows, I finished up by adding a texture layer to the gray background using my RadLab plug-in to help conceal any editing flaws that might be evident to a trained eye – and then, voila! It may not be perfect, but it’s a hell of a lot better than anything I’ve tried up to this point, and it does look almost exactly like what I envisioned:

And by the way, since my plan to paint the walls of my office fell to the wayside, I finally bit the bullet and bought a rather expensive backdrop called a Diamond Cloth from an online store called Backdrop Outlet. I’ve been eyeing their backdrops for awhile; they have different levels of quality, and I went with the Diamond Cloth since it was the cheapest version. It still was NOT cheap at almost $100, but I have to say it was worth it. The fabric is rather thin, but completely opaque, and it was HUGE. I hung it all the way up to the ceiling and the bottom STILL rolled out to cover almost my entire office floor! I was able to wash and dry it right out of the box, and although it still had some wrinkles when I hung it, they did not show up too much in the final photos. I’d forgotten how nice shooting color is against gray, and am very happy with the purchase. The store has literally hundreds of backdrops, many different textures and prints, but being me I’ll probably stick with solids for the most part since that seems to be my “thing.” They also make big, fancy fake floors you can roll out over your own to jazz up the look of your photos, but again, this stuff isn’t cheap, especially when I do such wide shots that I have to buy the biggest sizes. Moving on.
Much more from this shoot later – there’s an entirely different vintage gown, a burgundy-and-pink wig, lots of portraits, and jumping still to come.

LOL!!! That foam wig is worth a million bucks. I love the effect of it floating in different sizes all over the photo. I can only imagine the possibilities with this concept. Great colors too. Really a lot of fun here.
Yeah, making myself float is still a bit beyond my capabilities, and I fail at it more than I succeed, but perhaps me standing still while other stuff floats I can handle! One thing I also got out of the class I barely took was the importance of sketching out as detailed a vision as possible, rather than my usual method of getting a rough idea in my head then winging it to make it happen. I was much more planned and methodical with this, and the results were evident.
Love the final shot. Wig is nice to, Why is it your fave hmmm? 😛
It has that big bump up top that is very drag-queeny, and I just love that look. It is so dramatic for photos!