Drag Days of Summer, Part Two

OK, here we go with the actual photos! The ones I’ve had a chance to edit, at least, from Wednesday’s shoot. But first:

skirt3a

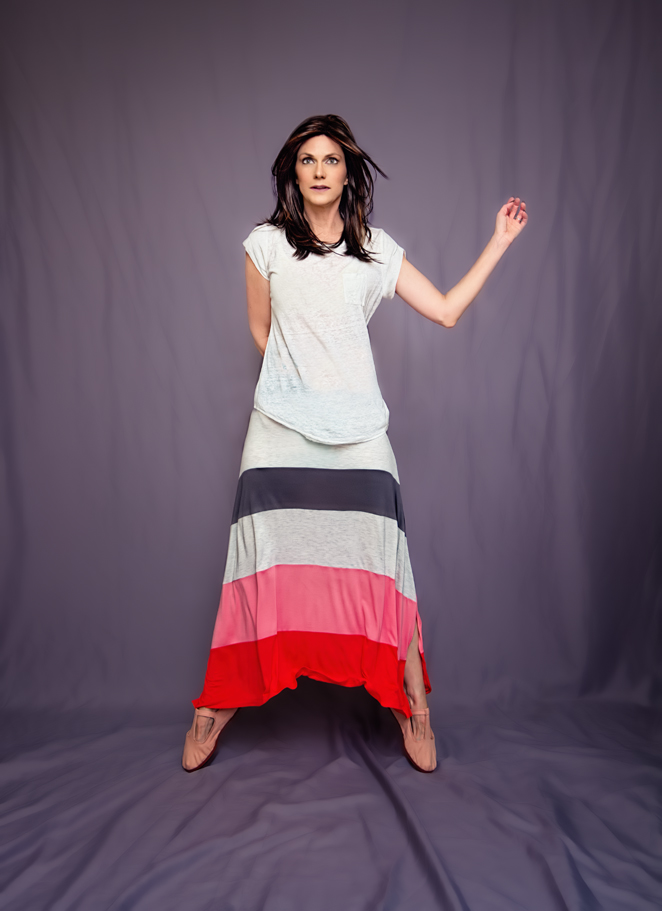
I actually have some shots to share from June that I never posted. First up is a few more with this fab striped skirt I got from The Gap – it really photographs well!

gapskirt1b

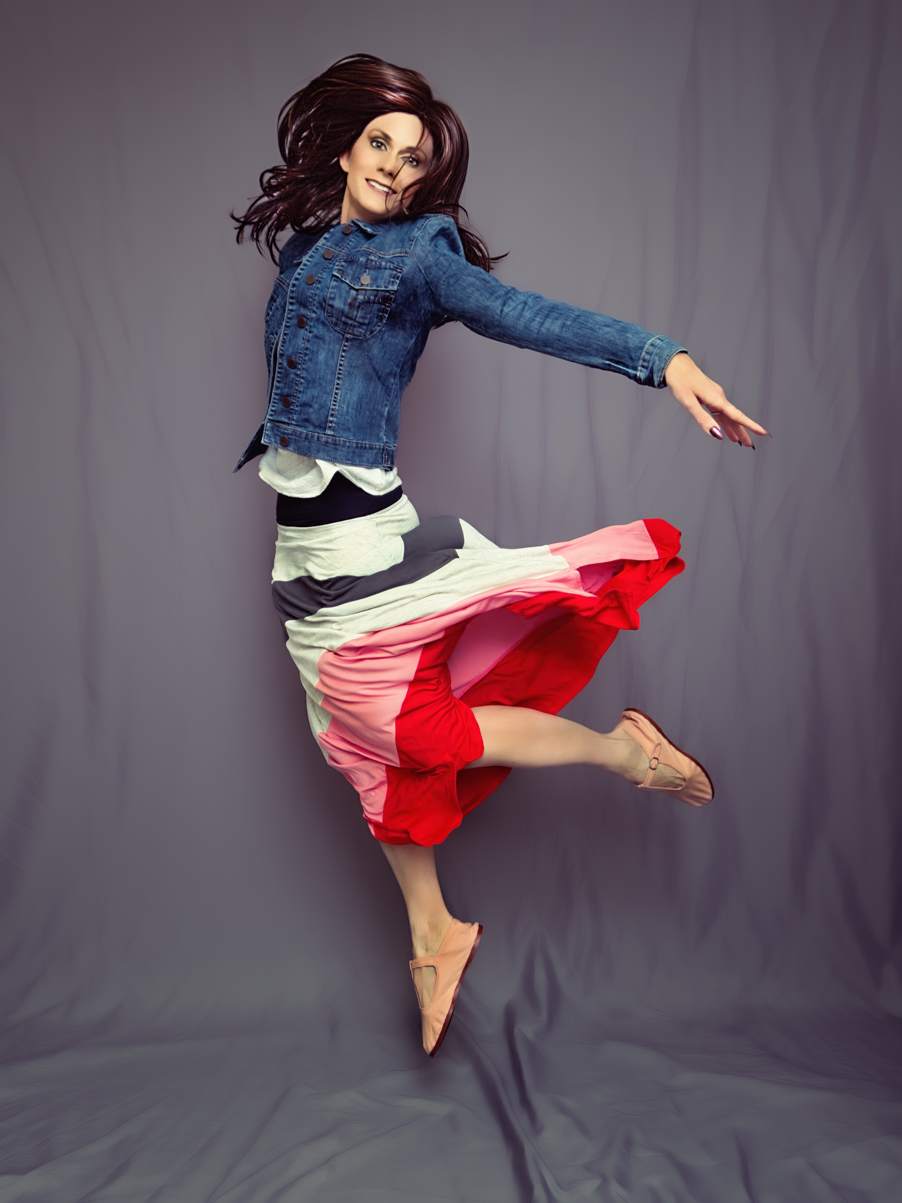
That was actually what I call an “unjump,” meaning an attempted jump shot that I timed wrong and did not capture properly. Both the unjump above and the next one are also composites – the top half of me is from one shot while the bottom half is from another:

skirt2a

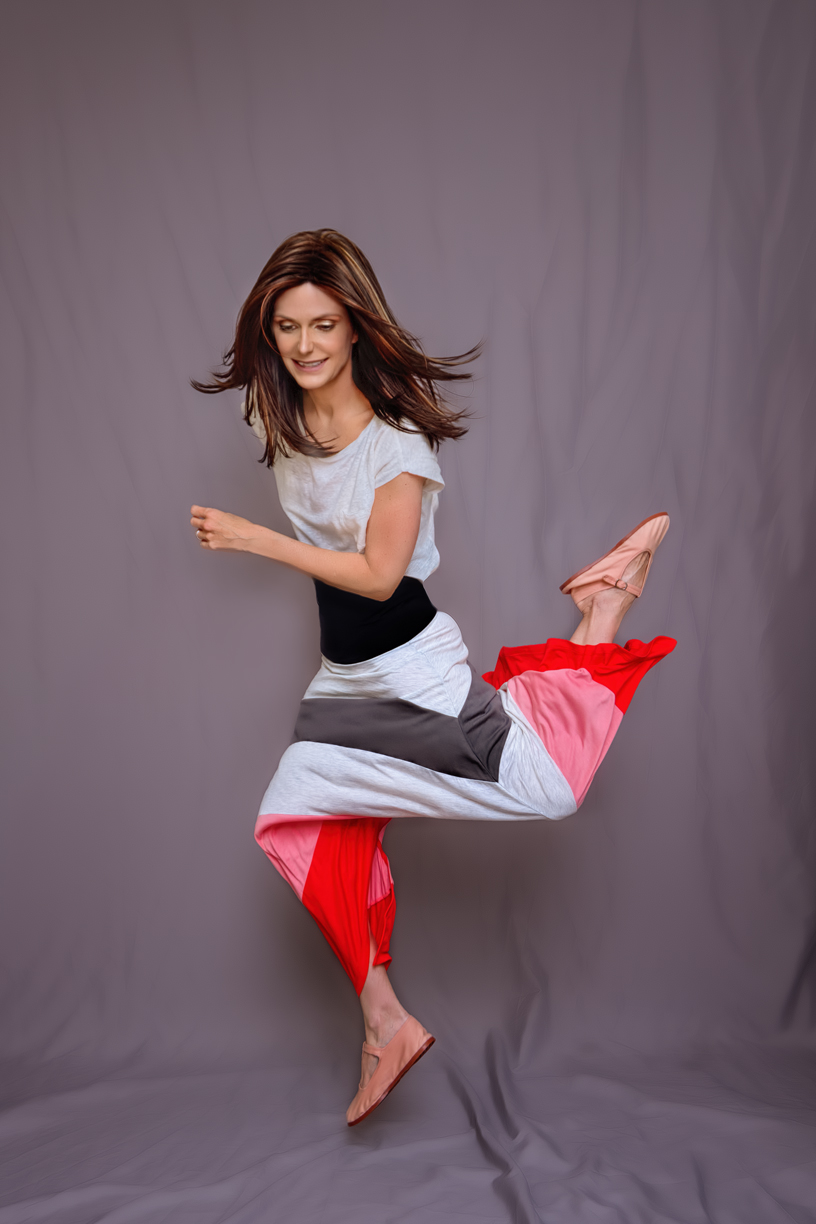
In both cases, I just didn’t like something that was going on in the top half (I think in one my hair was completely covering my face and in the other I just didn’t look too graceful) so I did my best to layer two different shots together. Took a long time, but I think I pulled it off OK.

Also, not gonna lie – in the shot directly above, the shadows were hitting my face in an unflattering manner, causing my nose to look unnaturally big. So, I used Photoshop to make it thinner. Then, I realized my eyes looked wonky with the thinner nose, so I worked some more magic to move them a leeeeetle father apart from each other, and thus  balancing them with the nose. Have you ever heard how if you try to get plastic surgery on one part of your face, you often have to alter another to make it look right? Well, that’s kinda what happened here, only, not permanent. Still, in the end I look a bit less like myself than normal, but whatevs. I already had a torso from one shot and the legs of a different one, so why stop there, right? Moving on.

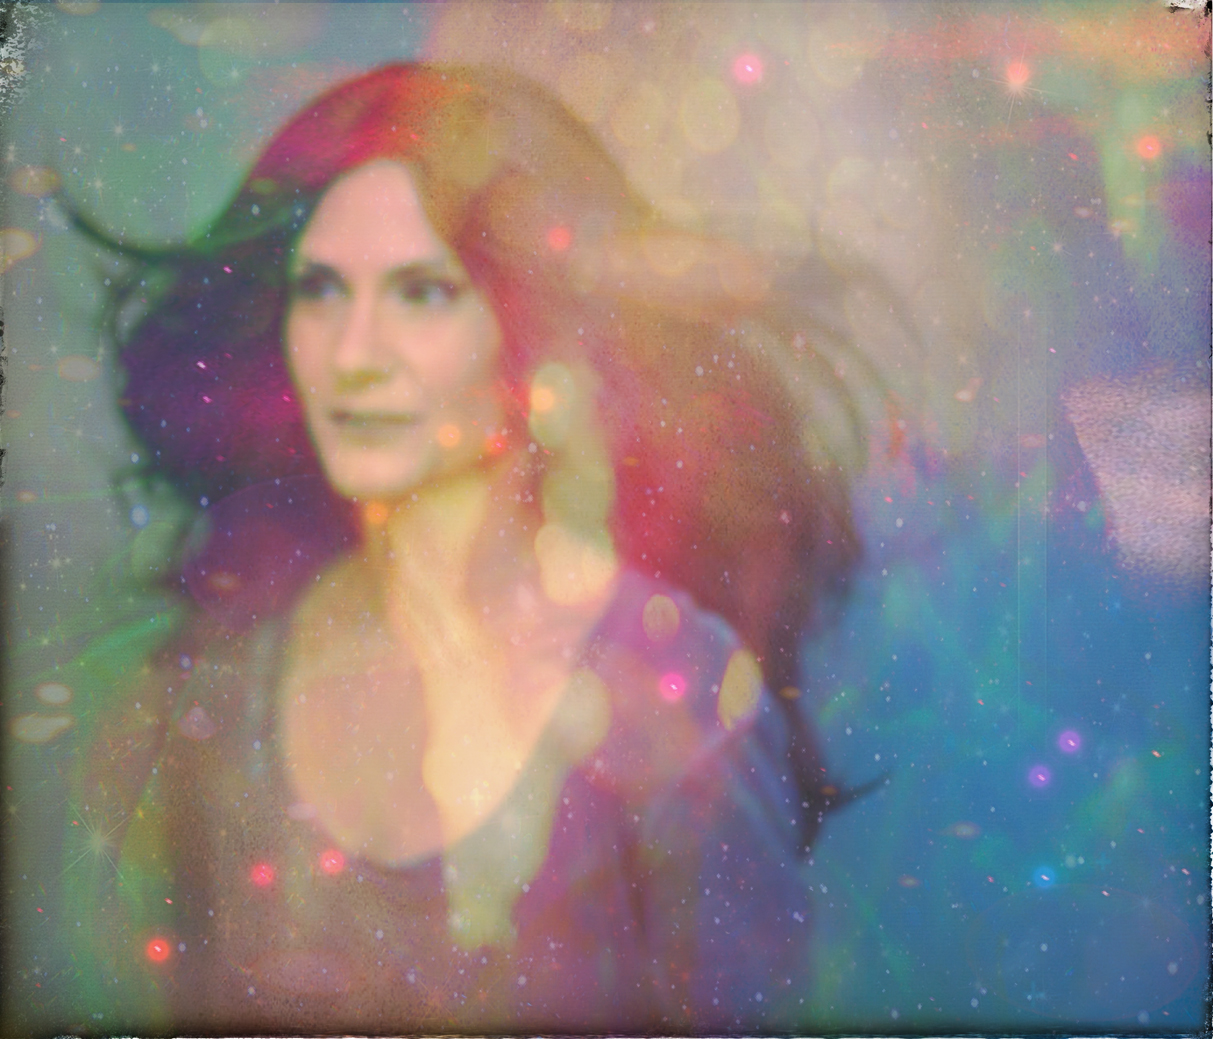
Here’s another shot I took of Robin when I was messing around with her after making my video review:

Robin3bb

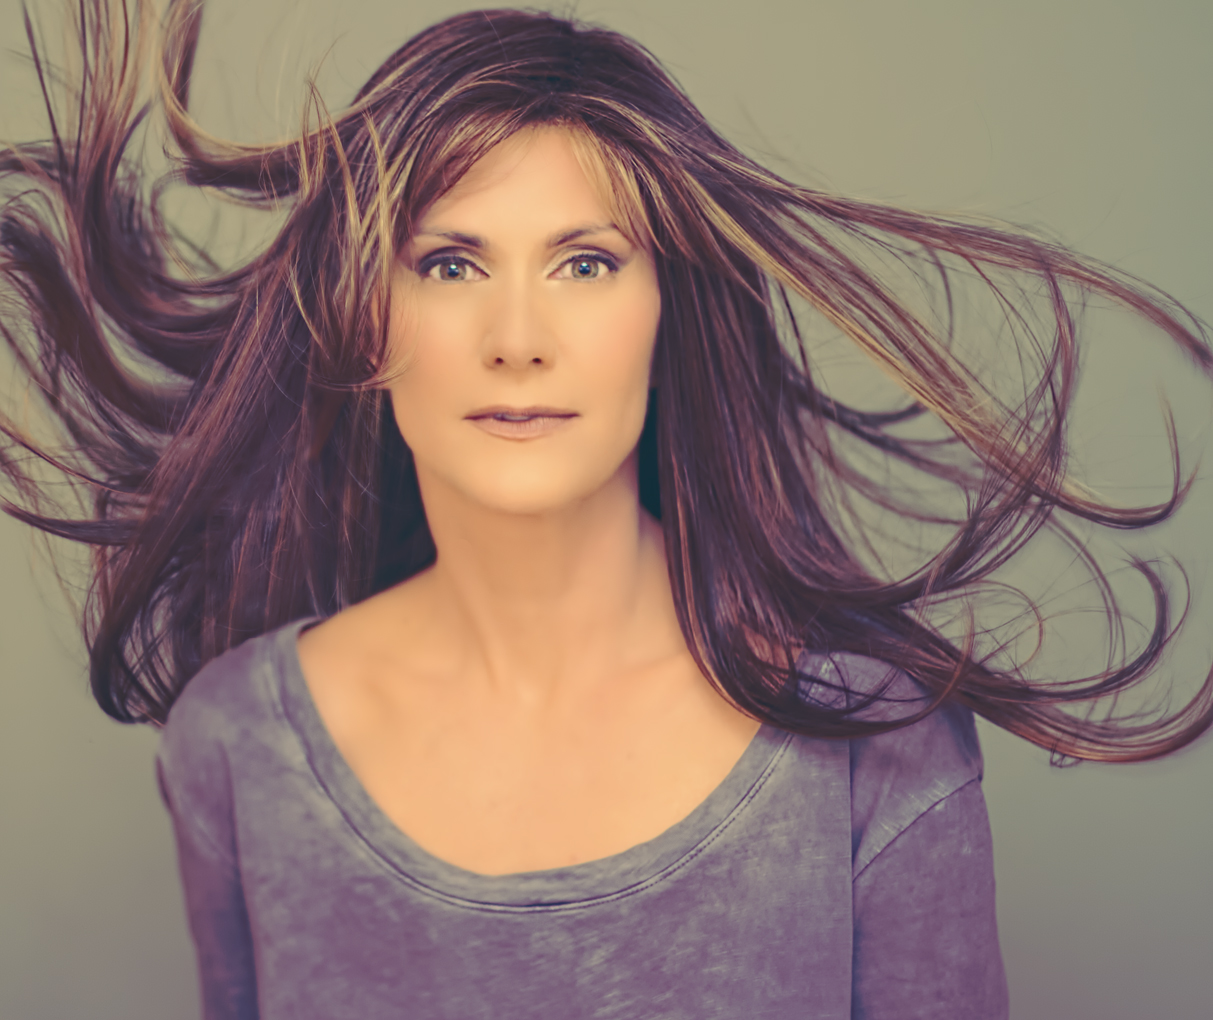
As in the last shot I shared, this one is also two different pics of the wig combined to give it more interesting movement. And lately I’ve been experimenting with some softer light filters than I’ve ever used before; I’m in a phase of feeling less insistent on absolute clarity and trying out softer looks. Who knows why. Always something to change up.

Brandi1

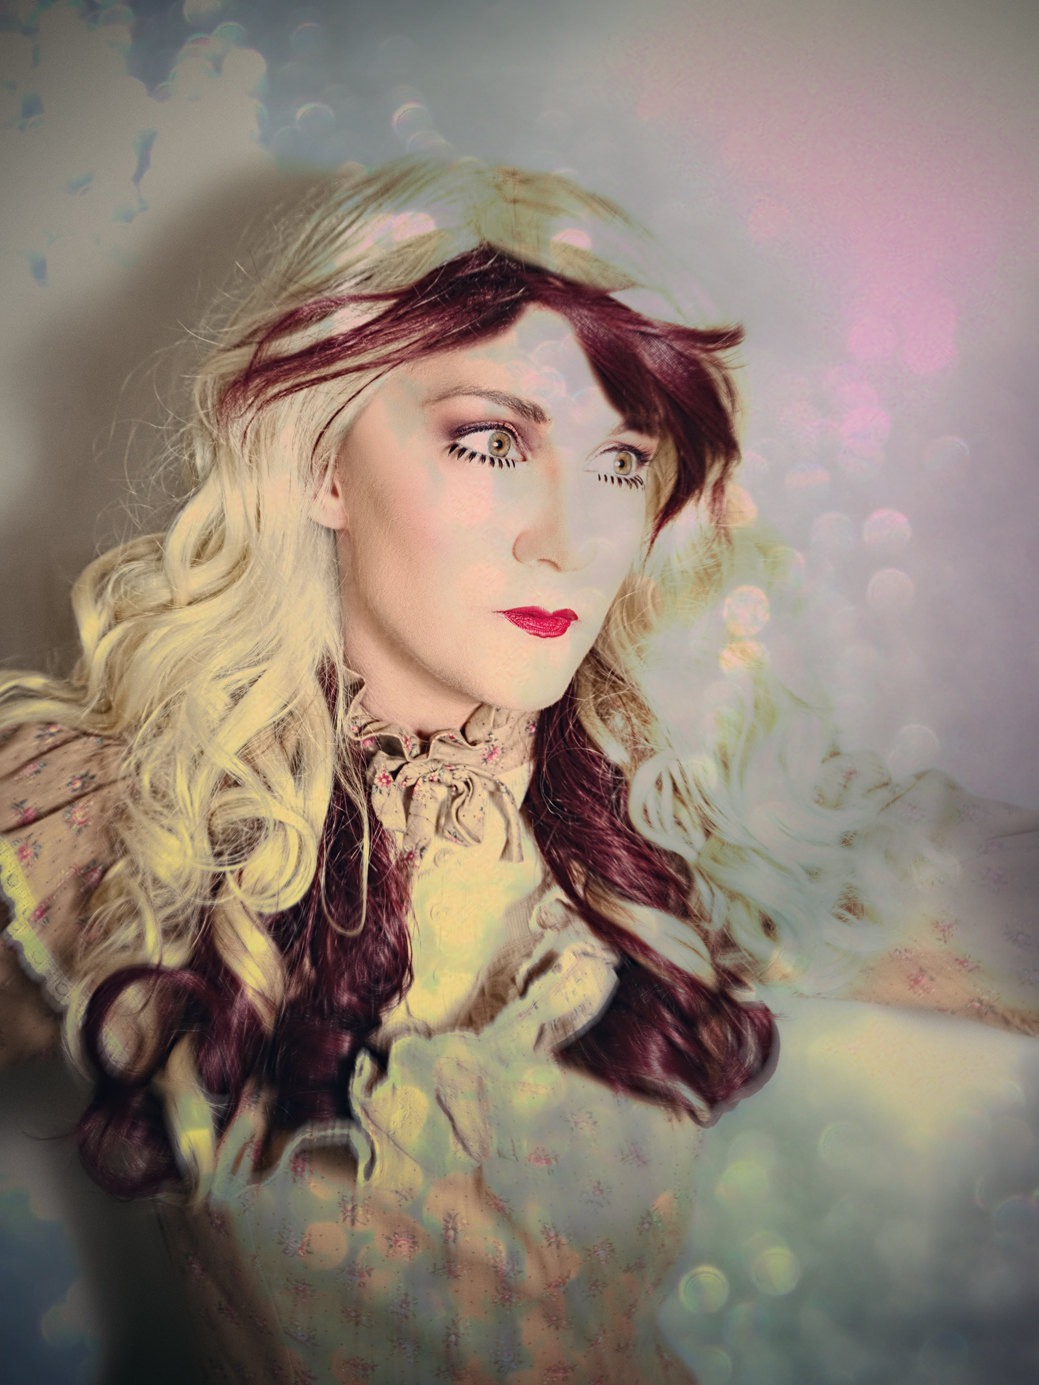
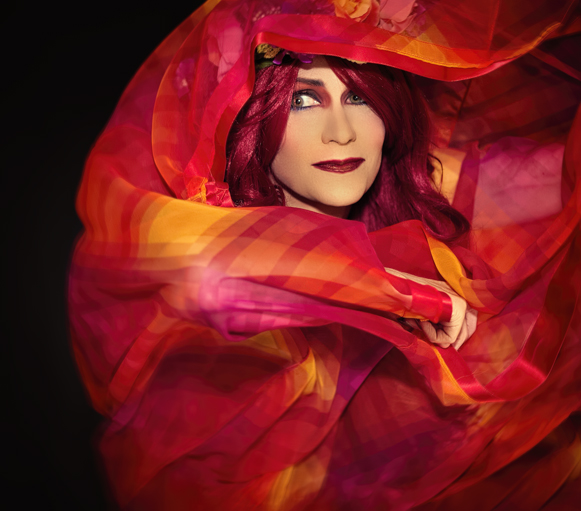
This is a shot I took of Brandi during the same shoot where I took the Robin pics (obviously, since the clothing is the same). Brandi is much more full, so I didn’t need to layer two photos together to get that much movement. One more from this set, this time ridiculously Pixlr‘ed:

Brandi2a

The original pic was out of focus, but I really liked how it looked in spite of that; there was a really nice shape to the flowing hair, so I chose to work with it anyway. I think I may have over-done the Pixlr overlays, but they have added so many cool ones lately I kind of can’t stop tinkering (I love the ‘mermaid’ and ‘candyminimal’ ones in particular). Speaking of overdoing it with Pixlr:

dolly1aa

I’d really started to get bored with June’s shots by this time, and dug back into the ol’ archives to find something else to edit. In the end it felt a bit boring, so I ran it through the Pixlr grinder also. Another old one I worked with that I did NOT Pixlr-fy was this one:

pink1a

That’s one of my favorite photo wigs, even though I tried to trim the bangs myself and really jacked them up. Not too noticeable when I’m throwing the wig around, fortunately.

Okay, so now on to the most recent stuff:

heart1b

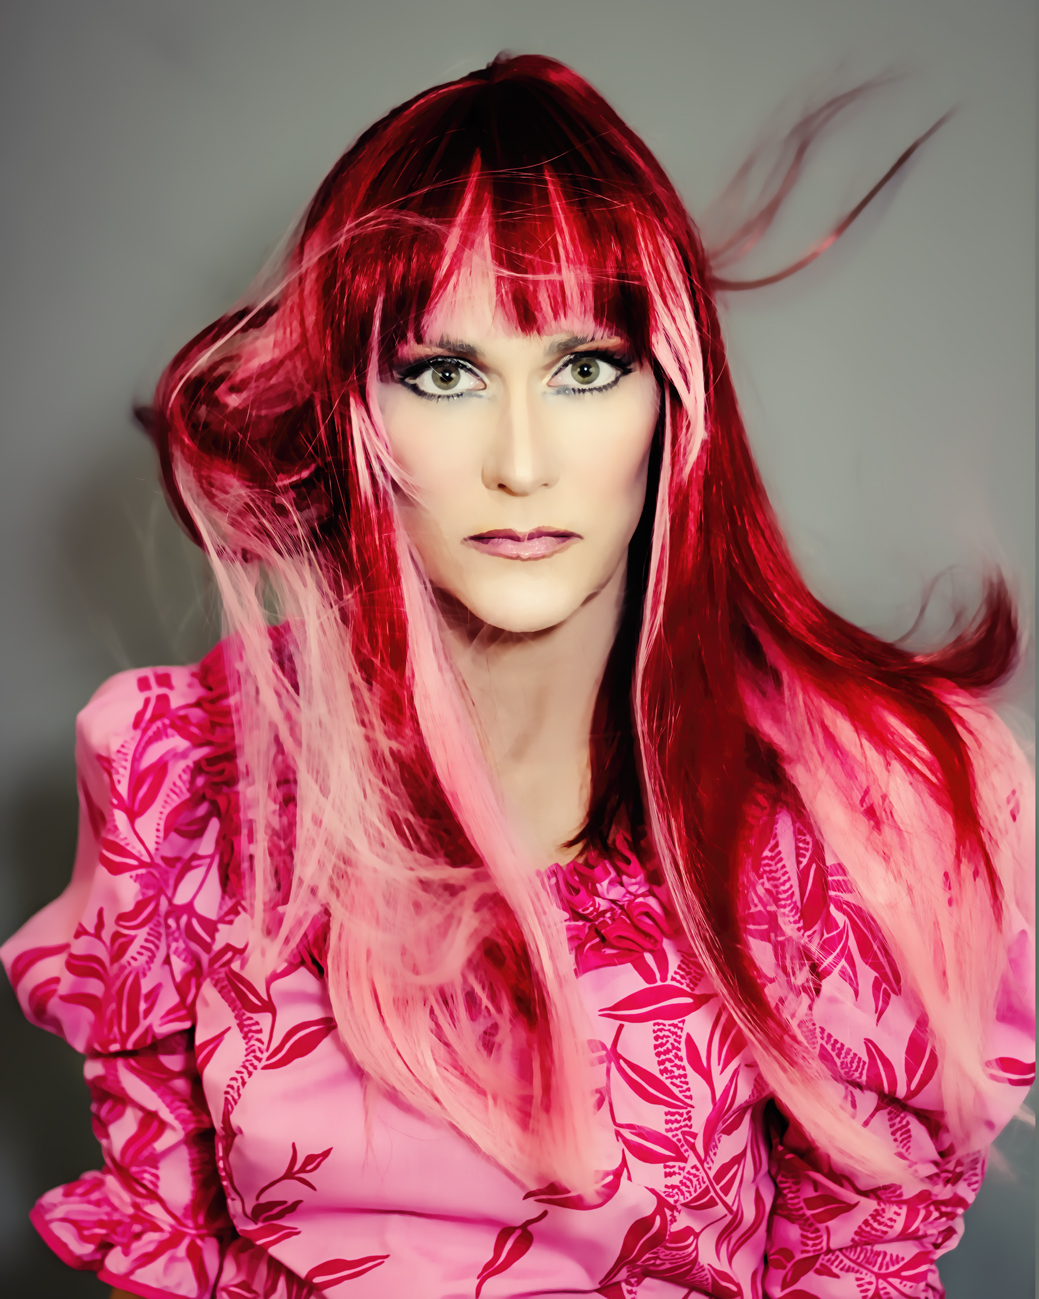
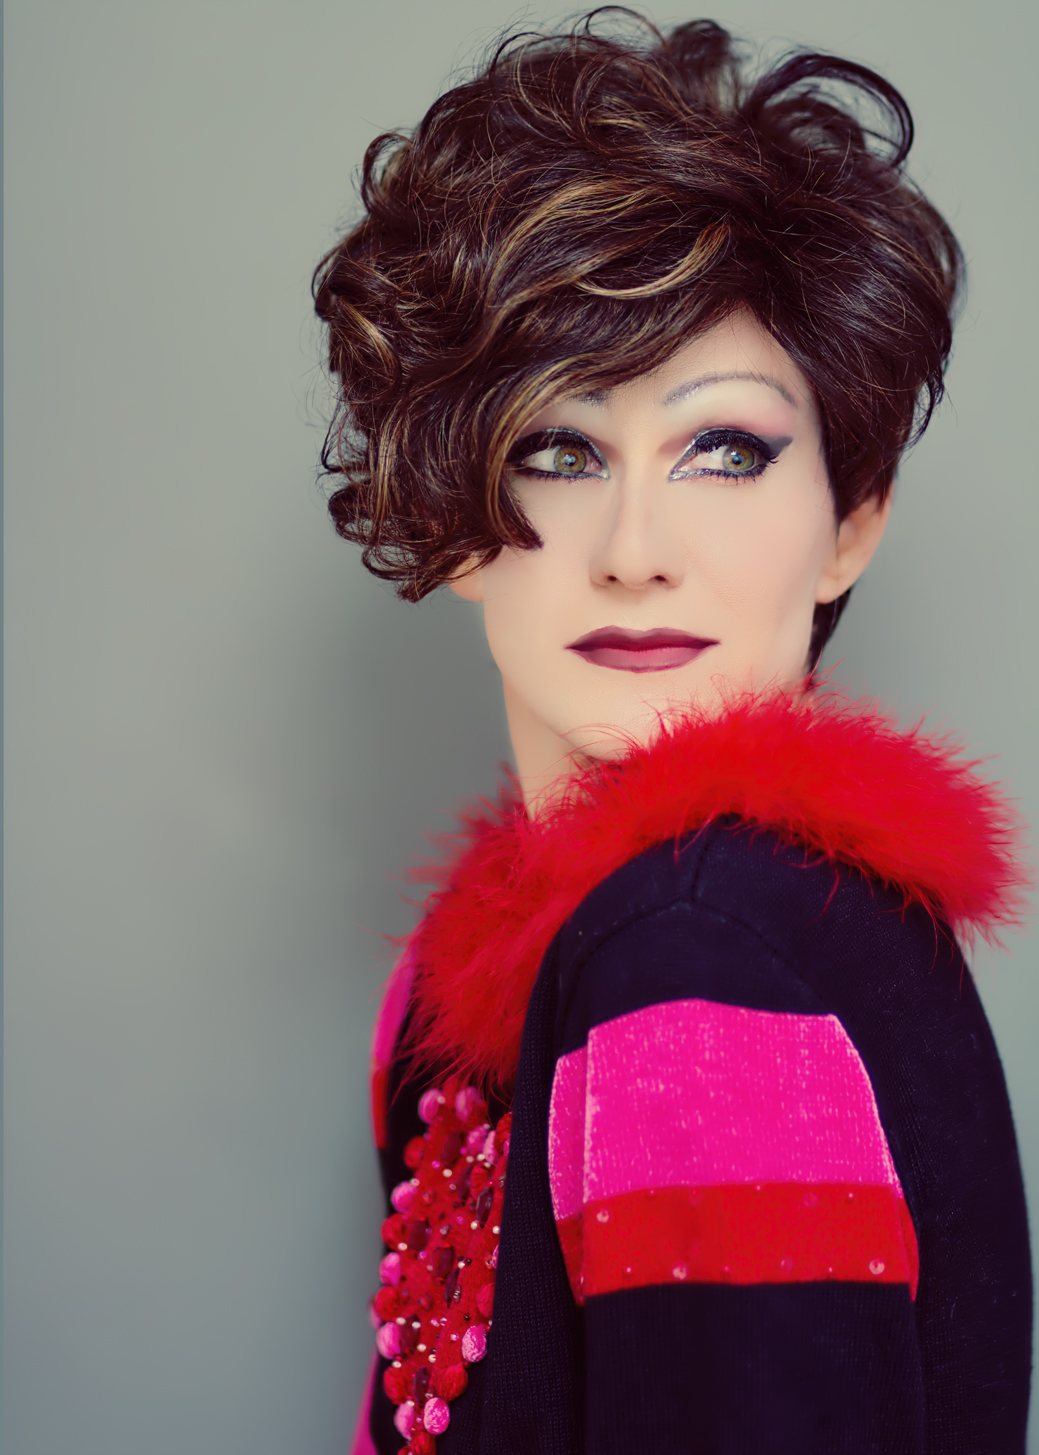
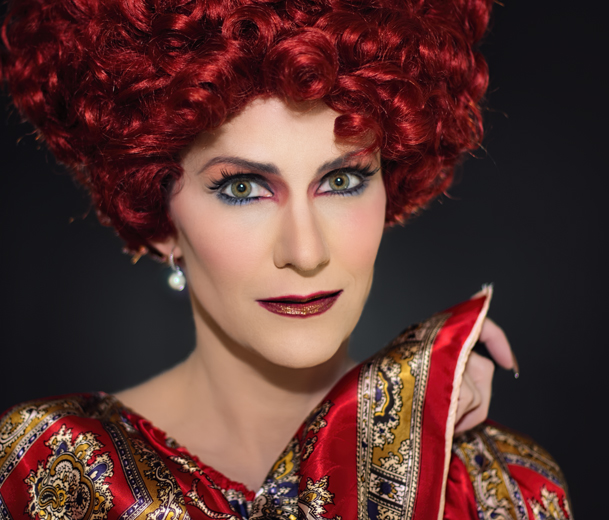
I already mentioned the makeup process I went through for this shoot, so can we talk about this sweater now? I got this from my favorite online store for vintage costume-like goodies, The Kissing Tree. Whenever I’m feeling a little bored with my current stash of costumes I go check them out (usually at their eBay store), and when I came across this thing I knew I’d found my next purchase. It is perfect for portraits because there’s so much going on, it can be used in many different ways even within the same shoot without it really looking like it’s the same sweater every time. It has a great feathery collar, and I love love LOVE clothing with texture; the sleeves are not only striped BUT they have little fabric balls AND beads AND rhinestones – fabulous! Just moving my arms around in interesting ways make very unique pictures – like this:

heart7

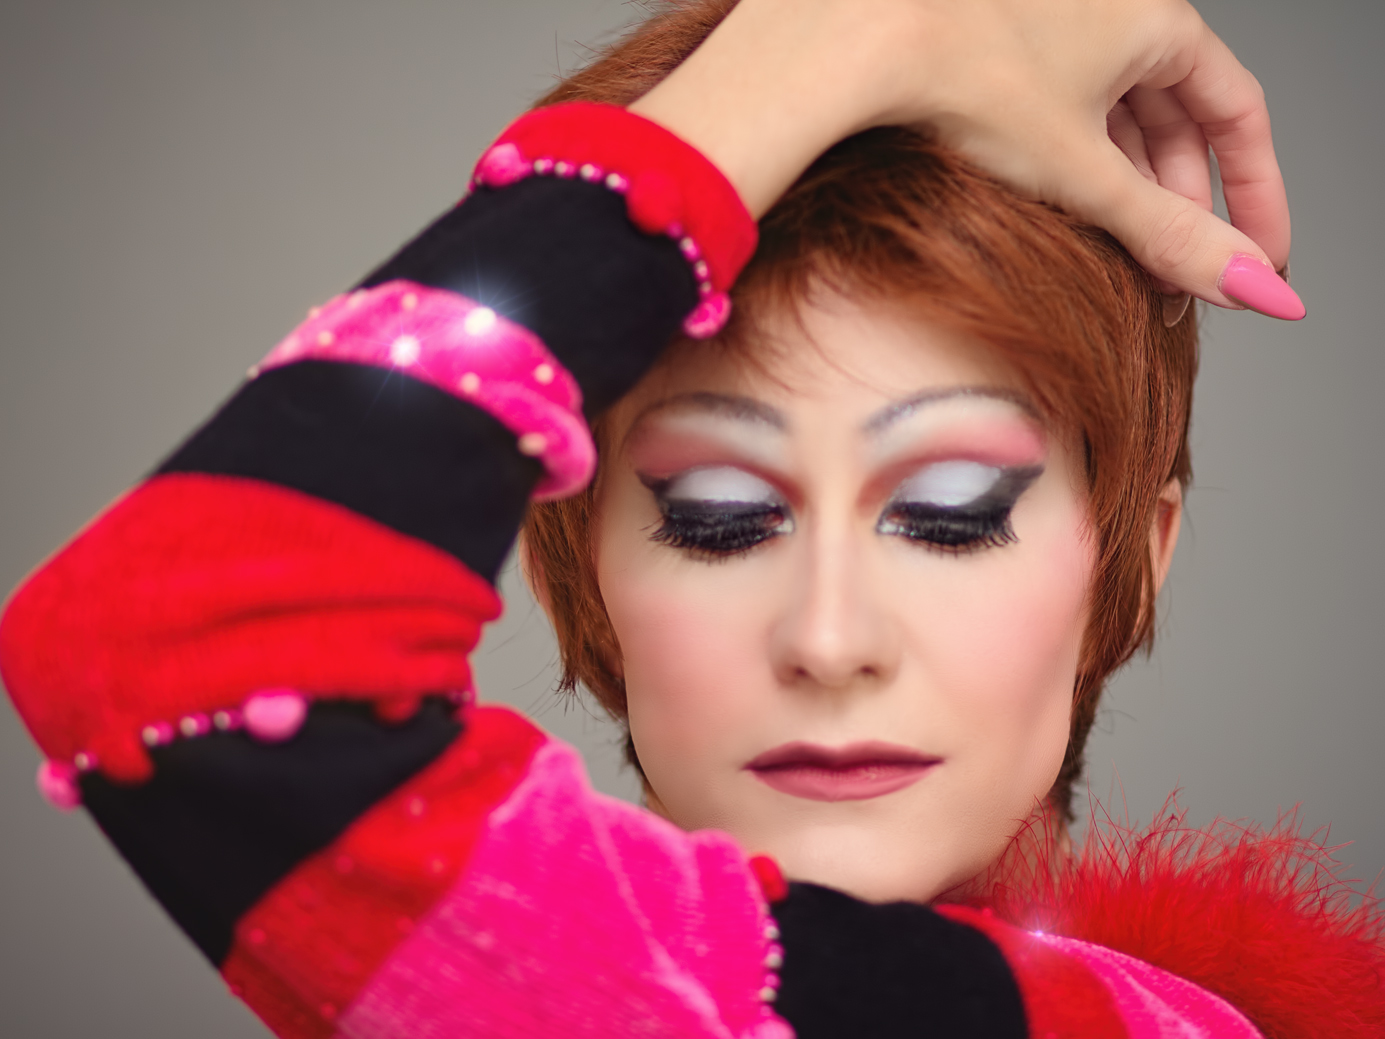
Then, for added fun, it also has that huge heart right in the middle. I didn’t actually use this sweater in nearly as many ways as I could have in this set, but I love any article of clothing that lends itself to a lot of different looks just by positioning the body in different ways. And at $34 it was a steal. The only downside is that it’s a sweater, and a heavy one at that, so for taking photos under bright lights in July in a small studio with tons of windows, it can get pretty hot, but I just stuck on some shorts and did the best I could – most of the shots I took were portraits; I spent two hours on that makeup and I was determined to get the most out of it! So for most of the shots wearing shorts that in no way matched the top was fine.

To maximize the shoot, I also made as many wig changes as possible:

heart3a

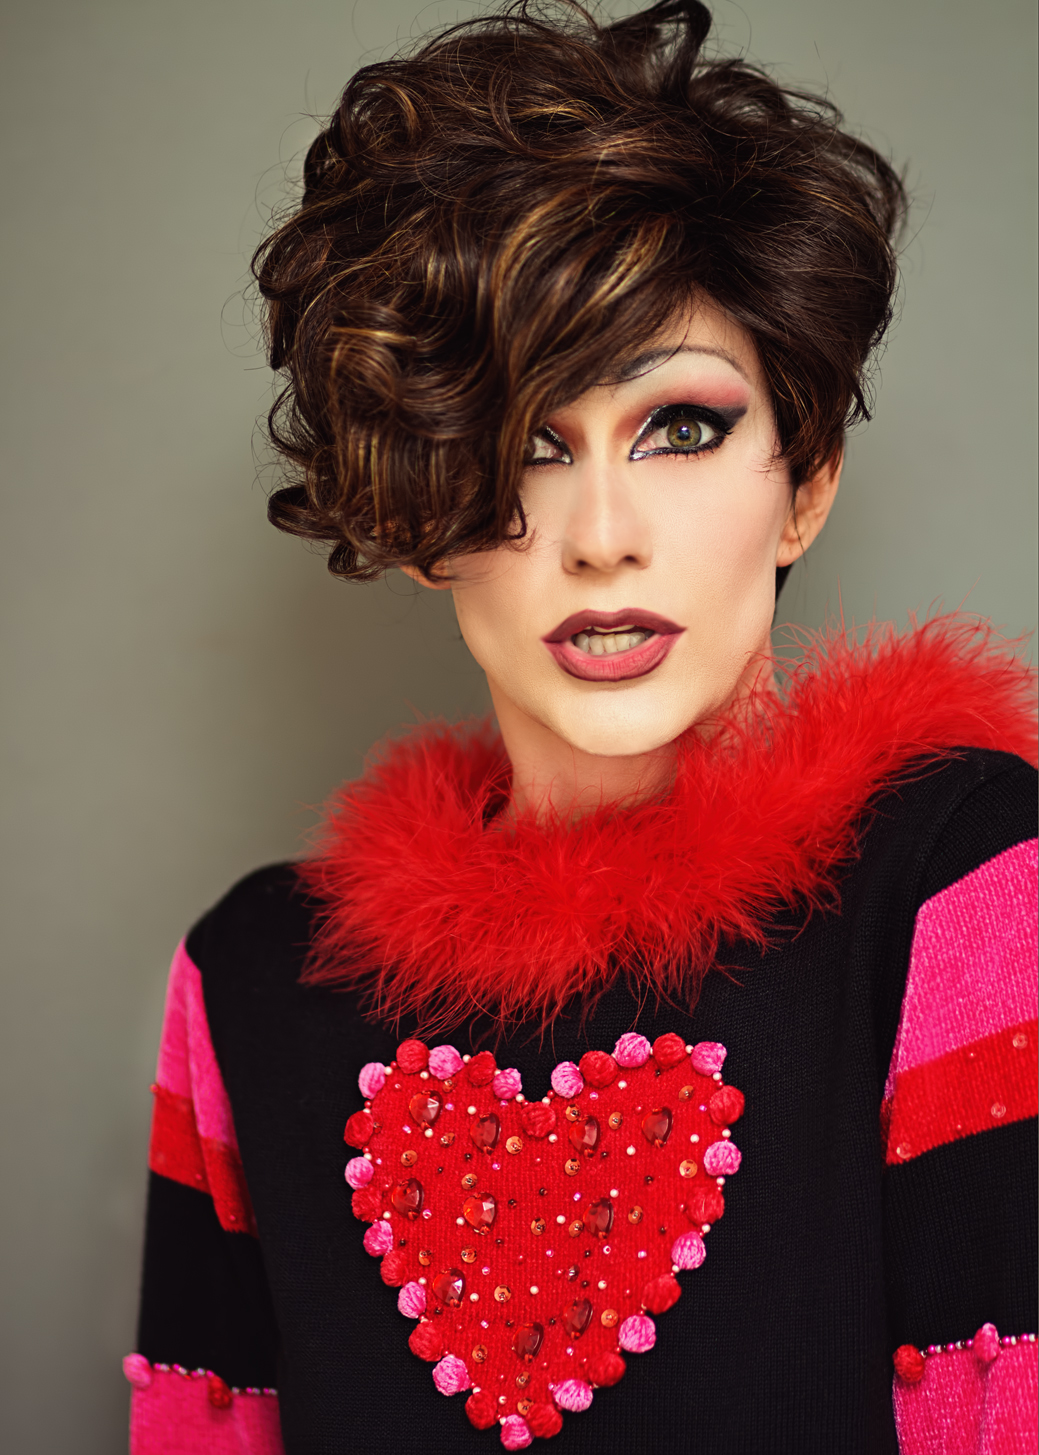
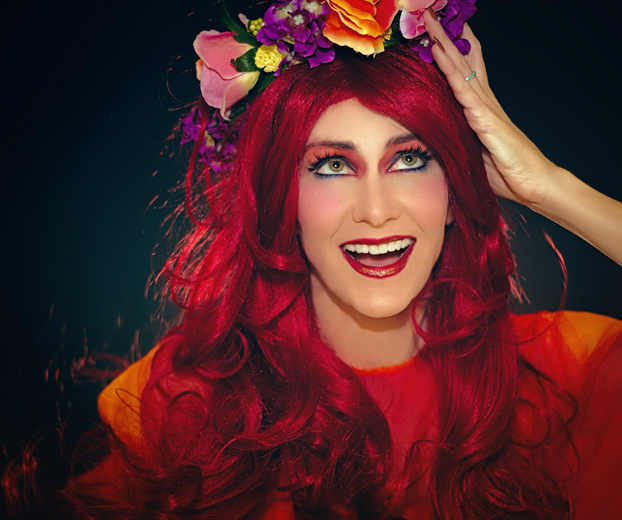
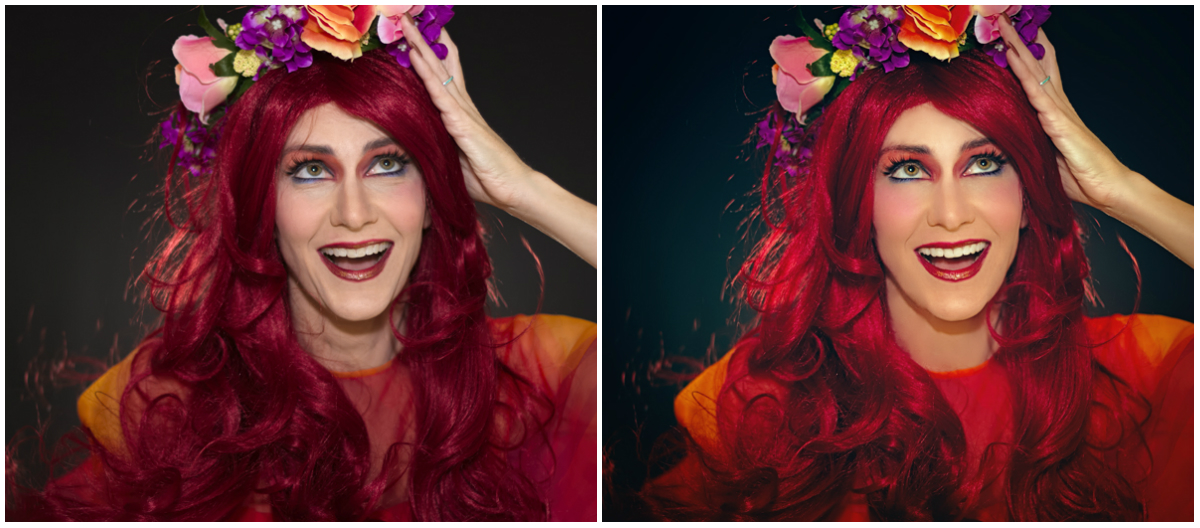
See what I mean about that sweater? This photo doesn’t even look like it’s from the same shoot! And there’s that softer lighting again. One thing I did differently this time was really neutralize a lot of the color in the RAW files so that I didn’t get some of the blown-out brightness and discoloration I tend to get when processing, but I think that resulted in my face looking too white later. That, and the fact that I used too much highlighting on my face when applying the makeup. Anyway, that led to me having to add some detail into the shots using shadows and filters, and I think I leaned towards softer light effects to help soften the face overall. If any of that makes sense. Also, my blending wasn’t great so I spent a lot of time smoothing out that eyeshadow, and I messed around with my nose a lot in most of the shots. I found that enlarging my nostrils just a bit really changed how I looked, so I did a lot of little tweaking like that here and there just to accentuate the drag-effect I was going for. Kind of the same technique I used for this one:

heart10

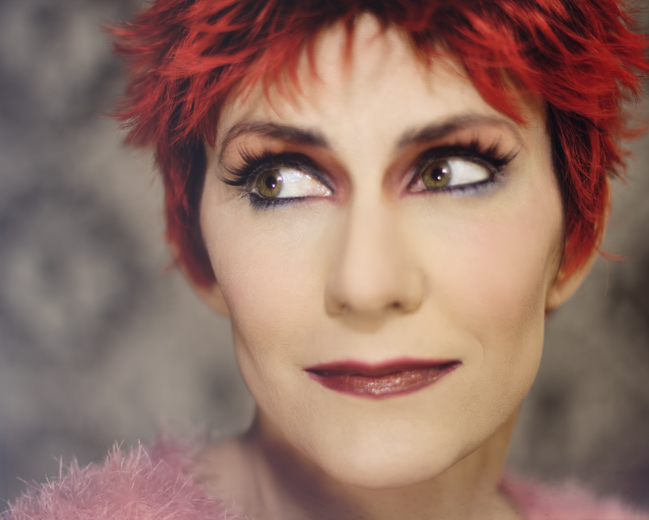
My face came out REALLY white in this one so again, the softer light helped to add some dimension and detail back to my face. And who knew that Rene of Paris Caitlyn would make such a great photography wig? I almost sold it, but in the end I decided against it because t was inexpensive and I thought it MIGHT be good for photos – that sure was a good call, because I LOVE how it looked in this set. I’ve been gravitating towards short wigs lately for photoshoots anyway, especially when I’ve just spent two hours on my makeup; they are so much easier to work with when posing, and they stay out of the face. I can’t get all that good flowy motion I love, so there’s always a tradeoff, but especially with the summer heat the shorties are definitely a good option to have.

They don’t look as good for jumping, though,but it was pretty hot in the sweater already so I stuck with Caitlyn for my leaps – which really weren’t leaps but levitations:

heart4c

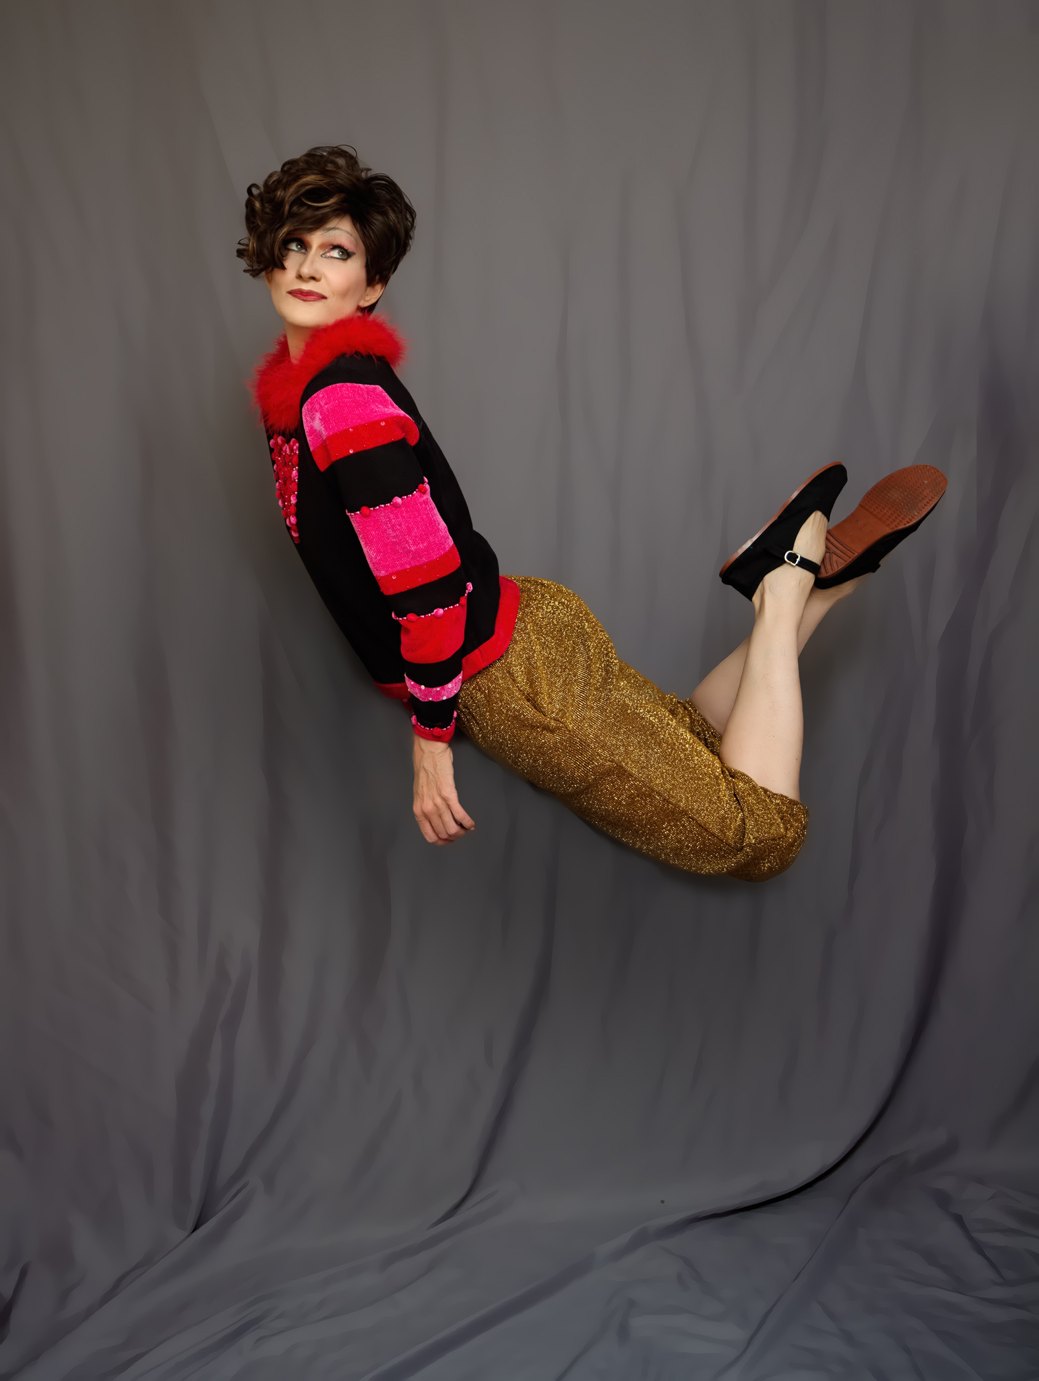
For this one I was leaning over a stool, then I layered that over a blank shot I took of the background so I could erase the stool out of the shot. This was mainly tricky because of the hand I was leaning on in the original:

heart4a

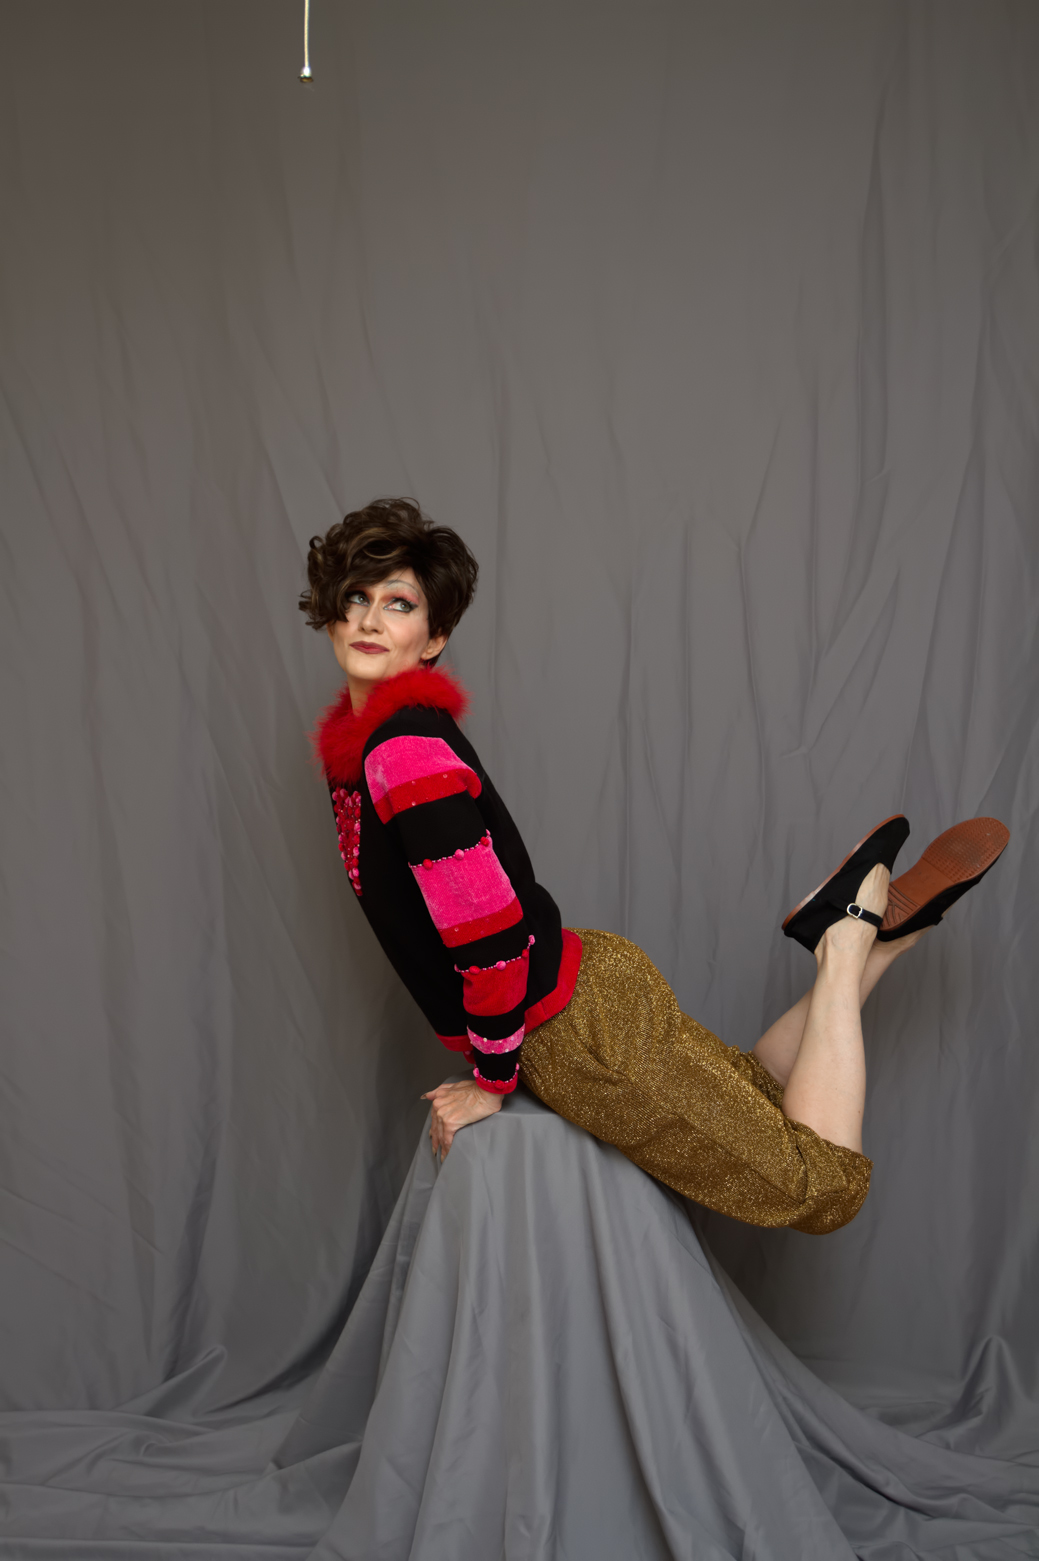
That hand was a real giveaway; it did not look at all natural when I was “floating” and made it obvious I’d been leaning on something, so I went back to my other shots from this point in the set, and found a hand I thought I could layer over the original one. However, THAT hand had all my fingers spread apart, and it was an absolute bitch to essentially cut and paste properly without the edges of the fingers looking really unnatural and obvious. I am not sure why it took me so long to give up on that hand and just go find another one; I think I spent something like four hours working on this photo and a good two of those hours were dealing with that stupid hand! In fact I gave up for the night eventually and returned to it the next day – at which point the solution became obvious, which was, duh, go find another hand.

Funnily enough, the hand I used ended up being the original hand from the next shot I processed; I didn’t notice that until I was editing this shot and working to erase the stool and had to maneuver around the hand again and thought, hey, this is as easy as it was working with that hand in my other shot – oh hey! It’s the same hand! Hi, Hand!

heart8

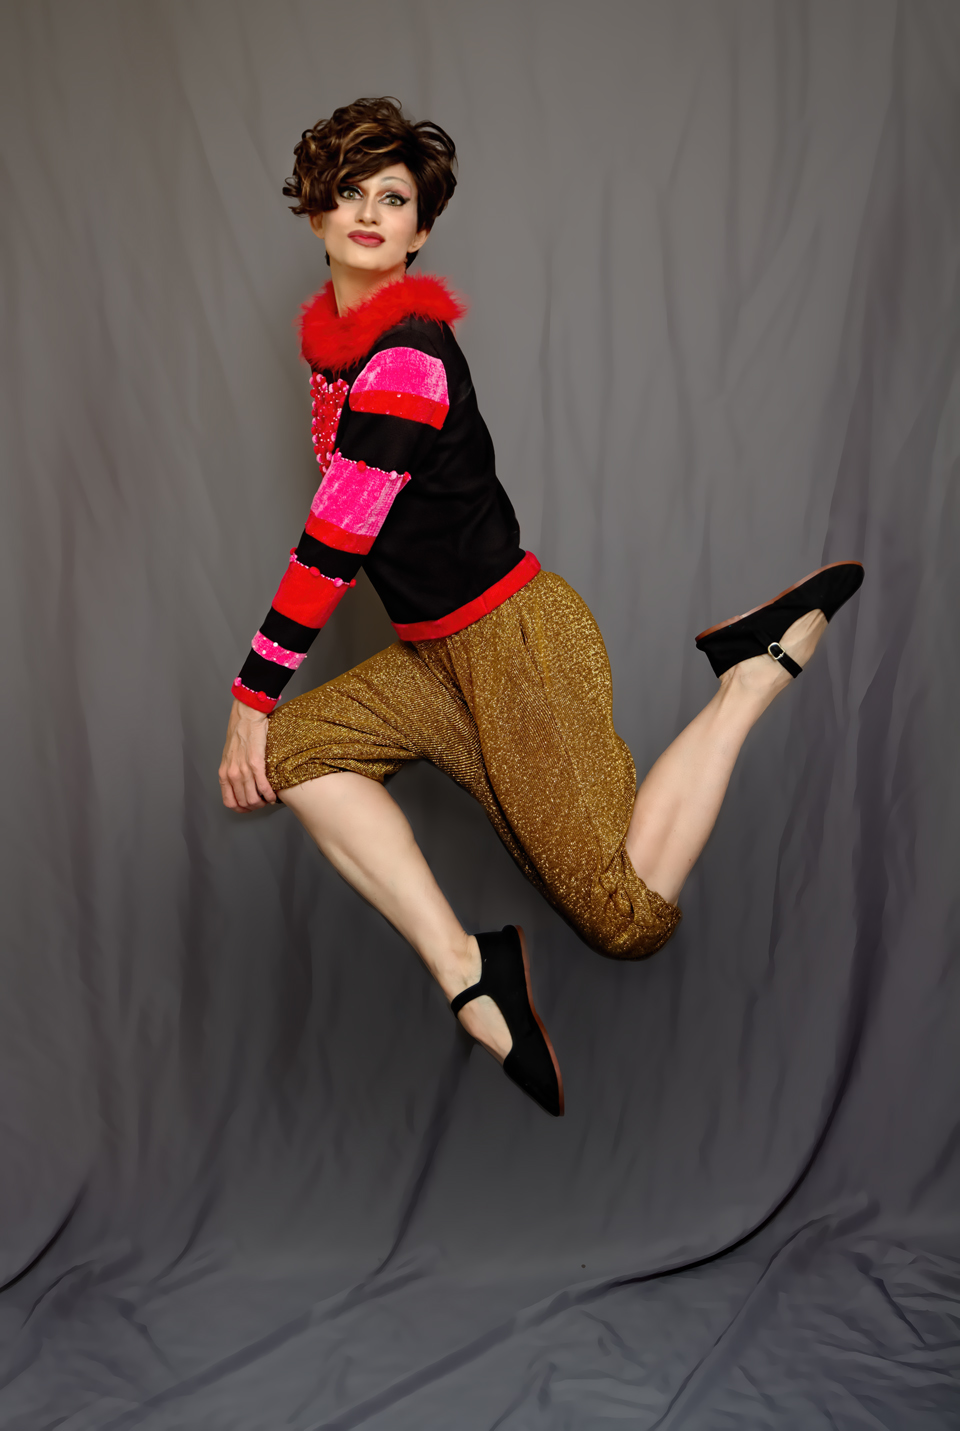
So now you can scroll up to the first levitation shot and see the same exact hand in that one as is here. Isn’t that completely uninteresting? And aren’t you glad I spent an entire paragraph and half talking about it? Of course you are. And in this shot, I was once again posing on a stool in the original, and used the same blank backdrop shot to layer over. My lips were also wonky in the shot, and in trying to fix the wonkiness I made them huge, then decided I kinda liked how they looked and kept them. Oh, and shadows. They’ve been a bitch for me ever since I started trying to edit them into levitation shots to make them look real, and I finally figured out a strategy that works for me. Instead of using the burn tool with a fairly small brush and drawing an outline around myself, I just make the thing HUGE and slap it over the entire subject several times, then erase the shadows from my body and reduce the opacity, and BAM. A nice shadow every time!

In yesterday’s post, I mentioned that I was playing around with lighting throughout this set, too (remember, I spent two hours on that makeup and was determined to get as many different looks as I could out of this shoot!). In most of the shots I had my Speedlight attached to the camera and bounced off the ceiling for some nice soft light, but occasionally I’d attach a light bender to it and aim bright light directly at my face for a different look:

heart2

Much harsher shadows behind me, and a lot less shadows on my face with a much brighter light. It’s a harsher look, and overall I don’t care for this effect as much as I do the softer ones, but for something different it’ll do.

And to sum up for now (who knows how many more of these I’ll edit – I have a few wigs and looks I haven’t even processed yet) here’s one last wig change:

heart9

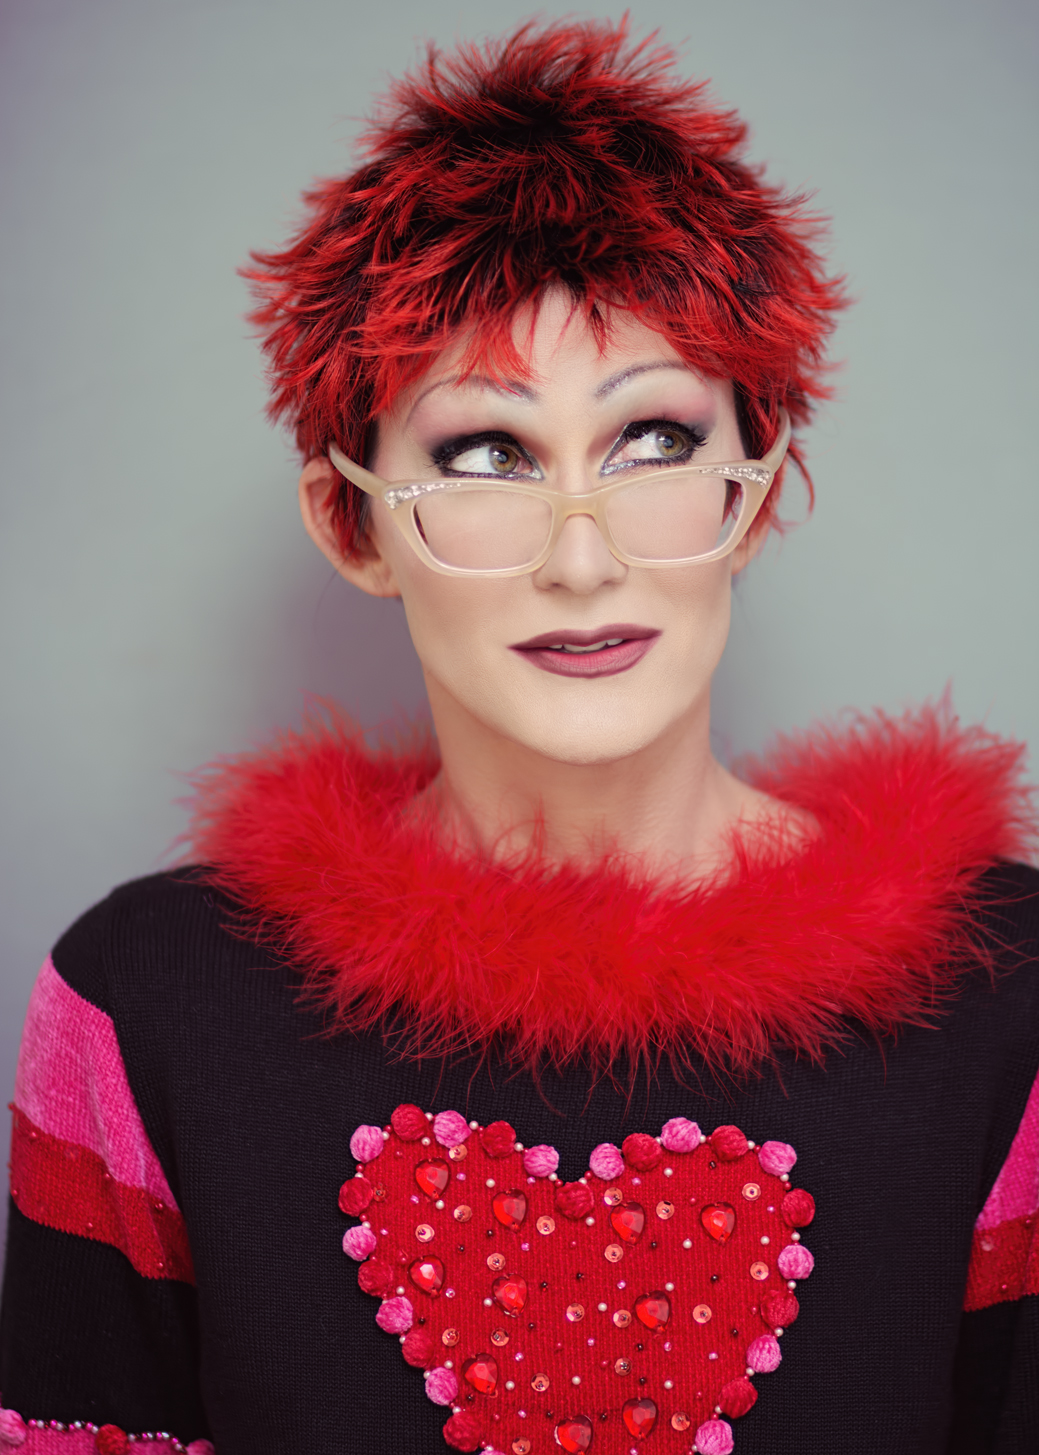
That wig is called “Sava” and I think it was made by Vanessa Wigs. I’ve gotten more photographic use out of that $20 wig than many of my costlier ones; it’s interesting, it’s easy to wear, and it works with so many different looks, believe it or not. Great wig. And those are some older Zenni Optical glasses I got and kept even though they are no  longer the right prescription, because they’re awesome.

Whoo I am all out of words! Which is great, because I’m also all out of photos for now. More to come though, as well as some new wig reviews: Camille by TressAllure (which is really Shilo by Noriko, but with a lace front); Miranda by Amore; Stevie by Amore; Kenzie by Noriko; an updated Code Mono by Ellen Wille; a Seville in Macadamia-LR by Noriko; a May by Noriko; and another Noriko Angelica (also in Macadamia-LR). Sheesh, did I really just admit to buying all of those?! As I may have said before, it’s my birthday this month, so I partied it up a little early with my purchasing. School starts in two weeks anyway, and I know my wig reviewing will either calm WAY down or possibly grind to a complete halt, so I’m getting it all in while I still can! Never fear though – I still have oodles of old vids to upload, so that should continue to either annoy or entertain you through the first semester, at least.

Oh and also – my July Stitch Fix will be here Wednesday, so that’s happening too. What can I say, folks – stay tuned!

Loose Change

N409UA

I’m posting this photo again because, of all the plane shots I’ve processed and shared so far from my shoot last month, this one has gotten the most positive response anywhere I’ve shared it – Twitter mostly, where a simple hashtag (#unitedairlines, #airbusintheUS) can connect a photo to the proper audience almost immediately. United Airlines, IAH, Hobby Airport, Airbus, and Airbus US have all re-tweeted it and sent me compliments, as well as several aviation and photography lovers who have since become followers. I find that interesting because I really felt I’d over-processed this one; most of the planespotters I follow stick to accurate representations of the planes and don’t appear interested in adding effects or filters. But I really haven’t done much more than skim the surface of the entire culture, so perhaps I’m wrong about that. At any rate, I’ve been pleased with the response to this one and it encourages me to experiment more, especially since it’s the part of the photography process I enjoy most.

Most of the new experimentation comes courtesy of the Topaz photo processing software I purchased over Christmas break thanks to a review by my blogger friend Beth Byrnes; as I get to know the software better I branch out more and try new things, and it’s amazing how a simple purchase of the right product can so enhance and even alter a creative process. It’s true that even without cool tools one can create art, be it painting or photography or poetry, but man are all the cool tools helpful.

And so, as I edit the 300 or so costume portraits I took Saturday, I’ve begun to experiment with them as well. I have a pretty set style at this point when it comes to portraiture – I like clarity and realism but I also want to look as good as possible, and there are lots of tricks I’ve learned to make that happen. Controversial or no, I do use Photoshop to edit out my under-eye wrinkles and even up/smooth my skin tone; I’ve learned to use stage makeup to great effect and eliminate the need for some of that sort of processing, but at 45 years of age it’s still necessary for me to get the effect I want – I’m not pretending that this is how I really look anyway since I’m always in costume, so whatever. Moving on.

After wrinkle removing and skin smoothing, I pull up RadLab to brighten, add contrast, pop color, and add light to the subject, as well as occasionally mess with filters to change tone. I don’t like too much contrast in a portrait, but I do like clarity, and I always, always put as much light on the face as possible without blasting out the skin and losing color or facial features. All that light is great to conceal any makeup errors I might make; even though it doesn’t show in the final shots, my makeup skills are still mediocre. I can follow a YouTube tutorial and put all the colors in the right space, but my blending skills are sub-par, especially when it comes to contouring the nose and adding lip liner. I am also a disaster at applying false lashes, so whenever I do apply them they are usually done poorly and practically falling off the entire shoot. All of these things can be concealed with enough light on the face; I already aim a lot at me during the shoot because I’ve learned it’s best to get as much right in the original shot as possible, but I always end up adding more, more, more.

Some examples from my latest shoot:

valentine1 valentine2

Brightening the whites of the eyes is always helpful, as well, and can be done using the dodge tool set to about 15% midtones. Really makes the eyes pop, or, if you’re into that sort of thing, it can make you look completely insane by making them too bright. Your call. My point in all of this (and I do have one) is that after processing these first two shots, I started playing around with the Topaz software more and experimenting with different approaches to editing them. This was not done intentionally, but came about as I clicked around in different filter programs just to see how each one changed the look of the photos. The first one to get a slightly different approach was this one:

valentine3

First of all, that fabric is a vintage dress I was wearing; I got the idea to yank the skirt up over my head and use it as a prop (it’s ideas like this that confirm my need to shoot only indoors and alone). And I was only using the Speedlite on my camera and no extra lighting for these shots; I’ve gotten to the point where I know how to manipulate that flash effectively enough so that the umbrella lights I used to always use are not needed as often. But, in some shots I got a bit too close to the flash and had just a bit too much light on my face; this photo was one of those. So, as I was processing I came across a filter that actually darkened my skin quite a bit and decided to go with it. I still think I came out a little orange, but it looks much better than it did when there was this bright white face staring out amidst all that vibrant fabric. It may not seem like such a big deal to anyone else, but believe me I agonized over that darkened skin tone; I knew it was the better choice but MAN it bugged the hell outta me. Moving on.

valentine5ab

I think the experiment here is obvious: to someone who is obsessive about clarity, working with an unfocused shot is a nightmare. But I loved the movement of the sleeves and the composition was pretty great with my face dead-on into the camera, so I decided to make a go of it and see what I could do. There are some fantastic Flickr photographers who work beautifully with blur (kokorage, who I learned of from the Pixlr blog, is probably one of the best) so I knew it could be done; I just wasn’t sure I could do it. With no real roadmap to follow, this literally took over four hours, and more filters and overlays than you could possibly imagine (I ended up using Pixlr for a lot of it, a program that hasn’t gotten a lot of love from me lately; mostly because of my fascination with Topaz, but also because my desktop  version crashes on occasion AND I still find the masking feature awkward to use). In the end I do like the result, but it was so hard to know when this one was finished, as opposed to my usual portraits where the stopping point is clear.

Now for this one, I really went to town:

valentine6ab

I went for something highly stylized, much like my plane photo at the top of this post. I envisioned a low-key look although I didn’t actually use any low-key filters to get that effect; I just wanted something cartoon-like to match the silliness of the expression. As I worked with it I kept thinking of print ads from the 1950’s – that overly-painted/colorized/watercolor effect they seemed to have. But it was HARD, y’all. First of all, none of my little tricks were available to me to help conceal my makeup flaws, so I had to use Photoshop to correct blending errors, something I’ve never had to do before and hope not to have to do again because it took forever. The blush on my left cheek? Totally edited; that side of my face showed very little color in comparison to the ride side which was nice and rosy, so I used a brush to add it – something that is much harder to do effectively than it sounds! And the wig had random flyaway hairs everywhere that I had to edit out; doing that was not too hard, but it left discolorations all over my skin that were enhanced once I began to add color rather than lightening it like I normally do – that took me ages to figure out how to do properly too. And then there was my nose. Remember how I said I am not the best at contouring noses? Well my contouring for this shoot was particularly bad; I had to lighten it in all my shots but it wasn’t a big deal; when making my skin darker and more colorful for this one, oh man was it hard to correct. But I eventually figured it all out, and I am pleased with the result, even though once again it was hard to know when it was finished and all the editing was done.

Since I love those comparison shots, let me show you the before of this one, so you can see how much work I had to do to get rid of all that wig hair and fix that terrible nose job (click to see it larger):

val_collage

I think you can tell in the before shot how much more blush was showing up on the right side than on the left, and in case I haven’t made the point clear enough let me repeat that getting rid of all that stray wig hair was really tricky. The editing left dark smudges on my forehead and neck, and it took some time to get the skin tone even as a result. And getting the shot to those exact colors took so many different filters I couldn’t recall them all if I tried, but I am obsessive about such details and will spend 20 minutes to choose an effect I end up reducing to 5% opacity, so that didn’t help. This is another one I spent about 4 hours getting right, so needless to say I only edited two that day.

I’ll close with the last one I’ve edited so far. I threw on a short wig and took some quick shots against a different backdrop towards the end of the shoot. I’ve taken to using up two walls in my office for backdrops instead of just one – the big blank wall holds a large, full-body backdrop, while against an adjacent wall I’ve stuck a shower curtain I bought years ago for just this purpose but that can only be used for portraits as it’s not very big. So for variety I wanted some shots against the other backdrop, but as often happens towards the end of a shoot my energy and creativity were low and I was anxious to upload the photos to my computer and start editing, so these shots weren’t all that thrilling. Still, there’s a few from this bit that I like, and this was one of them – nice close-up of the makeup I worked so hard on if nothing else (and yes, I did go through the torture of applying false lashes this time, even though they almost always make me cry and I end up with my real lashes all glued together):

valentine4

Continuing with the theme of editing photos differently, I obviously used a much softer effect here than I would normally do. The photo on its own and straight-up edited just wasn’t very interesting to me, so I played around with light leaks to give it some added appeal, even though it washed out the previously vibrant color quite a bit and the haze reduced the clarity. I still think it’s a decent shot, and the softness seemed to work OK, so I left it alone after adding the light leaks and called it a day (and in looking at this shot in particular, holy cow can I see the weight loss in my face. Losing ten pounds is no joke; even my head looks different and of course I’ve had to buy a bunch of new clothes. But I digress). Oh, and I love that wig – I believe it cost me a whopping $20 and it is awesome. Short wigs really are a great way to get short hair for a day, and overall they are much easier to deal with than long ones. But I digress again.

I’m finishing up Day 3 of my 5-day minibreak, with absolutely nothing to do on Monday, so I may take some Stitch Fix pics for my blog and some purse pics to share with friends on the Purse Forum where I am now a member (there’s no interest or hobby in which I indulge that I cannot find a message board somewhere to join. Trust me on this one). So who knows, a shopping post might be to follow, as well as loads more airplanes I have yet to edit! Suddenly I’ve gone from no photos to way too many.

Speaking of which, one of the things I’ve realized during this little break is that it’s not so much that I’ve grown tired of my portraits as it is that I’ve just not had time to do them properly. Every time I’ve had more than one day free on weekends since the start of the school year, though, I’ve gotten right back into the swing of things, so I think it’s mostly a time issue, and we can all rest easy that the selfies aren’t going anywhere anytime soon – they just get put on hold until I have some breathing room. One of the nice perks about being a teacher though (especially at a private school) is that time off is always worked into the schedule somewhere (except for the start of the school year, where there’s a pretty long stretch from August to November without any decent break). When I only get one day off on a regular weekend though (if I even get that), I don’t feel free enough to do a full shoot it seems. So this may be the last one I do until Spring Break next month, but with over 300 shots in the can that shouldn’t translate into a lack of portraits.

Enjoy your President’s Day!